Download

1 / 22
220 likes | 225 Views
Learn how to create a 4-year plan in Naviance, following the required classes and credits guidelines at MDHS. This step-by-step guide will help you get started and ensure your plan meets the necessary requirements.

E N D
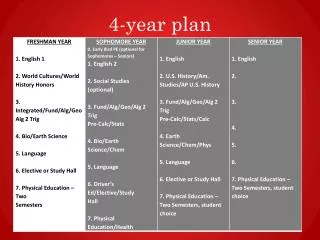
MDHS Required classes and credits guidelines. Keep this in mind when creating your 4-year plan
How to start: • Begin by logging into your Naviance account • https://student.naviance.com/mccalldhs
From your homepage, click on the “COURSES” tab on the top right of your screen. Next, click on “Plan coursework”
This screen will later show any current plans that you have made. To start a plan, click on the pink add button.
Click on the circle next to “Create Plan from Scratch” Then hit “CONTINUE”
There is only one type of plan to choose. Click “CHOOSE AND VIEW PLAN”
You can edit the name of your plan to whatever you want. Keep in mind that your counselor and other staff members will be seeing this. The top part of this page shows the minimum amount of credits you need and will eventually show how many credits you have added into your plan.
Scroll down the page and you will see the subject categories of classes needed. Click on “Add or change________ courses” Start with one class category and then move on to the next until all are completed.
After you click on the “Add or change _______ courses” this screen will appear with whichever category you are in. Click on the “SHOW” button for each grade and select the correct classes.
For each class subject and each grade year, you will need to pick a first and second semester class (unless only one semester is required). Make sure that the classes match. Hit “SAVE” Semester 1 Semester 2
After saving, you will go to a page that asks “In what grade(s) do you plan to take these courses?” Use the drop down arrows to choose a grade. Once you have selected the correct grade level, click “FISNISH ADDING COURSES” located at the bottom of the page.
Your selected classes will be saved and displayed along with how many credits are in your plan for that class category. Hit the “CLOSE” button to return to the class categories.
Repeat these steps for each class category until all required credits all filled. • **English will include: • 10th grade Critical Reading • 11th grade Speech • 12th grade Senior Project
*Choosing Electives for Multiple Years In the Elective class section, you can choose the same elective for multiple years. Ex: Concert Band 9th, 10th, 11th, and 12th grades. You will have to select the class(s) hit “SAVE” choose 9th grade, then hit “FINISH ADDING COURSES” Add the class again, hit “SAVE” choose 10th grade, then hit “FINISH ADDING COURSES” and so on. Repeat as necessary for selected electives. The program will only count the class once but after you hit “CLOSE” it will show that all credits are counted.
After all your classes are selected, the amount of credits will be shown along with any credits that are still needed.
Before submitting your plan, click on the “COURSES” tab, then click on “Plan coursework” and then click on “Manage Course Plans”
This will take you back to your ManageCourse Plans page. Your current plan that you just made will show up. Click “VIEW AS MULTI-YEAR PLAN”
You can now view your classes by grade year. Check that the credits match the MDHS requirements for each year. If you need to change anything, go back to your plan and hit “Edit”
Once you have reviewed your plan and made any final changes, go back into your plan by hitting the “Edit” button on the Manage Course Plans page and then hit the “SUBMIT FOR APPROVAL” button. This will be sent to Mrs. Shepard for review.
Congratulations! You have created a 4-year plan in Naviance. Mrs. Shepard will contact you after your plan has been reviewed.