Download
1 / 4
0 likes | 1 Views
Get 5 quick tips for installing trim gauges on your boat in 2023. Ensure smooth installation and accurate readings with these expert guidelines.

E N D
5 Quick Tips for Seamlessly Installing Trim Gauges on Your Boat in 2023
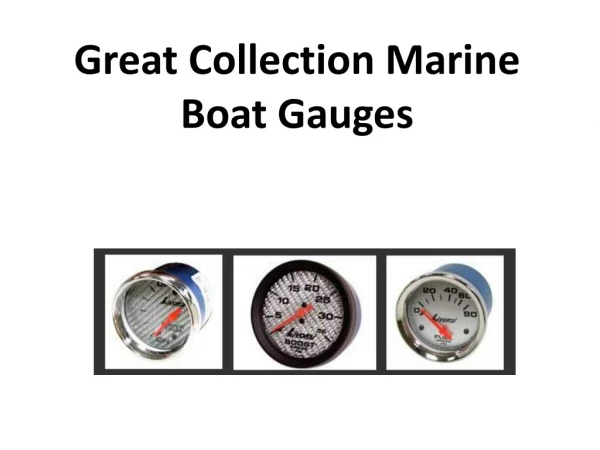
5 Quick Tips for Seamlessly Installing Trim Gauges on Your Boat in 2023 If you're reading this, it means you've taken the plunge into the wonderful world of boating, and we can't blame you! There's nothing quite like feeling the wind in your hair and the waves beneath your feet. To ensure a smooth sailing experience, it's essential to have all the right tools and equipment, and one vital aspect is installing trim gauges on your boat. Trim Gauges play a crucial role in maintaining your boat's balance and fuel efficiency, making your adventures even more enjoyable. However, setting up these gauges correctly can be a bit tricky, but fear not! We've got you covered with five quick tips to help you install trim gauges like a pro in 2023. Let's dive in! Understanding Trim Gauges and their Importance. Let Take a Good Look on Trim Gauges Before we embark on our installation journey, let's get acquainted with trim gauges. These nifty devices are mounted on your boat's dashboard and provide real-time information about the boat's trim angle. The trim angle refers to the tilt of your boat's engine concerning the water surface. Maintaining the correct trim angle is vital for various reasons, such as enhancing fuel efficiency, ensuring a smoother ride, and even extending the engine's life. Proper trim adjustment not only optimises performance but also enhances safety during your escapades on the water. The Importance of Installing Trim Gauges You might wonder, "Why do I need trim gauges when I can just feel the boat's performance?" While it's true that experienced boaters develop an intuitive sense of their boat's trim, trim gauges offer precise readings, taking the guesswork out of the equation. By providing real-time data, these gauges empower you to make instant adjustments, ensuring your boat is always operating at its peak efficiency. In the long run, this can save you fuel costs, reduce engine wear, and provide a more comfortable journey for you and your passengers. Essential Tools and Preparations Gather Your Tools To kickstart your trim gauge installation project, you'll need a few tools at your disposal. Here's a checklist to ensure you're well-prepared: Trim Gauges Kit: Acquire a high-quality trim gauges kit from a reputable marine store, which typically includes the gauge, sending unit, and installation instructions. Screwdriver Set: A set of screwdrivers, both flat-head and Phillips, will come in handy during the installation process. Drill and Drill Bits: You'll need a drill and various drill bits suitable for your boat's material to create holes for mounting the gauge. Wire Strippers and Crimpers: These tools are essential for connecting wires securely. Safety Gear: Don't forget safety goggles and gloves to protect yourself during the installation. Familiarise Yourself with the Boat's Structure
Before diving into the installation process, take some time to understand your boat's structure. Identify a suitable location on the dashboard for mounting the trim gauge. Ensure its easily visible and within reach for convenient operation. Moreover, locate the boat's electrical system to determine the best path for routing wires from the gauge to the sending unit. Step-by-Step Installation Guide Step 1- Disconnect the Battery Safety first! Before you begin any electrical work, disconnect the boat's battery to avoid any potential electric shocks or accidents. Step 2- Attach the Sending Unit Identify a suitable location on the boat's transom to mount the sending unit. It should be positioned horizontally, parallel to the water surface when the boat is level. Use the provided screws and a drill to secure the sending unit in place. Make sure it's tightly fastened to prevent any water leaks. Step 3- Mount the Trim Gauge Carefully choose the location on your dashboard to mount the trim gauge. Drill the necessary holes and secure the gauge using the provided screws. Ensure its firmly attached to prevent vibrations while the boat is in motion. Step 4- Connect Wires With the gauge and sending unit in place, it's time to connect the wires. Refer to the installation instructions provided in the trim gauges kit to correctly wire the gauge and sending unit to the boat's electrical system. Double-check all connections to ensure they're secure. Step 5- Reconnect the Battery and Test After completing the wiring, reconnect the boat's battery and power up the trim gauge. Verify that it displays accurate readings corresponding to your boat's trim angle. If everything checks out, congratulations, you've successfully installed the trim gauge! Know these Troubleshooting Tips Understanding Calibration Sometimes, after installing the trim gauge, you might notice inaccurate readings. Don't panic! This could be due to calibration issues. Most trim gauges allow calibration to ensure precise measurements. Refer to the manufacturer's guidelines to calibrate the gauge correctly. Double-Check Wiring Connections If the gauge is unresponsive or showing erratic readings, recheck all wiring connections. Loose or poorly connected wires can lead to inaccuracies in the gauge readings. Inspect for Water Intrusion Since the sending unit is mounted on the transom, it's susceptible to water exposure. Periodically inspect the unit for signs of water intrusion, such as condensation inside the gauge or erratic readings. Seek Professional Assistance If you encounter persistent issues or find the installation process overwhelming, don't hesitate to seek help from a professional marine mechanic. They have the expertise to resolve any challenges you might face during the installation. At Last And there you have it, fellow boating enthusiasts! Installing trim gauges on your boat might seem like a daunting task, but armed with our five quick tips, you can tackle this project with confidence. Remember, trim gauges are more than just fancy dashboard accessories– they are essential tools that enhance your boating experience, making it safer and more enjoyable. So, take the plunge, get your hands dirty, and install those trim gauges like a seasoned pro!
Don't miss out on the incredible benefits of installing trim gauges on your boat! Take the first step towards smoother rides, improved fuel efficiency, and a safer journey on the water. Get your hands on a high-quality Trim Gauges kit Today and elevate your boating adventures like never before! Address: 74 San Valentino Drive, Henderson Heights, Auckland, New Zealand Email: info@veethree.co.nz Website: https://veethree.co.nz https://veethree.co.nz