Download
1 / 16
160 likes | 360 Views
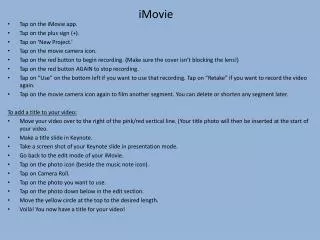
iMovie. Puppet Pals with iMovie. Au restaurant. Completed Video with iMovie and Puppet Pals. La Pizza. iMovie only!. Au musée de cire. Where to go? 3 options. Video- Student may select video. Shows videos on camera roll Project- A video already started Theatre- A new movie/assignment.

E N D
Puppet Pals with iMovie Au restaurant
iMovie only! Au musée de cire
Where to go? 3 options • Video- Student may select video. Shows videos on camera roll • Project- A video already started • Theatre- A new movie/assignment
Select Theatre! • By selecting theatre from previous slide, it allows the student to begin a new movie • Student may select from a variety of themes
Importing a video • Select video clip • Click on arrow • Video will then appear in the editing box. • Note: Selecting the the ? will allow for pop up hints. Record video, record voice, choose music (theme)
Editing By clicking on the clip, the student may: • Split the clip • Shorten the clip • Change the speed • Add audio/video • Add text Clicking on clip, pops up options.
Text Text • Select Title • Selecting Title will now give the options of where the text is to appear None, Opening, Middle, Closing
Once complete • Once complete the student may select the back arrow • Student may play, upload, trash or edit movie this scene.
iMovie “The Trailer” • Selecting Trailer gives the student the option to create a trailer. • Student select from a variety of themes. • Once theme is selected click Create Trailer
Adding Text Outline -Student can add credits to his trailor Storybook -Student may add text in blue shaded area -Student may add images from Camera Roll
Adding Pictures • Click box where the picture is to appear • Select the picture from Camera Roll • Picture will now appear in the box • Image to appear in box can come video, photo or camera Video, Photo, Camera
Once completed. • Once complete the student may select the back arrow and it will take him to the project. • Student may play, upload, trash or edit movie this scene.
Where to send the Trailer? • The Trailer can be sent to various locations • Save image to camera roll first then from camera roll send it to Youtube account.