Download
1 / 15
150 likes | 331 Views
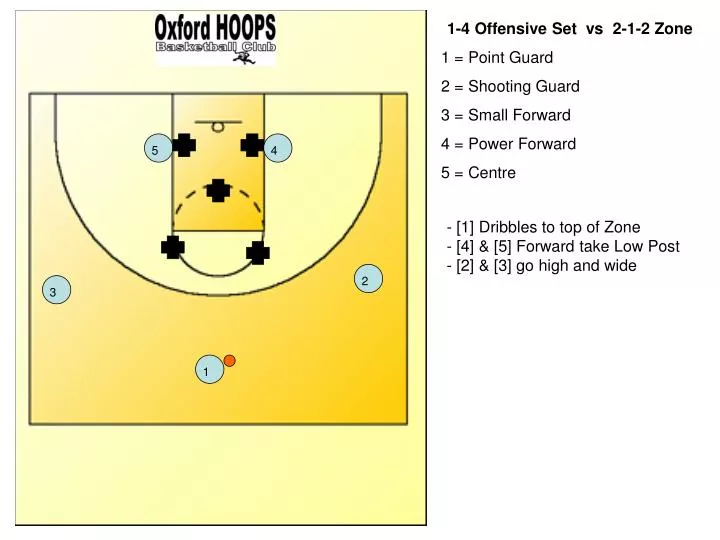
1. 3. 2. 4. 5. 1-4 Offensive Set vs 2-1-2 Zone 1 = Point Guard 2 = Shooting Guard 3 = Small Forward 4 = Power Forward 5 = Centre. - [1] Dribbles to top of Zone - [4] & [5] Forward take Low Post - [2] & [3] go high and wide. 1. 3. 2. 4. 5. 1 … ESTABLISH 1-4

E N D
1 3 2 4 5 1-4 Offensive Set vs 2-1-2 Zone 1 = Point Guard 2 = Shooting Guard 3 = Small Forward 4 = Power Forward 5 = Centre - [1] Dribbles to top of Zone- [4] & [5] Forward take Low Post- [2] & [3] go high and wide
1 3 2 4 5 1 … ESTABLISH 1-4 As the Defensive Guards PICK UP THE PG … Forwards come from behind the Defenders to take the HIGH POST – 3-Point Line Area
1 3 2 4 5 2 … RUN HIGH PICK & ROLL … [2] (The Shooting Guard) sets a PICK for [1] as … [4] (Power Forward) BACK PEDALS asking for Ball to THE BLOCK … [3] (Small Forward) “L-CUTS” to Strong Side Corner … [5] Moves slightly towards CENTRE of the High Post
1 3 2 4 5 3 … OVERLOAD … As the high pick & roll is executed and [3] overloads the strong side the Zone Defence MUST rush to stop the 2 OPEN SHOOTERS [1] and [3] [4] MUST HOLD his man back to keep [3] open. [2] takes advantage of the rush and uses [5] as a pick to take the weak side corner. Giving [1] a third offensive option.
1 3 2 4 5 4 … REVERSE THE BALL … As the defensive team is pulled away from the middle [1] REVERSES BALL to [2] Shooting Guard and Follows the pass and [3] Replaces. As the pass is made, [5] FLARES OUT to offer safety. [4] DUCKS IN HIGH to keep the Zone Tight and another passing option.
1 3 2 4 5 5 … DOUBLE CUT As the Defence tries to catch up and cover the open shooter … [5] “X-Cuts” Through Hard Looking for Pass hits the Block and then takes the High Post. [1] Goes Base Line and sets up on opposite Corner. [4] Follows [5] and Posts Up. [3] Replaces [5] [4] & [5] MUST CUT LOOKING FOR BALL and IN FRONT OF CENTRE.
1 3 2 4 5 6 … DOUBLE PICK & ROLL As the BIG GUYS rotate looking for the Ball and the Shooter gets Ready again … Corner to Corner Pass is possible as [4] holds his man Back … we RUN a Double Pick and Roll as [2] Dribbles out of the corner. [3] Sets first Pick and [5] Flares Out to offer safety. [1] Goes high to offer safety and a possible 3-Point Shot.
1 3 2 4 5 6 … Cont. DOUBLE PICK & ROLL As the BIG GUYS rotate looking for the Ball and the Shooter gets Ready again … Corner to Corner Pass is possible as [4] holds his man Back … we RUN a Double Pick and Roll as [2] Dribbles out of the corner. [3] Sets first Pick and [5] Flares Out to offer safety. [1] Goes high to offer safety and a possible 3-Point Shot.
1 3 2 4 5 7 … SKIP PASS As [2] takes the second pick & [4] & [5] replace each other … [1] and [3] will be open for a shot … Easiest Pass is to [1] because [2] is dribbling in that direction … However, if [1] gets picked as he receives the ball , he will have [3] open in the Corner as [4] Holds his man back to alllow the entry pass.
1 3 2 4 5 8 … HIGH POST If [2] is unable to pass to [1] or [3], then [5] MUST BE OPEN [2] Passes into [5] as [1] Hits the Corner or Goes Back Door. [4] Attacks the Middle. [2] & [3] Rotate as [1] Moves. [4] MUST KEEP HIS MAN OUT THE GAME
1 3 2 4 5 9 … PICK & ROLL - BASE Ball goes to [1] but Defence picks him up. [5] Follows Skip Pass. [1] Passes to [2] and goes Base Line as [4] Takes High Post. [3] Rotates to Replace [5]. [5] & [2] Run PICK & ROLL top Base Line.
1 3 2 4 5 9 … PICK & ROLL - BASE [1] Passes to [2] and goes Base Line as [4] Takes High Post. [5] & [2] Run PICK & ROLL top Base Line. As [2] Takes the Pick, [3] Replaces him offering safety and second pass option. [3] Would have a skip pass to [1] and High Post [4] too.
1 3 2 4 5 10 … PICK & ROLL - HIGH [2] does not have a shot or pass to [5]. [3] Replaces and [2] passes to [3] [1] Comes High as …
1 3 2 4 5 10 … Cont. PICK & ROLL - HIGH [2] does not have a shot or pass to [5]. [5] Continues cut through the zone and takes Low Post on other side – FACES THE BALL. [3] Replaces [2] and [2] passes to [3] and Cuts Through Zone to take the opposite Corner. [1] Comes High as …
1 3 2 4 5 10 … Cont. PICK & ROLL - HIGH [4] sets a SIDE PICK for [3]. [3] Attacks the Free Throw Area as [4] Rolls to the Corner Area. IF [3] is open he Must Shoot.[5] Fights for Position. [1] & [2] Rotate to stop possible Fast Break. IF [3] is picked by Centre he Can Pass to either [4], [1] or [3]