Download
1 / 2
20 likes | 35 Views
In this article, Get a complete explanation on the steps to take your website live on the Internet with the help of cPanel in depth. Letu2019s Get started!<br>

E N D
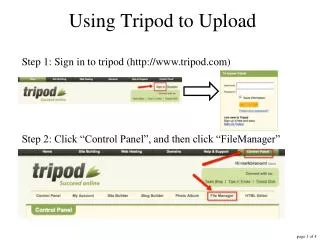
How To upload website Files and Database Using cPanel How To upload website Files Using Cpanel 1. Login into Cpanel. 2. Go to the FILES section below the EMAIL section. Then click on “File Manager” and another tab will be opened with a lot of folders in it. 3. You are now in the file manager window. Now locate the folder public_html and double click on it and the folder will open with no files in it. 4. Now you need to upload the website file. Click on the ‘Upload’ option in the top and another tab will be opened and you will get an option of ‘Select File’ 5. Click on the ‘Select File’ 6. If your website files are compressed as .zip format, upload the same from your computer. 7. Once it is uploaded, Click on ‘<-- Go Back to’ option. 8. Now you can see the uploaded .zip file. Click on the .zip and and you can extract the .zip file using the ‘Extract’ option located in the top right corner in the File Manager. 9. Now your website files can be seen in the public_html folder 10. Now go back to the cPanel and click on ‘mysql databases’ under ‘DATABASES’ menu and you can see the option of Create New Database. 11. In the box below, enter the database name you want to create and click on ‘Create Database’. 12. Now click on Go back. 13. Scroll down and under ‘MySQL Users, enter your database Username and password. 14. You can generate a strong password using Password Generator. Click on ‘Generate Password’. 15. Tick on ‘I have copied this password in a safe place. And click on ‘Use Password’. 16. Now click on ‘Create User’ and your Database user will be created. 17. Scroll down and Under ‘Add User To Database’ option, select the user and Database you want to Map 18. Now click on ‘Add’ 19. Tick the option of ‘ALL PRIVILEGES’ and click on ‘Make Changes’.
20. By doing this you are giving full permission to the user on the database. 21. Now click on Go back. 22. Now go back to the cPanel by clicking on the ‘cPanel’ in the top left corner. 23. Now Click on the ‘phpMyAdmin’ under ‘DATABASES’ option in cPanel. 24. Now the phpMyAdmin is opened in a new tab. Using this, you can Import the database backup to the newly created database. 25. Click on the database listed in the left menu. 26. Now clock on the Import option 27. Click on ‘Choose File’ and select the database backup which will be in .sql format or in a Compressed format ) 28. File may be compressed (gzip, bzip2, zip) or uncompressed. A compressed file's name must end in .[format].[compression]. Example: .sql.zip 29. Select the file and Click on ‘Open’ in your computer folder window. 30. Now you have selected the database file to upload. Scroll down and Clock on the button ‘Go’ and your database backup will be Imported in the database created. 31. Now Check your website and you can see your website is now live if you have already pointed your nameservers Source - https://www.hostitsmart.com/manage/knowledgebase/135/How- To-upload-website-Files-and-Database-Using-cPanel.html