Download
1 / 59
590 likes | 870 Views
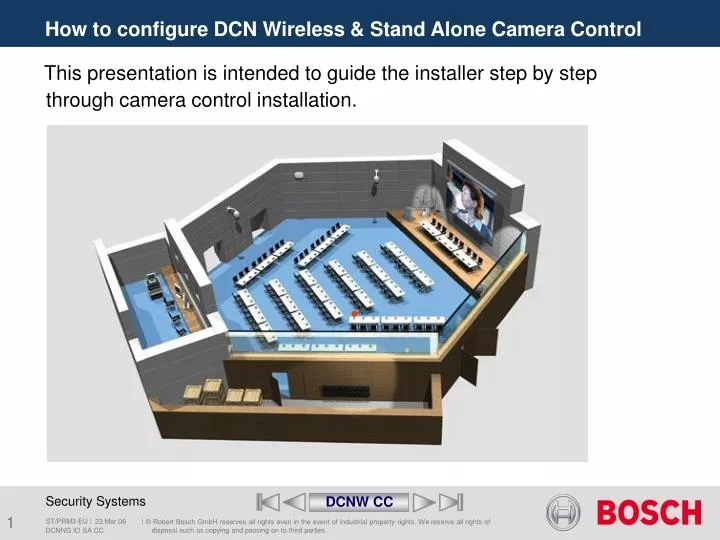
How to configure DCN Wireless & Stand Alone Camera Control. This presentation is intended to guide the installer step by step through camera control installation. DCNW CC. How to configure DCN Wireless & Stand Alone Camera Control. DCN-WCCU with direct Camera & Virtual Keyboard

E N D
How to configure DCN Wireless & Stand Alone Camera Control This presentation is intended to guide the installer step by step through camera control installation. DCNW CC DCNNG IO SA CC
How to configure DCN Wireless & Stand Alone Camera Control • DCN-WCCU with direct Camera & Virtual Keyboard • DCN-WCCU with direct Camera Control & Autodome Controller • DCN-WCCU with Allegiant Video Switcher DCNNG IO SA CC
DCN-WCCU with direct Camera & Virtual Keyboard • Requirements: • One AutoDome Camera • One monitor • Virtual keyboard software LTC 5138/00 • DCN-WCCU • Temporary Installation PC • Camera Control Software LBB 4162/xx DCNNG IO SA CC
Step 1 • Connect PC and Monitor to the Dome Camera Make sure that the Dome camera has an address. RS232 Temporary Installation PC I&U Instructions DCNNG IO SA CC
AutoDome Camera Step 2 • Install virtual keyboard software LTC 5138/00 Temporary Installation PC I&U Instructions DCNNG IO SA CC
Step 3 • Configure Virtual Keyboard DCNNG IO SA CC
Step 4 • Communication Setup DCNNG IO SA CC
Step 5 • Make sure you choose the right camera!! DCNNG IO SA CC
Step 6 DCNNG IO SA CC
Step 7 • Quick Commands settings DCNNG IO SA CC
Step 8 • Pre-Position Title Set DCNNG IO SA CC
Step 9 • Set Pre-Positions DCNNG IO SA CC
Step 10 DCNNG IO SA CC
Repeat Repeat Step 9 & 10 to set all Pre-Positions Set the highest Pre-Position as overview DCNNG IO SA CC
Step 11 • Check the Pre-Positions To NEXT >>>>>> DCNNG IO SA CC
End of how to configure: DCN-WCCU with direct Camera & Virtual Keyboard • DCN-WCCU with direct Camera Control & Autodome Controller • DCN-WCCU with Allegiant Video Switcher DCNNG IO SA CC
DCN-WCCU with direct Camera Control & Autodome Controller • Requirements: • One AutoDome camera • Monitor(s) • Autodome Controller LTC 5136/51 • DCN-WCCU • Temporary Installation PC • Camera Control Software LBB 4162/xx DCNNG IO SA CC
AutoDome Camera For Installation and User Instructions Autodome Controller Step 1 Only for Pre setting the Autodome Camera with the Autodome Controller • Connect Autodome Controller to data converter LTC 5136/51 • Connect Data converter to Aurodome Camera • Connect Autodome Camera to Monitor Data Converter Temporary Autodome Controller IUI Autodome DCNNG IO SA CC
Remark • If you were not successful setting up the pre-positions please don’t continue with the next steps. • First make sure that the pre-positions are set. DCNNG IO SA CC
Step 2 • Connect DCN-WCCU to PC RS232 Temporary Installation PC Port 2 Camera Control Protocol Baudrate 9.6K I&U Instructions DCNNG IO SA CC
Step 3 • CCU protocol and Serial Port settings DCN-WCCU Make sure that the ports of the CCU are set correct. Port 1Protocol = FullBaudrate = 115.2K Port 2Protocol = Camera ControlBaudrate = 9.6K S500 Dip switches Keep in mind !! You have to change the baudrate of Port 2 to 9.6K!! I&U Instructions DCNNG IO SA CC
Step 4 • Make sure you connect the RS232 cable to Port 2 of the DCN-WCCU. DCNNG IO SA CC
Step 5 • Install DCNNG Stand Alone Camera Control software LBB4162 DCNNG IO SA CC
Step 6 • Install Camera Control software LBB4162 DCNNG IO SA CC
Step 7 • Install Camera Control software LBB4162 DCNNG IO SA CC
Step 8 • Install Camera Control software LBB4162 DCNNG IO SA CC
Step 9 • Select the language for operator DCNNG IO SA CC
Step 10 • Select no use of Allegiant VideoSwitcher DCNNG IO SA CC
Step 11 • Installing DCNNG Stand Alone Camera Control software LBB4162 DCNNG IO SA CC
Step 12 • Finish installation DCNNG IO SA CC
Step 13 • Start DCN Next Generation Camera Install DCNNG IO SA CC
Step 14 • Combine seat numbers with camera pre positions LBB4162 DCNNG IO SA CC
Step 15 • Make sure you choose the right camera!!Camera nr = Camera Address LBB4162 DCNNG IO SA CC
Step 16 • Insert LBB4162 DCNNG IO SA CC
5 Step 17 • Stop Camera Installation LBB4162 DCNNG IO SA CC
AutoDome Camera Step 18 • Connect DCN-WCCU to AutoDome Camera RS232 Port 2 Camera Control Protocol Baudrate 9.6K Baudrate 9.6K I&U Instructions DCNNG IO SA CC
End of how to configure: DCN-WCCU with direct Camera Control & Autodome Controller • DCN-WCCU with Allegiant Video Switcher DCNNG IO SA CC
DCN-WCCU with Allegiant Video Switcher • Requirements: • Allegiant switcher • Video Switcher keyboard • Fixed and/or AutoDome cameras • Monitor(s) • DCN-WCCU • Temporary Installation PC • Camera Control Software LBB 4162/xx DCNNG IO SA CC
Step 1 • Connecting system hardware BOSCH Temporary Installation PC DCNNG IO SA CC
DCN-WCCU Step 2 • Connect DCN-WCCU & Allegiant Switcher to Temporary PC Port 2 Camera Control Protocol RS232 RS232 Allegiant Switcher Baudrate 19.2K Baudrate 19.2K I&U Instructions DCNNG IO SA CC
Step 3 • CCU protocol and Serial Port settings DCN-WCCU Make sure that the ports of the CCU are set correct. Port 1Protocol = FullBaudrate = 115.2K Port 2Protocol = Camera ControlBaudrate = 19.2K S500 Dip switches I&U Instructions DCNNG IO SA CC
Step 4 • Make sure you connect the RS232 cable to Port 2 of the DCN-WCCU. DCNNG IO SA CC
Step 5 • Install DCNNG Stand Alone Camera Control software LBB4162 DCNNG IO SA CC
Step 6 • Installing DCNNG Stand Alone Camera Control software LBB4162 DCNNG IO SA CC
Step 7 • Installing DCNNG Stand Alone Camera Control software LBB4162 DCNNG IO SA CC
Step 8 • Installing DCNNG Stand Alone Camera Control software LBB4162 DCNNG IO SA CC
Step 9 • Select the language for operator DCNNG IO SA CC
Step 10 • Select use Allegiant VideoSwitcher DCNNG IO SA CC
Step 11 • Installing DCNNG Stand Alone Camera Control software LBB4162 DCNNG IO SA CC
Step 12 • Finish installation DCNNG IO SA CC