Download
1 / 36
360 likes | 389 Views
Explore the comprehensive guide on disk installation procedures, interfaces, geometries, and RAID technologies for enterprise environments. Learn about SCSI, IDE, SATA, USB interfaces, disk geometry, filesystem setup, and more.

E N D
Outline • Interfaces • Geometry • Add new disks • Installation procedure • Filesystem check • Add a disk using sysinstall • RAID • GEOM • Appendix – SCSI & SAS
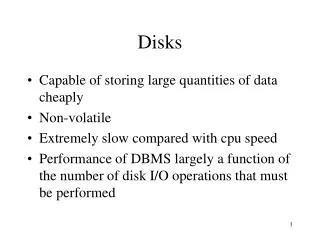
Disk Interfaces Expensive! • SCSI • Small Computer Systems Interface • High performance and reliability • IDE (or ATA) • Integrated Device Electronics (or AT Attachment) • Low cost • Become acceptable for enterprise with the help of RAID technology • SATA • Serial ATA • SAS • Serial Attached SCSI • USB • Universal Serial Bus • Convenient to use SCSICard ~ 10k Low Price! Enhancement Speeds up!
Disk Interfaces – ATA & SATA • ATA (AT Attachment) • ATA2 • PIO, DMA • LBA (Logical Block Addressing) • ATA3, Ultra DMA/33/66/100/133 • ATAPI (ATA Packet Interface) • CDROM, TAPE • Only one device can be active at a time • SCSI support overlapping commands, command queuing, scatter-gather I/O • Master-Slave • 40-pin ribbon cable • SATA • Serial ATA • SATA-1 1.5Gbit/s, SATA-2 3Gbit/s, SATA-3 6GBit/s Primary Master (0)/Slave(1) Secondary Master(2)/Slave(3)
Disk Interfaces – ATA & SATA Interfaces • ATA interface and it’s cable • SATA interface and it’s cable Data Power Data Power
Disk Interfaces – USB • IDE/SATA to USBConverters
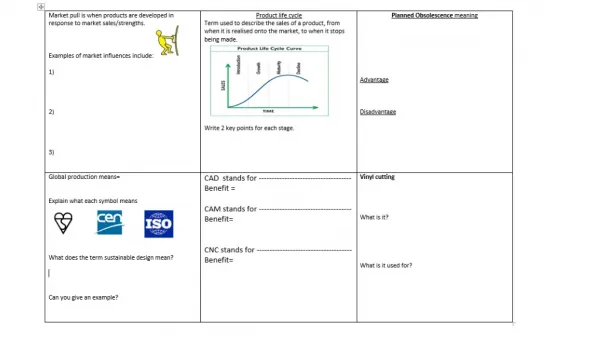
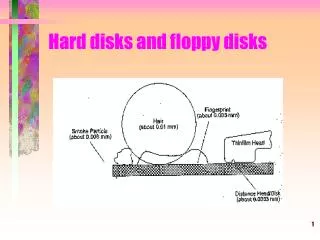
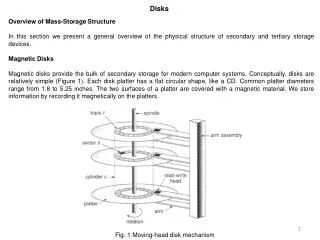
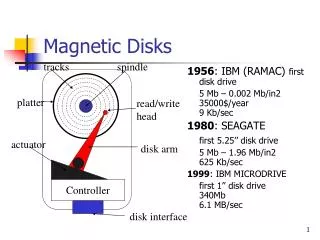
Disk Geometry (1) Like CDs.. • sector • Individual data block • track • circle • cylinder • circle on all platters • Position • CHS: Cylinder, Head (0, 1, …), Sector
Disk Geometry (2) • 40G HD • 4866 cylinders, 255 heads • 63 sectors per track, 512 bytes per sector • 512 * 63 * 4866 * 255 = 40,024,212,480 bytes • 1KB = 1024 bytes • 1MB = 1024 KB = 1,048,576 bytes • 1GB = 1024 MB = 1,073,741,824 bytes • 40,024,212,480 / 1,073,741,824 ≒ 37.275 GB G M K Why? 10^3 vs. 2^10…
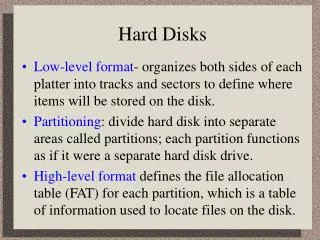
Disk Installation Procedure (1) • The procedure involves the following steps: • Connecting the disk to the computer • IDE: master/slave • SATA • SCSI: ID, terminator • power • Creating device files • Auto created by devfs • Formatting the disk • Low-level format • Manufacturer diagnostic utility • Kill all address information and timing marks on platters • Repair bad sectors mark the bad sectors and don’t use them! Please do it offline… Meta data a HD data Format (meta data + data) vs. fast format (data only)
Disk Installation Procedure (2) • Partitioning and Labeling the disk • Allow the disk to be treated as a group of independent data area • e.g. root, home, swap partitions • Former Suggestions: • /var, /tmp separate partition (for backup issue) • Make a copy of root filesystem for emergency • Establishing logical volumes • Combine multiple partitions into a logical volume • Related to RAID • Software RAID technology • GEOM: geom(4)、geom(8) • ZFS: zpool(8)、zfs(8)、zdb(8)
Disk Installation Procedure (3) • Creating UNIX filesystems within disk partitions • Use “newfs”to install a filesystem for a partition • Establish all filesystem components • A set of inode storage cells • A set of data blocks • A set of superblocks • A map of the disk blocks in the filesystem • A block usage summary
Disk Installation Procedure (4) Software info. • Superblock contents • The length of a disk block • Inode table’s size and location • Disk block map • Usage information • Other filesystem’s parameters • sync • The sync() system callforces a write of dirty (modified) buffers in the block buffer cache out to disk. • The sync utility can be called to ensure that all disk writes have been completed before the processor is halted in a way not suitably done by reboot(8) or halt(8). SoftUpdate done automatically nowadays~
Disk Installation Procedure (5) • mount • Bring the new partition to the filesystem tree • mount point can be any directory (empty) • # mount /dev/ad1s1e /home2 • Setting up automatic mounting • Automount at boot time • /etc/fstab • % mount –t ufs /dev/ad2s1a /backup • % mount –t cd9600 –o ro,noauto /dev/acd0c /cdrom ad1 d partition, newfs s1 e f Mount CD Also for ISO img. file Usually: 2, 1 for root; No write = 0 liuyh@NASA:/etc> cat fstab # Device Mountpoint Fstype Options Dump Pass# /dev/ad0s1b none swap sw 0 0 /dev/ad2s1b none swap sw 0 0 /dev/ad0s1a / ufs rw 1 1 /dev/acd0 /cdrom cd9660 ro,noauto 0 0 /dev/ad2s1a /backup ufs rw,noauto 2 2 csduty:/bsdhome /bsdhome nfs rw,noauto 0 0 Mount from the network; talk about it in “NFS”…
Disk Installation Procedure (6) • Setting up swapping on swap partitions • swapon, swapoff, swapctl • swapinfo, pstat e.g. swapon –a // mount all partitions for swap usage
fsck – check and repair filesystem (1) • System crash will cause • Inconsistency between memory image and disk contents • fsck • Examine all local filesystem listed in /etc/fstab at boot time. (fsck -p) • Automatically correct the following damages: • Unreferenced inodes • Inexplicably large link counts • Unused data blocks not recorded in block maps • Data blocks listed as free but used in file • Incorrect summary information in the superblock • fsck(8)、fsck_ffs(8) • ffsinfo(8): dump metadata auto. Do it at boot time check if filesys. is clean… 0 dirty (rw) 1 clean (ro)
fsck – check and repair filesystem (2) No guarantee on fully recover you HD… • Run fsck in manual to fix serious damages • Blocks claimed by more than one file • Blocks claimed outside the range of the filesystem • Link counts that are too small • Blocks that are not accounted for • Directories that refer to unallocated inodes • Other errors • fsck will suggest you the action to perform • Delete, repair, …
Adding a disk to FreeBSD (1) • Check disk connection • Look system boot message • Use /usr/sbin/sysinstall to install the new HD • Configure Fdisk Label • Don’t forget to “W” the actions • Easiest approach, but has some problems. • fdisk(8), bsdlabel(8), newfs(8) • Make mount point and mount it • # mkdir /home2 • # mount –t ufs /dev/ad3s1e /home2 • # df • Edit /etc/fstab ad3: 238475MB <Hitachi HDS722525VLAT80 V36OA6MA> at ata1-slave UDMA100 Line, speed
Adding a disk to FreeBSD (2) • If you forget to enable soft-update when you add the disk • % umount /home2 • % tunefs –n enable /dev/ad3s1e • % mount –t ufs /dev/ad3s1e /home2 • % mount /dev/ad0s1a on / (ufs, local, soft-updates) /dev/ad1s1e on /home (ufs, local, soft-updates) procfs on /proc (procfs, local) /dev/ad3s1e on /home2 (ufs, local, soft-updates)
RAID – (1) • Redundant Array of Inexpensive Disks • A method to combine several physical hard drives into one logical unit • Depending on the type of RAID, it has the following benefits: • Fault tolerance • Higher throughput • Real-time data recovery • RAID Level • RAID 0, 1, 0+1, 2, 3, 4, 5, 6 • Hierarchical RAID e.g. HD1, HD2 D:\ in windows RAID1 - RAID0 - HD - HD - HD - RAID0 - HD - HD - HD RAID1 RAID0 RAID0
RAID – (2) • Hardware RAID • There is a dedicate controller to take over the whole business • RAID Configuration Utility after BIOS • Create RAID array, build Array • Software RAID • GEOM • CACHE、CONCAT、ELI、JOURNAL、LABEL、MIRROR、MULTIPATH、NOP、PART、RAID3、SHSEC、STRIPE、VIRSTOR • ZFS • JBOD、STRIPE • MIRROR • RAID-Z、RAID-Z2、RAID-Z3
RAID 0 (normally used) (500GB+500GB=1TB) • Stripped data intro several disks • Minimum number of drives: 2 • Advantage • Performance increase in proportional to n theoretically • Simple to implement • Disadvantage • No fault tolerance • Recommended applications • Non-critical data storage • Application requiring high bandwidth (such as video editing) e.g. HD1 (500GB), HD2 (500GB) D:\ in windows (1TB) parallel file io from/to different HDs
RAID 1 (normally used) (500GB+500GB=500B) • Mirror data into several disks • Minimum number of drives: 2 • Advantage • 100% redundancy of data • Disadvantage • 100% storage overage • Moderately slower write performance • Recommended application • Application requiring very high availability (such as home) Cause by double check mechanisms on data…
RAID 0+1 (normally used) [(500GB+500GB)+(500GB+500GB)]=1TB) • Combine RAID 0 and RAID 1 • Minimum number of drives: 4 RAID1, RAID1 Them RAID0 above it
RAID 2 • Hamming Code ECC Each bit of data word • Advantages: • "On the fly" data error correction • Disadvantages: • Inefficient • Very high ratio of ECC disks to data disks • Recommended Application • No commercial implementations exist / not commercially viable Read, check if correct, then read
RAID 3 • Parallel transfer with Parity • Minimum number of drives: 3 • Advantages: • Very high data transfer rate • Disadvantages: • Transaction rate equal to that of a single disk drive at best • Recommended Application • Any application requiring high throughput RAID1 if two HDs Save parity
RAID 4 • Similar to RAID3 • RAID 3 V.S RAID 4 • Byte Level V.S Block Level • Block interleaving • Small files (e.g. 4k) Block normally 512bytes (4k for WD HDs)
RAID 5 (normally used) • Independent Disk with distributed parity blocks • Minimum number of drives: 3 • Advantage • Highest read data rate • Medium write data rate • Disadvantage • Disk failure has a medium impact on throughput • Complex controller design • When one disk failed, you have to rebuild the RAID array Origin from RAID3 Parallel file I/O Can tolerate only 1 HD failure
RAID 6 (normally used) • Similar to RAID5 • Minimum number of drives: 4 • 2 parity checks, 2 disk failures tolerable. Slower than RAID5 because of storing 2 parities…
GEOM Modular Disk Transformation Framework
GEOM – (1) • Support • ELI – geli(8): cryptographic GEOM class • JOURNAL – gjournal(8): journaled devices • LABEL – glabel(8): disk labelization • MIRROR – gmirror(8): mirrored devices • STRIPE – gstripe(8): striped devices • … • http://www.freebsd.org/doc/handbook/geom.html Journalize (logs) before write Software RAID1 Software RAID0
GEOM – (2) • GEOM framework in FreeBSD • Major RAID control utilities • Kernel modules (/boot/kernel/geom_*) • Name and Prodivers • “manual” or “automatic” • Metadata in the last sector of the providers • Kernel support • {glabel,gmirror,gstripe,g*} load/unload • device GEOM_* in kernel config • geom_*_enable=“YES” in /boot/loader.conf devices Logical volumes (1) On demand load/unload kernel modules.. (2) Build-in kernel and recompile (3) load automatically at booting
GEOM – (3) Why us it? bundle by name instead of bundle by provider • LABEL • Used for GEOM provider labelization. • Kernel • device GEOM_LABEL • geom_label_load=“YES” • glabel (for new storage) • # glabel label -v usr da2 • # newfs /dev/label/usr • # mount /dev/label/usr /usr • # glabel stop usr • # glabel clear da2 • UFS label (for an using storage) • # tunefs -L data /dev/da4s1a • # mount /dev/ufs/data /mnt/data e.g. ad0s1d usr Label auto. at boot >> Create only this time /dev/label/usr Stop using the name Clear metadata on provider “data” is a name
GEOM – (4) • MIRROR • Used for GEOM provider labelization. • Kernel • device GEOM_MIRROR • geom_mirror_load=“YES” • gmirror • # gmirror label -v -b round-robin data da0 • # newfs /dev/mirror/data • # mount /dev/mirror/data /mnt • # gmirror insert data da1 • # gmirror forget data • # gmirror insert data da1 • # gmirror stop data • # gmirror clear da0 ※ Using gmirror for building up RAID1 logical volume called “data”, using HD: da0, … Add in HD Kill inexist HDs
GEOM – (5) • STRIPE • Used for GEOM provider labelization. • Kernel • device GEOM_STRIPE • geom_stripe_load=“YES” • gstripe • # gstripe label -v -s 131072 data da0 da1 da2 da3 • # newfs /dev/stripe/data • # mount /dev/stripe/data /mnt • # gstripe stop data • # gstripe clear da0 Create logical volume “data”, which stripe da0~da3 HDs