Download

1 / 60
630 likes | 922 Views
Plastic Repair. Level One Apprenticeship. What you need to know. Ability to identify the type of plastic Proper steps to achieve correct results Which method of repair? Will the repair be satisfactory? Is it cost effective? Do you have all the necessary materials?

E N D
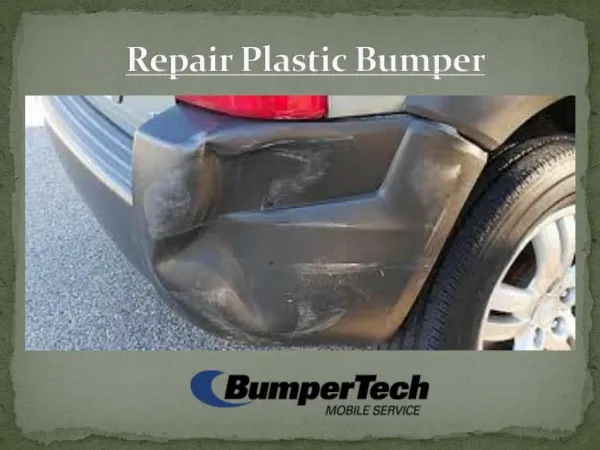
Plastic Repair LevelOne Apprenticeship
What you need to know • Ability to identify the type of plastic • Proper steps to achieve correct results • Which method of repair? • Will the repair be satisfactory? • Is it cost effective? • Do you have all the necessary materials? • Are we allowed to repair the part? • Is it a Thermoset, or a Thermoplastic?
Plastics Usage Through the Years 1970 1980 1990 2000+
Where are these plastics used? • wheel housings and liners • exterior body panels • valve covers • composite plastic floor tunnels • virtually anywhere • fascias • bumper covers • interior trim • exterior trim • fan shrouds • batteries • gas tanks
Viper... Is a perfect example of Plastics and performance
Methods of Identification • ISO Code • Body Repair Manual • Sanding Test • Float Test • Flexibility Test • Rod Adhesion Test
Other means of Identification PET(E) PP HDPE PS PVC Other LDPE
TheMitchell Manual is another source for plastic identification information
Identifying the Extent of Damage • One sided Repair - Nick, Scratch or gouge • Two sided Repair - Puncture, Rip or Tear • Reshaping with Heat - Dents or distortion
Repair Methods • Welding • Hot Air Welding • Airless Welding • Ultrasonic • Adhesive • Olefin • Non-Olefin • Rigid • Flexible
Steps for Welding or AdhesiveRepair • Thoroughly wash part with soap and water • Warm soapy water • Aids in cleansing water soluble materials • Secondary damage becomes apparent • Wax and Grease remover • Cleans surface of waxes and silicones • Removes non-water soluble materials, such as road tar
Once clean, use heat if necessary to reshape panel and remove any distortion • Heat gun • Heat lamp • Make repair decisions • One sided repair? • Two sided repair? • Which method of repair will be appropriate? • If cosmetic, Adhesive repair will suffice • If torn, a two sided repair will be needed • Will an Adhesive or a Welding repair be stronger?
Safety First! - With the vast amounts of chemicals found in plastics and adhesives today, following the proper safety precautions should be first and foremost when performing any repair procedure
Adhesive Repair • Tools needed for a one-sided repair • Sander (D/A or Single action) • Sanding block • Air nozzle • Materials • Plastic cleaner • Adhesion promoter (if polyolefin) • Repair material (2-part) • 120-180 grit sandpaper
One Sided Repair Procedure • Featheredge the nick, scratch or gouge to the base of the damage • Clean area by blowing away leftover dust • Clean sanded area with approved plastic cleaner (Do not mix systems) • Wash clean and dry • Apply adhesion promoter if necessary • Mix chosen repair material correctly and apply • Sand material to desired finish
Two Sided Procedure • Tools • Die grinder • Small grinder (50 grit) • DA sander • Blow gun • Spreaders • Clamping devices • Materials • Backing materials • Repair Adhesive and adhesive promoters • Abrasives
Repair Materials Do not intermix materials!
Cleaners • Plastic cleaners are important for a couple of reasons • They aid in removing surface contaminants left from the manufacturing process • Help cleanse the surface of contaminants left from the sanding and grinding process
Repair Adhesives • Procedures vary from manufacturer to manufacturer • Materials and their characteristics will vary as well • Can be made up of Epoxies, Urethanes or Acrylics • All have different curing times and sanding / handling times • Procedures are all brand and material specific
Curing times Example only
Using the Mixing Guns • Insert Cartridge into applicator gun • Remove protective cap from cartridge • Purge cartridge to equalize contents • Install new mixer tip • Gun out approximately 1 1/2 - 2 inches of mixed material to ensure proper mixing on waste material • Apply material to repair area, keeping the mixing tip in the applied adhesive
Once all Material needed has been applied, leave used mixing tip in place on cartridge • Release pressure from cartridge and remove cartridge from applicator gun • Store leftover cartridge in a cool, dark environment • Shelf life of a used cartridge is usually one month, an unused one is a year
Reinforcement Materials • Can consist of mesh materials • Loose Fiberglas mesh • Woven Fiberglas cloth • Can consist of materials consistent with the material being repaired • Leftover or discarded plastics of similar makeup
Adhesion Promoters • Are used primarily for improving the adhesion characteristics of Olefin based plastics • Improve adhesion by chemically changing the surface of the Olefin plastic, allowing an adhesive to bond with it • Other methods include a flame treatment to promote adhesion
Minor Repairs • Instant Adhesives, or ‘crazy glue’ have their place in the bodyshop as well as 2-part adhesives • Serve well for minor replacement of broken tabs or mounting hardware • Limited strength
Plastic Welding Hot Air and Airless