Download
1 / 20
210 likes | 456 Views
PLC Fundamentals Mod. 4. Programming with Ladder Logic. Module Objectives. Upon successful completion of this module, students will be able to: Identify the ladder diagram elements. Identify and define the different symbols used in ladder diagrams.

E N D
PLC FundamentalsMod. 4 Programming with Ladder Logic
Module Objectives • Upon successful completion of this module, students will be able to: • Identify the ladder diagram elements. • Identify and define the different symbols used in ladder diagrams. • Draw the truth table and write the output boolean expression for the given ladder diagram. • Draw ladder diagrams for simple logic operations. • Convert the given function block diagram to ladder diagram. • Build simple LOGO! applications using the RS latching relay in ladder diagrams. • Build ladder diagrams using the On-delay and Off-delay timer to implement LOGO! timing applications. • Complete timing diagrams for the given timer application. • Convert simple electrical circuits to ladder diagrams. • Build simple LOGO! applications using the Up-counter and the Down-Counter in ladder diagrams.
4.1 Introduction to Ladder Diagram (LAD) • They are called ladder diagrams (LAD) because they resemble a ladder. In this module, you will learn how to program the LOGO! using Ladder Logic or Ladder Diagrams.
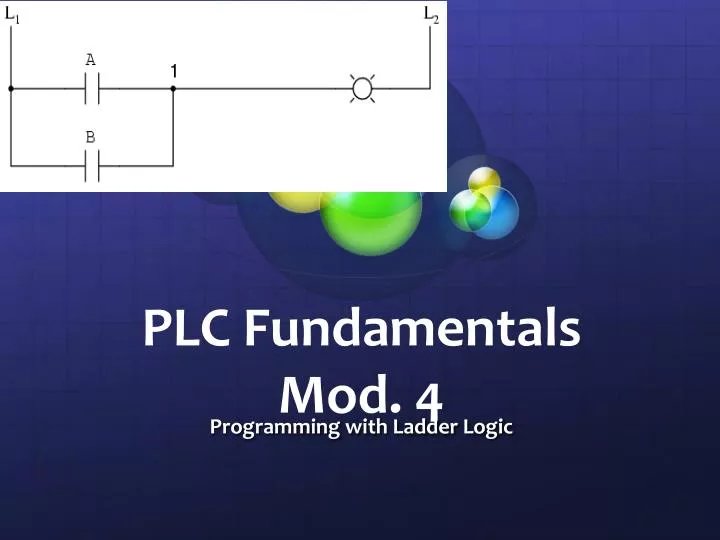
LAD • Example of a ladder diagram. • Rails : Vertical Lines • They have two vertical power rails on the left and on the right (not shown) that supply power, • Rungs : (horizontal lines) that represent each path of the circuit. • How many rungs the LAD includes? • The elements in a ladder diagram are contacts, coils and blocks. • Ladder logic diagrams are read from left to right and from top to bottom.
LAD • The example of the LAD shown in Figure 4.1 has TWO Rungs. Each rung is connected to an independent output.
4.2 Ladder Logic Symbols • The set of symbols which are commonly used in LAD are as follows: • A. Contacts • Contacts are of two types: • Normally Open (NO) Contact: It produces a HIGH output when its input is HIGH or ‘1’. • Normally Closed (NC) Contact: It produces a HIGH output when its input is LOW or ‘0’. • The Contact Symbols are shown in figures 4.4 and 4.5
B. Coils • Coils represent Relays that are energized when power flows through them. • When a relay coil is energized, it sets its output state to HIGH (1) or ON. • Its output goes LOW (0) or OFF in the absence of power.
Symbols of the coil types: • Normal Coil: Outputs the result of the logic operation. • Negating Coil: Outputs an inverted version of the logic operation.
Example: Ladder diagram for the AND Operation • Functions and function blocks can also be used within Ladder Diagrams. • Let I1 and I2 be the two NO input contacts, and let Q1 be the normal output coil. • The Output Q1 will produce a HIGH output only if both I1 and I2 inputs are HIGH. • The Boolean output expression is: Q1 = I1.I2
Class Activities • Solve Skill 1 – Page 6 • Solve Skill 2 – Page 7 • Solve skill 3 – Page 8 • Solve skill 4 – Page 9
4.3 Special functions • Among the special functions, the latching relays, timers, and counters are commonly used. • 4.3.1 RS latching relay • The RS function block (or RS latching relay) is a memory function which can be used to set and reset any operation.
4.3 Special functions – example 1 • A conveyor belt is used to transport non-metallic work pieces to the workbench. A horn has been connected to the output of the PLC and it will sound to show error when metallic work pieces are detected. A pushbutton is also connected to the input that will be used to stop the horn.
4.3.2 Timers • Only On-Delay and Off-Delay Timers will be discussed in this module. • On Delay timer: It is used to start an action after a certain time. • Trg (Trigger) is used to trigger the timer. • T (time) is used to set the On-delay time.
4.3.2 Timers • OFF Delay timer: It is used to stop an action after a certain time. • Trg (Trigger) is used to trigger the timer. • R (Reset) is used to reset the off-delay timer. Reset has priority over the Trigger input. • T (time) is used to set the OFF-Delay time.
Skill 6 : Example-1 • An escalator in a certain mall is required to Start after a delay of 3 secondsonce the sensor senses the person. Identify the type of timer that could be used for this application… • Draw the LAD and complete the timing diagram.
Example-2 • A corridor light must switch ON immediately after sensing a person and switch off 10 seconds after it turns ON. Draw the ladder diagram and the timing diagram. • Draw the LAD … • And the Timing Diagram …
4.3.3 Counters • Counters are used for counting applications, such as counting the number of cans or cartons or work pieces. The Up/Down counter can be set as Up Counter or Down Counter by using the Dir input. • R: Resets the counter • Cnt: Counts the 0 to 1 transitions at input • Dir (Direction): it determines the direction of count. • Dir = 0: count Up-counter • Dir = 1: count Down-counter • Par: Specifies the range (from 0 to 999999)
Skill 8 • Use the counter function block in the LAD … • Figure, shows a parking area at a mall which can only take 12 cars. It is required to design a Parking System which can display the ‘No spaces’ message when the parking is full. Draw a ladder diagram using the counter block to count the cars entering the parking area. • Hint: Count the no of cars, and if count=12, display ‘No spaces’.