Download
1 / 22
220 likes | 355 Views
Phase Processing. GS20 PDM Version 1.0-1.05. Setting Up the GS20 (Creating a Phase configuration). In order to process phase data, it is necessary to: Enable Post Processing in the GPS Logging Screen Select Max Accuracy in the GPS Tracking Screen

E N D
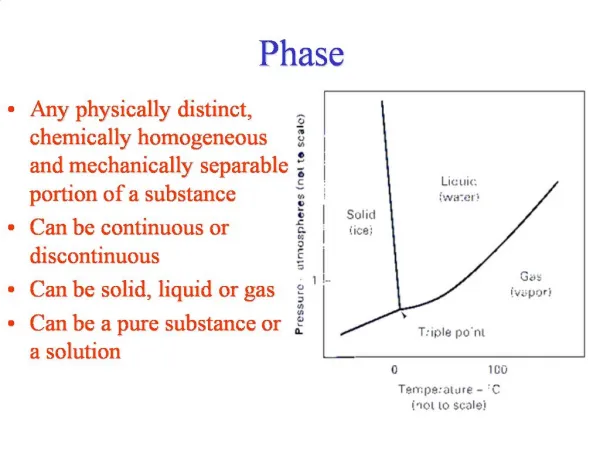
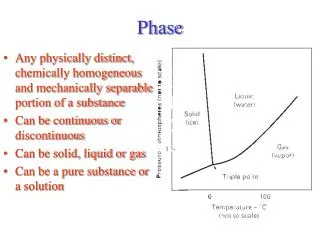
Phase Processing GS20 PDM Version 1.0-1.05
Setting Up the GS20 (Creating a Phase configuration) • In order to process phase data, it is necessary to: • Enable Post Processing in the GPS Logging Screen • Select Max Accuracy in the GPS Tracking Screen • Select Setup from the Main Menu, and choose Setup. • Select the POSTPROC configuration. • Create New and Name the configuration PHASE. • Highlight the PHASE Configuration and press enter to select. • Press enter again to edit the configuration.
Editing the Configuration • Expand the GPS group and open the Tracking Screen • Press the left arrow to make Max Accuracy active • Arrow down to enter the Mask Angle • Set the Mask Angle to 15 Degrees • Higher Elevation Satellites provide better signal and are less prone to cycle slip! • Arrow down the DOP and select GDOP of value 8 • Escape and Save each screen until you return to the Main Menu.
Setting the Logging Interval • For Rapid static collection, it is necessary to collect a variety of phase positions with varying satellite geometry • Longer occupations don’t require 1 second sampling • In the GPS / Logging screen, you can reduce the collection time to 5-10 seconds for rapid static, or 15-30 seconds for static occupations.
Collecting the Data • In order to collect phase data, it is necessary to use the AT501 Survey Grade antenna on a stable device such as a Tripod or Bipod. • Measure the height of the Antenna and enter this information in the GPS antenna configuration screen. • Hint: When powering on the unit, it will ask for the antenna type and height.
Feature ID Template • Because SKI PRO handles point features based on the ID or name, it is important to ensure differentiation between point names. • When using the ID Template for Points, it is advisable, to prefix the number with a unique ID. • Unique ID could be last 4 digits of the serial number • Select Auxiliary / ID Template Management • Create a New Feature Template and Save
Planning Your Collection • Will you be using a 3rd party Reference station? • Leica Internet Download • Other: Rinex or Leica data • Will you be processing as • Single receiver Occupation using one reference • Single baseline • Simultaneous receiver Occupations • Multiple baselines: usually for networking • Note: Multiple bases can allow for network closure and loop adjustments! This will allow you to verify point accuracy.
Phase Point Occupation • When Occupying a point, the positional count will be provided in the status bar at the bottom of the screen • The Positional count indicates the amount of GPS observations recorded. • Positions are not to be confused with time, unless the logging rate is set to 1 second. For a 1km Rapid Static Location 15:00min x 60sec / 5sec =180 positions
Rules of thumb for L1 Phase collection • Single frequency phase collection requires shorter baselines and longer occupation times than a dual frequency receiver. • It is recommended that occupation times in Static or Rapid Static should never be less than 15 minutes. • It is also recommended not to exceed 20km in baseline length. • A good rule of thumb is 5 minutes per kilometer of baseline length with a minimum of 15 minutes
Back in the Office: Phase Processing with DataPRO • DataPRO is capable of both L1 and L1/L2 phase processing. • Phase Processing requires a special hardware Lock that is attached to the parallel port of your computer • DataPRO provides a GPS processing engine called SKI PRO • DataPRO does not provide network creation or analysis • The SKI Wizard can export baseline data for 3rd Party network adjustment packages. The General Setting under the Tools Pull down will allow you to view purchased options
More General Options • It is also necessary to change the default processing settings • From the Tools pull down, select General Setting • Choose the Data Processing Tab • Select No automatic behavior • Advanced users may wish to setup pre-defined criteria • Uncheck the Discard data with poor satellite geometry • Set averaging limits so that points outside of acceptable accuracy tolerance are not averaged together
Opening the SKI Wizard • This presentation assumes the user is already capable of creating a job, transferring and importing data. • To find out more about job creation and data import, review the GIS DataPRO User Manual • From the Tools Menu, select Post Process, or choose the globe icon form the Toolbar. or
Housekeeping Phase kinematic chain Data • Versions 1.0 - 1.05 of the GS20 are currently not enabled to process kinematic or moving phase data. • GPS kinematic chain data is still collected, in order to process lines and areas with the C/A code. • Static • Kinematic • Because the ambiguity resolution of each static point is unique, it is necessary to remove chain data between static points. • If points are linked with chain data, SKI PRO will attempt to solve each point with the ambiguity resolution of the 1st solution. This is how kinematic phase collection works.
SKI PRO Wizard • The post-processing engine of GIS DataPRO is the same as that used in SKI-PRO. • GIS DataPRO and SKI PRO versions run in parallel, so it is easy to determine the version. Note: Reference data imported from within the SKI PRO window will not show in the map • To open the SKI PRO Window, Select Post-process from the Tools pull-down window.
Viewing the data in the SKI Wizard • By Default, imported rover data is assigned as rover (green) and imported reference is assigned reference (red) • Note the additional chain data above and below the actual points of interest. This data must be deleted so that ambiguities can be resolved uniquely for each point.
Working in the SKI PRO window • To delete the chain data, select the extraneous data for each point, place the mouse over the highlight, right click, and select delete. Note you can select multiple data, but only for 1 chain at a time. • To deselect, or change the status of GPS data, right click in the right window. • To deselect, right click in the open area • To change status, place the mouse over the GPS data of interest.
Changing the Reference Coordinates • To assign known values to reference coordinates, it is necessary to edit the point. • You can edit a point by right clicking the point ID , then changing the point class to control.
Processing Parameter • It is not recommended to process L1 baselines in access of 20km. • Default baseline settings in the SKI PRO interface are 9 minutes for minimum time and 20km for maximum length • If your ambiguities do not resolve, right click in the SKI PRO window and select system parameter, and select Show advanced parameters.
Processing the Data • To process the data, right click in the right SKI window and select process, or choose the gears icon from the toolbar. • A progress bar and dialog will let you know when the processing is complete. • Data must be saved in the results screen before exiting the SKI PRO wizard!
Reviewing and Storing the Data • Once your data is processed, you can check to see if your ambiguities were resolved and save your data. • Select next twice to enter the results screen. • Expand your processing run, and select the Points folder.
Reviewing and Storing your data • Select the points that meet your criteria (normally resolved ambiguities) • Hold Shift to select a group, or CTRL for individual points • Right click on a highlighted row and store • Close the SKI Window and your data will be updated.
Advanced Processing • To process multiple sessions for networking, it is necessary to deselect data, and change the status of data to rover or reference. • For additional information about static phase processing, please refer to “A General Guide to Static and Rapid Static Surveys” located on the Leica download site http://downloads.leica-geosystems.com/downloads/areas/zz/gps/gps_system500/manuals/