Download
1 / 10

E N D
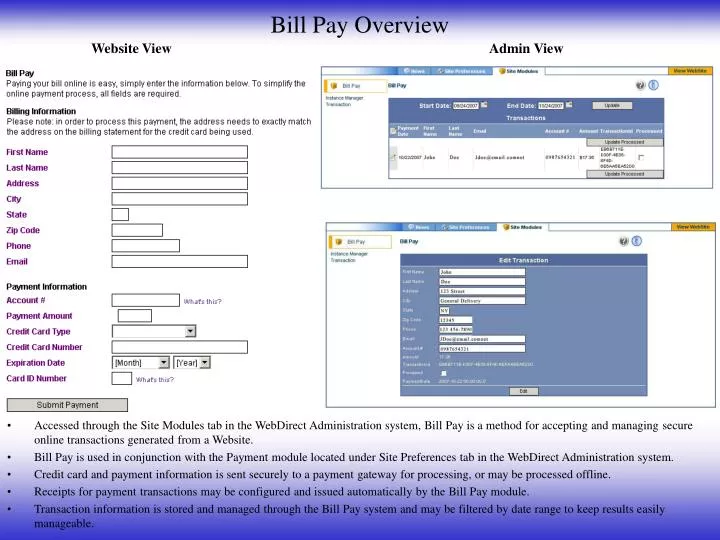
Website View Admin View Bill Pay Overview • Accessed through the Site Modules tab in the WebDirect Administration system, Bill Pay is a method for accepting and managing secure online transactions generated from a Website. • Bill Pay is used in conjunction with the Payment module located under Site Preferences tab in the WebDirect Administration system. • Credit card and payment information is sent securely to a payment gateway for processing, or may be processed offline. • Receipts for payment transactions may be configured and issued automatically by the Bill Pay module. • Transaction information is stored and managed through the Bill Pay system and may be filtered by date range to keep results easily manageable.
Payment Module– Add New Payment Type • The Payment module must be configured prior to setting up Bill Pay module options. • Enter a Payment Name for future identification of the Payment Gateway. • Select a payment gateway, or processor, from the drop-down menu to authorize the Payment Type for use on the Website.
Payment Module – Payment Gateway/Processor Selection • Select your online payment processor from the drop-down list, or choose to process orders offline. • Offline payment information will be gathered by the system for processing offline. Although all submitted credit card information is secure, the information is not sent to a Payment Processor and must be processed using an alternate method.
Bill Pay Module - Edit Instance • Bill Pay allows Website Visitors to pay their bills securely online, while creating a manageable Administrative record for transactions. • Once configured, access to Bill Pay for Website Visitors is provided by a link, which may inserted into site content or navigation.
Bill Pay Module - Edit Instance – Payment Options • Specify payment option parameters for accepting online payments. • Minimum Payment • Maximum Payment • Payment Processor • The Payment Processors are set-up through the Payment module in Site Preferences (see Pages 1 & 2) • Credit Card Types • Check the box to the left of a credit card type to accept the credit card for online payments
Bill Pay Module - Edit Instance – Receipt Options • The Bill Pay module is capable of issuing an email receipt for payments accepted through a Website. The payment receipt may be customized to suit individual needs. • Receipt Email From • The email address issuing the receipt to the Consumer. • Receipt Email To (Optional): Designate an email address to receive a copy of the receipt. • This is often the email address of the processing department for online payments. • Receipt Email Subject: The email subject line that will be seen by Consumers when they receive their receipt via email. • Custom Thank You Page: Select a page from the Web Direct modules to direct Consumers to once they have completed their online transaction.
Bill Pay Module - Edit Instance - Options • Additional settings are available for Bill Pay • Use SSL: Required for secure transactions • Default Date Range: When viewing transactions, the list will automatically display the transactions performed within the last 30-days. • This may be overridden by the Admin User through the filters available in Bill Pay – Transaction. • Account # Example Page: When viewed on the Website, a link appears to the right of the Account # field, “What’s This”. • The pop-up page behind the “What’s This” link is the Page Builder page, “Pay Bill Online – Sample Invoice”.
Bill Pay on a Website • A form is generated by the Bill Pay module, which is made available to Site Visitors. • Information submitted through the Bill Pay form is secure and may be proceed online or offline. • Submitted transaction information is gathered in the Bill Pay module under Transaction, and may also be sent to a specified email address as a receipt.
Bill Pay Module - Transactions • Due to the settings in Bill Pay Instance Manager, by default the transactions performed in the last 30-days will be displayed. • To specify a date range other than the default 30-day time period, select a time period to view transactions in the top Start and End Date fields. Click Update to view the transactions for that time period. • Transactions appear in the table with Payment Date, First Name, Last Name, Email, Account #, Amount, Transaction ID, and Process status. • A check mark in the Processed column indicates the transaction has been fully processed for payment and completed. • Select the edit icon to the left of a transaction to open the transaction for editing.
Bill Pay Module – Edit Transaction • From the Edit Transaction screen, a payment may be edited and/or marked as processed • Details about he payment are visible, • The payment amount, transaction ID # and Payment Date may be viewed but are not editable.