Download

1 / 23
230 likes | 391 Views
Hello World. Learning Objectives. This module will help you... Get started with running a simple JXTA application Understand the JXTA configuration process. Getting Started – Java. System requirements Java Run-Time Environment (JRE) or Software Development Kit (SDK) 1.3.1 or later

E N D
Learning Objectives • This module will help you... • Get started with running a simple JXTA application • Understand the JXTA configuration process
Getting Started – Java • System requirements • Java Run-Time Environment (JRE) or Software Development Kit (SDK) 1.3.1 or later • Accessing on-line documentation • http://platform.jxta.org/java/api/overview-tree.html • Downloading binaries • See Downloads link at http://www.jxta.org • Quickest option is to download the Project JXTA stable build
Getting Started – Java Required Binaries • jxta.jar • jxtasecurity.jar • log4j.jar • jxtaptls.jar • minimalBC.jar • cryptix-asn1.jar • cryptix32.jar
Getting Started – Java Compiling and Running JXTA Applications • Compiling C:> javac -classpath .\lib\jxta.jar SimpleJxtaApp.java • Running c:> java -classpath .\lib\jxta.jar;.\lib\log4j.jar; .\lib\jxtasecurity.jar; .\lib\cryptix-asn1.jar;.\lib\cryptix32.jar; .\lib\jxtaptls.jar;.\lib\minimalBC.jar;. SimpleJxtaApp
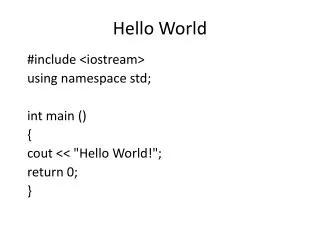
Hello World – Java public class SimpleJxtaApp { static PeerGroup netPeerGroup = null; public SimpleJxtaApp() { } public static void main(String args[]) { System.out.println("Starting JXTA ...."); SimpleJxtaApp myapp = new SimpleJxtaApp(); myapp.startJxta(); System.out.println("Hello JXTA"); System.exit(0); } private void startJxta() { try { // create and start the default JXTA NetPeerGroup netPeerGroup = PeerGroupFactory.newNetPeerGroup(); } catch (PeerGroupException e) { System.out.println("fatal error : group creation failure"); e.printStackTrace(); System.exit(1); } } }
Getting Started – C • System requirements • Apache APR 2.0 runtime environment • Expat XML parser • Optional DB CM backends (BerkeleyDB, APR DB) • Accessing on-line documentation • http://jxta-c.jxta.org • API • http://jxta-c.jxta.org/cdocs/html/files.html • Downloading binaries • Stable and Development • http://download.jxta.org/stablebuilds/index.html
Getting Started – C Compiling and Running JXTA Applications • Compiling gcc -c -I./include/jxta -I../lib/apr/include myapp.c • Running LDFLAGS=-ljxta (JXTA lib) -ljpr (JXTA portability library layer) -lapr (APR) -laprutil (APR util) -lexpat (XML parser) -lcrypt (Crypto) -ldb1 -ldl (CM Database backend)
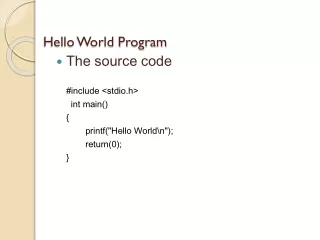
Hello World – C int main(int argc, char **argv){ Jxta_PG* pg; Jxta_status status; #ifdef WIN32 apr_app_initialize(&argc, &argv, NULL); #else apr_initialize(); #endif status = jxta_PG_new_netpg(&pg); if (status != JXTA_SUCCESS) { fprintf(stderr,"jxta_PG_netpg_new failed with error: %ld\n", status); } fprintf(“hello world”); JXTA_OBJECT_CHECK_VALID (pg); jxta_module_stop((Jxta_module *) pg); JXTA_OBJECT_RELEASE(pg); return 0; }
JXTA Configuration Tool • Runs automatically the first time a JXTA application is run on a system • Used to configure: • Peer name • TCP/IP and HTTP configuration • Rendezvous and relay peers • Security information (username/password)
Configuration Process • Two configuration files used: • PlatformConfig— contains config information • reconf— used to force a reconfiguration • Configuration Tool creates: • PlatformConfig • cm directory — local cache • pse directory — username/password
Example PlatformConfig File <?xml version="1.0"?><!DOCTYPE jxta:PA><jxta:PA xmlns:jxta="http://jxta.org"> <PID> urn:jxta:uuid-59616261646162614A787461503250335E3B160E5E6 541959F2892A08A4C77E003 </PID> <Name> suzyq </Name> <Dbg> error </Dbg> <Desc> </Desc> <Svc>TCP configuration information, edited for brevity </Svc> <Svc> HTTP configuration information, edited for brevity </Svc></jxta:PA>
JXTA Configuration Tool Basic Settings
JXTA Configuration Tool Advanced Settings
JXTA Configuration Tool Rendezvous/Relays Settings
JXTA Configuration Tool Security Settings
Re-Entering Configuration • Configuration information • Network configuration information stored in current directory (PlatformConfig file) • Username/password stored in files in ./pse subdirectory • To change configuration information • Remove these files and restart shell • Create file called reconf in ./.jxta directory • Use the JXTA shell peerconfig command: JXTA> peerconfigpeerconfig: Please exit and restart the jxta shell to reconfigure !!!!!
Command Line Configuration • Can create/edit PlatformConfig file by hand before starting Shell (or application) • Can specify username/password on the command line:-Dnet.jxta.tls.password=******** -Dnet.jxta.tls.principal=myusername • Can set properties in a program:System.setProperty("net.jxta.tls.password", "yourPassword") System.setProperty("net.jxta.tls.principal", "yourLogin");
Running Multiple Peers • To start a second Shell application as a different JXTA peer: • Copy C:\Program Files\JXTA_Demo\Shell directory to Shell2 • Remove .jxta subdirectory from Shell2 • Start second shell (Shell2\shell.bat) • When the configuration tool appears, enter a different port number [on the Advanced Tab, TCP settings change port 9701 to 9702]
Running Multiple Peers No Internet Connection • First peer: • Advanced panel • Disable HTTP • Select Manual under TCP settings, and enter IP address – use a different port number for each peer • Rendezvous/Relays panel • Check Act as Rendezvous
Running Multiple Peers No Internet Connection • Second peer: • Advanced panel • Disable HTTP • Select Manual under TCP settings, and enter IP address – use a different port number for each peer • Rendezvous/Relays panel • Add the internal IP address and port number of the first peer to the Available TCP Rendezvous field