Download
1 / 23
250 likes | 510 Views
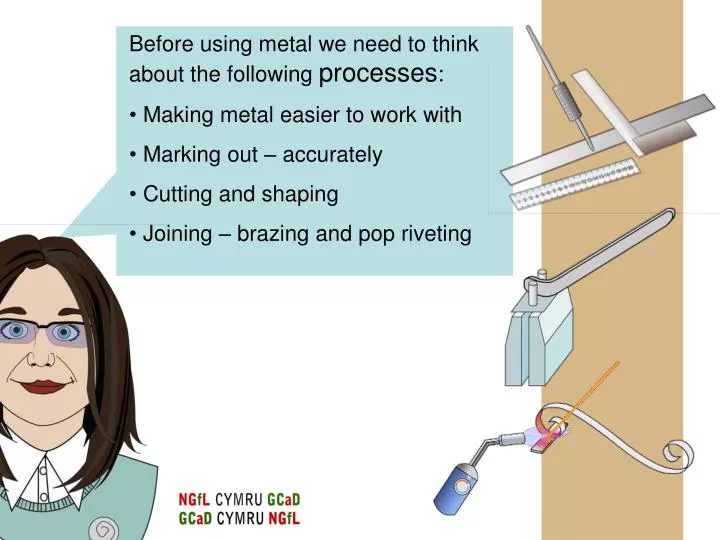
Before using metal we need to think about the following processes : Making metal easier to work with Marking out – accurately Cutting and shaping Joining – brazing and pop riveting. Working with Metal. What happens when you bend the ring pull of a canned drink, again and again ?.

E N D
Before using metal we need to think about the following processes: • Making metal easier to work with • Marking out – accurately • Cutting and shaping • Joining – brazing and pop riveting
Working with Metal What happens when you bend the ring pull of a canned drink, again and again? When metals are squeezed, hammered, or shaped when COLD they become hard. This is called WORK HARDENING. Work hardening is caused by the stresses being set up within metals. As the metal hardens it becomes very difficulty to work with. It will eventually become so hard that no more work can be carried out without it cracking or snapping. WORK HARDENING
Making metal easier to work with Metals are often heatedto improve their properties. Heating a metal can, for example make it easier to bend and shape. It also improve other properties e.g. make it less likely to snap or become brittle when you are working with it. The properties of the mild steel we are going to use to make the candle holder will need to be improved by a process called annealing . ANNEALING - is a heat treatment process which is used to soften a metal. Each metal has an annealing process which suits it best. Steels are heated to a bright red colour and left to cool slowly in a safe place. Annealed metals bend easily when pressure is applied and can be filed, shaped around a jig and drilled with ease. The annealing process will enable you to make scrolls from steel for the tealight holder.
Marking Out Accurate marking out and measuring are essential to good metal work. Metal can be worked to very fine limits, up to .025mm! Many metalwork tasks consist of a number of different components. Without accurate marking out at an early stage, the parts would not fit. It is an important skill to learn. The STEEL RULE is made of steel and comes in a variety of lengths. It has a zero end and has imperial and metric measurements on it. The ENGINEER’S TRY SQUARE is accurately set at 90° and is used for marking out and testing right angles.
Flash Marking Out The CENTRE PUNCH is used for marking the positions of drilled holes. The indent created prevents the tip of the drill from wandering. A COIN is needed to create a RADIUS on the edge of the steel to improve the appearance and make it safe, with no sharp edges. The SCRIBER is the metalworker’s pencil. It is a hard, metal point which scratches a fine line onto metal. Watch the Flash animation as it will help you to mark out accurately.
Marking Out From making a model you will realise the length and number of pieces of mild steel you will need to make your design. Using a STEEL RULE, measure the correct length of steel you will need. Line up the ENGINEER’S TRY SQAURE to the edge of the steel. Using a SCRIBER, scratch a straight line into the steel, at the correct length. This will identify where to cut the steel later.
Watch the Flash animation as it will help you cut and shape correctly. Flash Adjustable hacksaw Cutting and shaping The mild steel can be cut in two different ways – depending on what equipment you have in the workshop. You could cut the steel by hand using an ADJUSTABLE HACKSAW or by machine, using a CHOP SAW. Chop saw
2. Using an appropriate FILE, file until you create a smooth radius on each end of your steel. Be careful of the metal bur – file it off. Flash Watch the Flash animation as it will help you cut and shape correctly. Cutting and shaping • On both ends of your piece of steel, draw around a coin with a scriber, to create a radius.
Shaping - Scrollwork Working with metals such as copper, steel and wrought iron to form decorative shapes has been a traditional metalworking skill for hundreds of years. SCROLLWORK allows us to make products such as candle holders, gates and garden furniture. To produce a scroll you have to form the metal around a JIG. It can be cold formed (bent cold by hand through hammering and force or heat treated to softened and bent easily). What is the name of a craftsperson who works in metal? A blacksmith at work
Lets look at the scrolling process in more detail in the next slides. Shaping - to form scrolls Interesting shapes can be created in metal using just the cranking jig, as shown in the previous page and in the products below. To make a scroll - push the steel through the jig and bend it slightly, push it through a little again and bend again. Repeat until your shape is formed. All sorts of creative shapes can be formed to suit your design. a cranking jig
Place the CRANKING JIG in vice. 2. Place the tip of the mild steel in CRANKING JIG. Pull the steel round the jig to form a hook. Flash Watch the Flash animation as it will help you cut and shape correctly. Shaping - to form scrolls a cranking jig
3. Remove the CRANKING JIG from the vice and replace with a SCROLL JIG. a scroll jig 4. Hook the steel to the centre of the SCROLL JIG and pull the steel around the jig. Flash Watch the Flash animation as it will help you cut and shape correctly. 5. Repeat the process on the other end of the steel to create an equal scroll. You could use different sized SCROLL JIGS. Processes ~ To form scrolls
Recap – can you explain what is happening? Answer The tip of the steel is placed in a cranking jig The steel is pulled round the cranking jig The steel is placed in a scroll jig The steel is hooked in the centre of a scroll jig and pulled around A finished scroll
Joining Metal POP RIVETING is a quick method of permanently joining two or more pieces of material together. Rivets can form hinge pins in moving joints, or rigid joints in sheet material. BRAZING is used to permanently join steel parts together, which often don’t have a large enough shared surface area to be join together by pop riveting. To join your steel (scrollwork) together there are a couple of methods of construction available to you in the school workshop: BRAZING POP RIVETING
pop rivet Pop Riveting POP RIVETINGis quick and easy and can be done from one side of the work. Rivets are made from soft, malleable metals such as iron, brass and aluminium. Pop rivets always leave a protruding head. Pop riveting is a process used to join metals in aircraft construction and ship building. Another type of riveting that could be used for this project is snap-head riveting. pop rivet gun
Align the pre-drilled holes of the dish and the steel scroll or piece of steel in a vice. 2. Place the central pin of the pop rivet into the open jaws of the pop rivet gun. Feed the head of the rivet into the aligned holes of the steel. Flash Watch the Flash animation as it will show you how to rivet. Pop riveting
4. When the strain on the central pin becomes so great, it will fracture and a ‘pop’ noise will indicate when the pin breaks away from the rivet head. 5. Open the jaws of the pop rivet gun and allow the pin to fall out. The pop riveted joint is completed. Pop riveting 3. Slowly squeeze the jaws of the pop rivet gun closed. You will notice the head of the rivet will start to deform and the two pieces of steel are squeezed and joined together.
Recap – can you explain what is happening? Align the pre-drilled holes of the dish and the steel scroll steel in a vice Place the central pin of the pop rivet into the open jaws of the pop rivet gun. Feed the rivet into the aligned holes of the steel. Slowly squeeze the jaws of the pop rivet gun closed. Open the jaws of the pop rivet gun and allow the pin to fall out.
A gas torch and a firebrick lined brazing hearth is used for the process. The joint must be cleaned thoroughly and FLUX applied. The joint should be heated to a cherry red colour using the gas torch. The brazing rod (brass) is added to build up a strong joint. Flash Brazing Watch the Flash animation of brazing. BRAZINGis a type of hard soldering. It gives a much stronger joint than soft soldering because the solders are harder and they have a higher melting point.
3. Turn the brazing torch on. Gas is fed through the nozzle, light a match to ignite a flame. The length of the flame can be adjusted with the gas-aircontrol. The tip of the blue flame is the hottest part of the flame. Flux prevents oxidation taking place on the metal surfaces as this would prevent brazing being successful. Processes ~ Brazing 1. Clean the steel - use wire wool or emery cloth to remove any grease or dirt. 2. Arrange the pieces of steel ready to braze, on the brazing hearth. Mix the flux (a pink powder) with water to produce a thick paste. Brush the flux along the joint.
Processes ~ Brazing 4. Heat the overall joint gently to slowly raise the temperature. This causes the steel to expand slowly. Move the flame smoothly and quickly over the joint. 5. Aim the blue tip of the flame directly over the joint, moving it slowly back and forwards. The joint will eventually become red in colour.
Processes ~ Brazing 6. Using a brazing rod, gently push the tip of the rod into the joint. If the steel is hot enough, the tip will melt and run along the joint. Continue to feed the brazing rod into the joint until a brazed joint is completed. 7. Allow the steel to cool slowly in a safe place (on the hearth). If the joint is cooled quickly (such as quenching in water), the joint could crack. Be careful when handling the very hot steel!