Download
1 / 21
250 likes | 462 Views
Microsoft Access – Tutorial 3. Querying a Database a query is a question you ask about data stored in a database you tell Access what fields you need and what criteria Access should use to select the records ex. find records for employers located in a specific State or Province

E N D
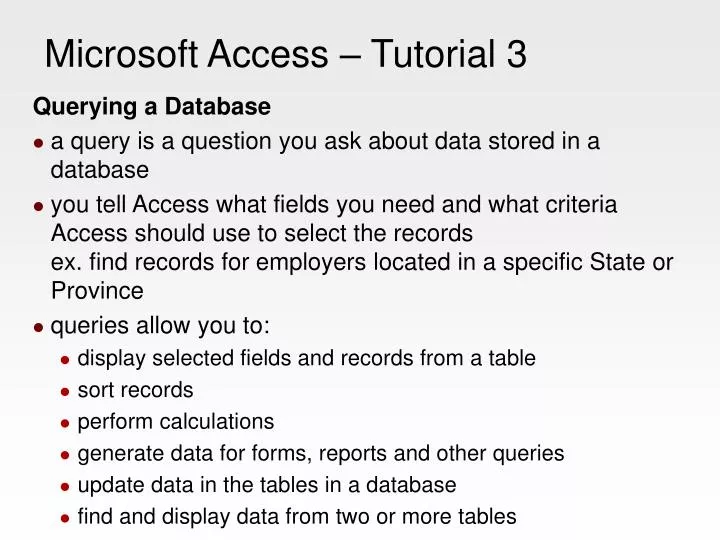
Microsoft Access – Tutorial 3 Querying a Database • a query is a question you ask about data stored in a database • you tell Access what fields you need and what criteria Access should use to select the recordsex. find records for employers located in a specific State or Province • queries allow you to: • display selected fields and records from a table • sort records • perform calculations • generate data for forms, reports and other queries • update data in the tables in a database • find and display data from two or more tables
Microsoft Access – Tutorial 3 Query by Example (QBE) • We use the Query Window in Design View to create a query • You Query by Example by giving Access an example of the information we are requesting • Access then retrieves the information we are requesting • We want to create a query to display: • employer ID • employer name • city • contact first name • contact last name • web site information • for each record in the Employer table
Microsoft Access – Tutorial 3 Query by Example (QBE) • open the Northeast database we created last week(I have included a copy in the Common Directory on the desktop) • Click Queries in the Objects bar • click the New button • make sure Design View is selected and click OK • show the Employer Table and the close the Show Table dialog box • maximize the Select Query window
Microsoft Access – Tutorial 3 Query by Example (QBE) • you will see the field list in a box entitled Employer (the table name) • you can double-click or drag fields to the design grid • in the design grid, you include the fields and record selection criteria for the information that you want to see • you can see the current results of your query at any time by View button or the Run button on the Query Design toolbar • the current results will appear in a datasheet view
Microsoft Access – Tutorial 3 Query by Example (QBE) • drag the split bar and resize the windows as you like • double-click the following fields in order: EmployerID, EmpoyerName, City, ContactFirstName, ContactLastName and Website • note the checkbox that that allows you to show or hide fields • click Run (or View (Datasheet View)) to see the results in a datasheet • click the View button to return to Design View • click the Save button on the toolbar and name the query EmployerAnalysis
Microsoft Access – Tutorial 3 Updating Data using a Query • return to the Datasheet view • indicate that The Adele Bannister House (10135) now has a website • change the Contact person for Alpine Touring Center (10152) to Mary Grant • close the Query and note that it has been added to the Queries in the Objects bar • open the Employers table and verify that the changes have been made • close the Employers table
Microsoft Access – Tutorial 3 Table Relationships • remember that Access is a relational database management system • relationships are created among tables by using common fields • this process is often called a join • when you join tables with a common field, you can extract data from them as if they were one table • the Employer and Position tables are joined with the common field EmployerID (a foreign key) • you can use a query form or report to extract selected data from each table even though the information is in two tables
Microsoft Access – Tutorial 3 One-to-Many Relationships • a one-to-many relationship exists between two tables when one record in the first table matches zero, one or many records in the related table • and when one record in the in the second table matches exactly one record in the first table • the primary table is the one table in the one-to-many relationship • this is the Employer table • the related table is the many table • this is the Position table
Microsoft Access – Tutorial 3 One-to-Many Relationships • orphaned records can be created when inconsistencies occur between tables • for example: • if an Employer ID is changed in the Employer table • if an Employer is deleted from the Employer table • if a position is added for an Employer that doesn’t exist in the Employer table
Microsoft Access – Tutorial 3 One-to-Many Relationships • Referential Integrity is a set of rules that Access uses to prevent records from being orphaned • it maintains consistency between tables when you update data • when you add a record to a related table, a matching record must already exist in the primary table • if you attempt to change the value of a primary key in the primary table, Access prevents the change if matching records exist in a related table (however, if the cascade updates option is chosen, the foreing key values will be updated automatically) • Access prevents the deletion of records in a primary table if matching records exist in a related table(if cascade deletes option is selected all records with that key will be deleted – this is not recommended)
Microsoft Access – Tutorial 3 Defining Relationships • you can define relationships between tables using the Relationships window • click the Relationships button on the Database toolbar • add Employer and AvailablePositions and close the Show Table dialog box • lengthen and widen each window to show all fields • click and drag EmployerID from the Employer Table to EmployerID in the AvailablePositions table • the Edit Relationships window will appear • the Primary Table, Related Table and Common Field will be visible
Microsoft Access – Tutorial 3 Defining Relationships • check Enforce Referential Integrity • note that the two Cascade options become available • check Cascade Update Related Fields(remember that it is not recommended to check the Cascade Delete Related Records as you may inadvertently delete records) • click create and note the join line that appears and the symbols on it • now create a one-to-many relationship between the NAICS table and Employer Table with NAICS code as the common field (foreign key) • click the Save button and Close the window
Microsoft Access – Tutorial 3 Multi-Table Queries • now that we have created Relationships among (joined) our tables, we can query them as one • create a new query in design view • add the Employer and PositionsAvailable tables • create a query in the following order: • EmployerName • City • StateProv • Openings • PositionTitle • StartDate • EndDate • run it and save the query as EmployerPositions
Microsoft Access – Tutorial 3 Sorting Data in a Query • sorting is rearranging records in a specified order or sequence • open the EmployerPositions query in datasheet view • select the first record in the Employer Name field and use the sort buttons to sort alphabetically • to sort by more than one field go to Design View • select the entire column for Openings • click and drag it so that it is the last field (after EndDate) • use the Sort field to sort PositionTitle Ascending • sort Openings Descending • run the query • within groups of fields with the same Position Title, the record – save the query
Microsoft Access – Tutorial 3 Filtering Data in a Query • you can filter query results using the Filter by Selection button • double-click the word clerk in one of the Position Title records • click the Filter by Selection button and you will see only results for different kinds of clerks • click the remove filter button to turn off the filter • filter results for New Hampshire (NH)
Microsoft Access – Tutorial 3 Defining Record Selection Criteria • you can specify a condition which is a criteria or rule that tells Access which records to display • we will create query by using wizard using a condition • click create query by using wizard and make sure the Table: AvailablePositions is selected • add all the fields by clicking >> • remove both PositionID and EmployerID from the Selected Fields list box • to add fields from another table after the current set of fields, select Openings • now add EmployerName, StateProv, ContactFirstName, ContactLastName and Phone from the Employer Table
Microsoft Access – Tutorial 3 Defining Record Selection Criteria • click the Next button • make sure the Detail radio button is selected and click Next again • name the Query July1Positions and click the Modify the Query Design radio button • in the StartDate Criteria type 07/01/2006 • Access adds # signs before and after the criteria • run and save the query • only positions with start dates of July 1st will be displayed
Microsoft Access – Tutorial 3 Formatting the Appearance of the sheet • select all the records • Format>Font • change the size of the fonts to 8 • double click between columns to resize them
Microsoft Access – Tutorial 3 Setting Range Criteria • open the July1Positions query in Design View • remove the Start Date criteria • set the Wage criteria >=17 • run the query and Save it As HighWageAmounts
Microsoft Access – Tutorial 3 Using Multiple Selection Criteria with the And operator • open the July1Positions query in Design View • add PE as criteria for StateProv • run the Query and you’ll see results that match both criteria • close and save the query • right click on the Query July1Positions in the Query window • rename it PEJuly1Positions
Microsoft Access – Tutorial 3 Using Multiple Selection Criteria with the Or operator • create a new query in Design view • use the Employer and AvailablePositions tables and add the following fields: EmployerName, City, PositionTitle, HoursPerWeek, and Experience • set the HoursPerWeek criteria to <30 • in order to select records in which either (not both) of the conditions is met type Yes in the or: field • run the query • sort it alphabetically ascending by Employer Name • Save it as HoursorExperience