Download
1 / 10
100 likes | 328 Views
Slab Project. You will learn how to make a Slab Container with character. You will learn to male Chinese Bronze Vessels out of slab-built clay ceramic techniques. The lesson incorporates art history, aesthetics, and criticism with hands-on activity.

E N D
Slab Project You will learn how to make a Slab Container with character.
You will learn to male Chinese Bronze Vessels out of slab-built clay ceramic techniques. • The lesson incorporates art history, aesthetics, and criticism with hands-on activity. • The lesson focuses on various ceramic techniques and important composition and design elements essential to creating a carved ceramic box in the style of the Chinese Bronze Vessel; fundamental technical skills for using specially glazes and finishing products to create unique surfaces; and self-expression Learning objectives and Goals
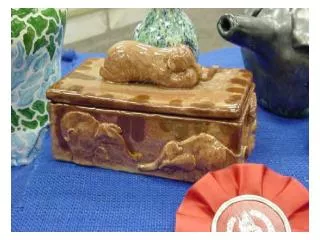
Chinese Bronze Vessels were used during the Shang and Zhou periods in ancestral rituals. • Ancestors, it was believed, could intercede on behalf of the living, provided they were honored and respected. • The bronze vessels were kept in ancestral halls and used during a variety of feasts and banquets. • Most bronze vessels were used for food or to heat or cool a millet-based wine. • Others served as water basins or jugs. Wine vessels dominated during the Shang, but ritual changes in the middle of the Western Zhou period resulted in a shift toward food vessels. Background and Preparation
Step 1: Draw the shape and design of the vessel you would like to create. Vessels should be approximately 10” in height. • I must approve the design to make sure it is feasible. • Step 2: Make patterns from newspaper for vessel. • I’ll check patterns to make sure the proper size for project. Instructions
Step 3: Roll a slab to approximately 3/8 – inches thick. Using template or patterns, cut the bottom and sides of vessels. • Step 4: Layer slabs between approximately 20 sheets of newspaper, wrap paper, and place in plastic to store overnight. • The newspaper pulls enough moisture out of the clay so that it is firm enough to build the form. Instructions
Step 5: Put the pieces together by scoring the edges and using a slip to seal the edges. • Be sure the sealed edge is smoothed with a damp sponge. Instructions
Step 6: Make legs and tops for your containers using slab techniques. • Use the slip to attach legs and handles. • When not working on your project, keep them loosely covered in plastic so they do not dry out and become hard. Instructions
Step 7: When you completed building your vessel, draw the design you would like to carve on a piece of paper and have it approved by the teacher. • Use Chinese border designs and other motifs. • Create complex, intricate, and interesting designs. • Stay away from hearts, stars, rainbows, and sun designs. • Step 8: Transfer design to vessel Instructions
Step 9: Carve design into vessel. Craving is done with variety of ceramic tools. Carve your designs carefully to different depths without cutting through the clay. • Step 10: When Design is complete, allow pieces to dry slowly to avoid cracking. Instructions
Step 11: When thoroughly dry, Bisque Fire • Step 12: Textured Alligator glazes combined with Rub ‘n Buff create a “faux” ancient bronze finish. Apply three coats of Glaze to the bisquedvessel. Fire cone • Step 13: When the piece is fired and cooled, apply Rub ‘n Buff to the vessels with a soft cloth and gently buff to metallic luster. • Step 14: Decorate with a variety of finishes: under glazes plus Rub ‘n Buff and Acrylic paint. Instructions