Download
1 / 19
190 likes | 205 Views
Explore the effect of particle size on drug diffusion rates through gelatin using dyes, mimicking drug transport in tissues. Measure and analyze dye penetration to understand drug delivery better.

E N D
Gel Diffusion Experiment STEM ED/CHM Nanotechnology 2010
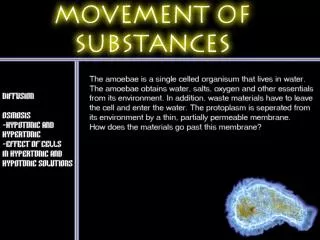
Background • The delivery of nanoscale medicines to cells in the human body requires diffusion through tissues, organs and cell membranes • This activity will explore the affect of particle size on diffusion rates • Understanding molecular diffusion through human tissues is important for designing effective drug delivery systems
Introduction • Measuring the diffusion of dyes in gelatin illustrates the transport of drugs in the extra-vascular space • Gelatin is a biological polymeric material with similar properties to the connective extracellular matrix in tumor tissue • Dyes are similar in molecular weight and transport properties to chemotherapeutics • Their concentration can be easily determined simply by color intensity
Experiment Overview • The diffusion of the dyes will be compared to demonstrate the effect of molecular weight on transport in tumors • Gelatin will be formed into cylindrical shapes in Petri dishes and colored solutions will be added to the outer ring • Over several days the distance that the dyes and particles penetrate into the gelatin cylinders will be measured
Collect materials Petri Dishes Food Dye Syringes Paper Cups Gelatin Crisco/Petroleum Jelly Baking Pan Prepare Gel Cast Determine water needed for proper coverage in pan Dissolve Gel into warm water (2Pks/Cup) Microwave for 90 Sec. Pour into pan and let set. Set-up
Gel Cast Cut circles in pan w/metal cookie cutter Remove excess Move Gel Cast from pan and transfer to Petri Dish Smooth side Down! Centered as best can Adding Dye Mix dyes in cups Inject one color/dish No dye on top of Cast No seepage under cast Do not move dishes after dye inserted Setup
Collect Data and Observations • Take Digital photos • Same time each day and at same interval • 8:00 AM and again at 4:00 PM each day • From approximately same height and angle • Helps to have a good background under the Petri dish
Data Collection3 Food Dyes Start 4 hours Diffusion is first visible
Questions to consider • Are the results expected? • Which dyes penetrated better? • Does that make sense? • Conversely, does fast diffusion mean greater or poorer retention? • How could diffusion and retention be optimized? • Is this the intuitive result?
Gel Diffusion Analysis Nanotechnology Institute 2010
Image Analysis Method 1: • Measure the dye penetration distance each day using a ruler. • Use graph paper to plot distance vs. time • The rate is the slope of the line. During the relatively short diffusion time (as in this lab), the relationship between distance and time is somewhat linear. A line of best fit may not have a y-intercept of 0 due to error.
Image Analysis • Group Pictures by Color in date/time order • Create a data table (paper or Excel) 6-1-0600 6-1-1800 6-2-0600 6-2-1800
Pick one color to start Load the first morning shot Windows Photo Gallery or other image program
Using the magnifier expand the photo Using a mm ruler, measure from the edge of the gel cast to the inner most edge of the diffusion for each color.
Enter diffusion distances for each color and time period in the appropriate column of your data table
Important Details • When mixing dyes, red and yellow can be fairly concentrated. They tend to fade in the gel. The blue should not be concentrated- it should be strong, but translucent. • Inject dye towards the outside of the petri dish, not towards the gel. Avoid getting dye on top or underneath gel. • Try to use an even number of millimeters for the volume of dye. • The initial level of dye should not exceed ¾ of the way up the gel. • Photograph the gel: same time, same distance, same sequence. Keep camera parallel to gel (do not tilt) to avoid parallax.