Download
1 / 41
410 likes | 583 Views
Linux Network Setup. Introduction. Linux can implement different protocols for networking TCP/IP the most common one We will look at how to setup a simple linux network using Fedora Core 6. Network topology – simple configuration. 216.220.99.1. Cable modem. eth0 = 216.220.99.3.

E N D
Introduction • Linux can implement different protocols for networking • TCP/IP the most common one • We will look at how to setup a simple linux network using Fedora Core 6
Network topology – simple configuration 216.220.99.1 Cable modem eth0 = 216.220.99.3 Firewall/Router eth1 = 192.168.1.1 Hub/Switch eth0 = 192.168.1.2 eth0 = 192.168.1.4 Server/Gateway Workstation 1 Workstation 2 eth0 = 192.168.1.3
Network Components • Firewall/router – a modest computer with two network interfaces can easily become a firewall/router if there is no such device available • Hub/Switch – a physical device used to extend the network • Server – a computer that will be running FC6 and implement DNS, web server and database server. • Workstation – a computer that will be running FC6 • Except the hub, everything else can be implemented using virtual machines
FC6 installation • Partitioning the hard drive: • Can be done either manually or automatically(by the installation script) • For the beginning the best bet is to let the script do the work for you • On the firewall and the server we will install only the packages that we need. • On the workstations we will install everything
Installing the Firewall • Use FC6 DVD and proceed with the installation. • When prompted for network setup • choose to set up hostname manually • Type in the name firewall.mynetwork.com • Edit the network devices • Input the network address for eth0 – 216.220.99.3 • If the script shows a configuration option for eth1, edit that one too, and entered the network address for eth1 – 192.168.1.1 – If it does not you will have to configure this interface manually after the system is started • In the Miscellaneous Settings area enter • The gateway address: 192.168.1.2 (this is the address of the server) • The Primary DNS: 192.168.1.2 (this is the address of the server)
Installing the Firewall – cont. • All Fedora Core installations include the following network services: • centralized logging through syslog • email through SMTP (Simple Mail Transfer Protocol) • network file sharing through NFS (Network File System) • remote access through SSH (Secure SHell) • resource advertising through mDNS (multicast DNS) • The default installation also provides: • network file transfer through HTTP (HyperText Transfer Protocol) • printing through CUPS (Common UNIX Printing System) • remote desktop access through VNC (Virtual Network Computing)
Installing the Firewall – cont. • We will choose a minimal installation – packages can be added off the DVD later on if we need to • The minimal installation should include • DNS • Iptables • You do not have to worry about the dependencies since the installation script checks for them
Installing the Server • The installation of the server is similar to that of the firewall except that we can choose to install more packages, even a complete installation. • When installing the network, follow the same steps as for the firewall. The IP address of the server is 192.168.1.2
Installing the Server (cont.) • If you want to be conservative – select only the packages that you need to run DNS, Apache and Mysql – you do not have to worry about the dependencies since the installation script checks for them • Otherwise, install everything – be aware that install everything does not mean install every single package on the DVD
Installing the Workstations • The installation is similar to the server and the firewall
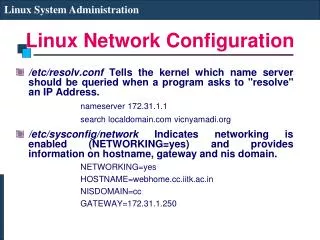
TCP/IP Network Configuration files • /etc/resolv.conf - host name resolver configuration file search name-of-domain.com - Name of your domain or ISP's domain if using their name server nameserver XXX.XXX.XXX.XXX - IP address of primary name server nameserver XXX.XXX.XXX.XXX - IP address of secondary name server • /etc/hosts - locally resolve node names to IP addresses 127.0.0.1 your-node-name.your-domain.com localhost.localdomain localhost XXX.XXX.XXX.XXX node-name – enter the full qualified network name first then the alias
TCP/IP Network Configuration files (cont.) • /etc/nsswitch.conf - System Databases and Name Service Switch configuration file hosts: files dns nisplus nis • It tells Linux to first resolve a host name by looking at the local hosts file(/etc/hosts), then if the name is not found look to your DNS server as defined by /etc/resolv.conf and if not found there look to your NIS server
TCP/IP Network Configuration files (cont.) • /etc/sysconfig/network • Red Hat network configuration file used by the system during the boot process. • /etc/sysconfig/network-scripts/ifcfg-eth0 • Configuration settings for your first ethernet port (0). Your second port is eth1. • /etc/modules.conf alias eth0 eepro100 • Modules for other devices on the system will also be listed. This tells the kernel which device driver to use if configured as a loadable module.
Fedora Network GUI Configuration Tools - TCP/IP ethernet configuration • Network configuration: • /usr/sbin/system-config-network • Text console configuration tool: • /usr/sbin/system-config-network-tui
Fedora Network GUI Configuration Tools – Gnome Desktop • Gnome Desktop Network Configuration • /usr/bin/gnome-network-preferences • Proxy configuration. Choose one of three options: 1. Direct internet connection 2. Manual proxy configuration (specify proxy and port) 3. Automatic proxy configuration (give URL)
Assigning an IP address - Static IP address assignment • Command Line: • ifconfig eth0 192.168.1.1 netmask 255.255.255.0 broadcast 192.168.1.255 • Fedora GUI tools: • /usr/bin/neat Gnome GUI network administration tool. Handles all interfaces. Configure for Static IP or DHCP client. • Fedora Console tools: • /usr/sbin/system-config-network-tui (Text User Interface)
More Network Configuration • Directly edit configuration files/scripts • The ifconfig command does NOT store this information permanently. Upon reboot this information is lost. (Manually add the commands to the end of the file /etc/rc.d/rc.local to execute them upon boot.) The commands netcfg and netconfig make permanent changes to system network configuration files located in /etc/sysconfig/network-scripts/, so that this information is retained.
Fedora Core IP Configuration Files • /etc/sysconfig/network • Static IP address Configuration: (Configure gateway address) NETWORKING=yes HOSTNAME=my-hostname - Hostname is defined here and by command hostname FORWARD_IPV4=true - True for NAT firewall gateways and linux routers. False for everyone else - desktops and servers. GATEWAY="XXX.XXX.XXX.YYY" - Used if your network is connected to another network or the internet. Static IP configuration. Gateway not defined here for DHCP client.
Fedora Core IP Configuration Files (cont.) • DHCP client configuration NETWORKING=yes HOSTNAME=my-hostname - Hostname is defined here and by command hostname • (Gateway is assigned by DHCP server.)
Fedora Core IP Configuration Files (cont.) • /etc/sysconfig/network-scripts/ifcfg-eth0 • This file used by the command scripts ifup and ifdown • Static IP address configuration: DEVICE=eth0 BOOTPROTO=static BROADCAST=XXX.XXX.XXX.255 IPADDR=XXX.XXX.XXX.XXX NETMASK=255.255.255.0 NETWORK=XXX.XXX.XXX.0 ONBOOT=yes - Will activate upon system boot TYPE=Ethernet HWADDR=XX:XX:XX:XX:XX:XX GATEWAY=XXX.XXX.XXX.XXX
Fedora Core IP Configuration Files (cont.) • DHCP client configuration DEVICE=eth0 ONBOOT=yes BOOTPROTO=dhcp IPV6INIT=no USERCTL=no PEERDNS=yes TYPE=Ethernet HWADDR=XX:XX:XX:XX:XX:XX • Used by script /etc/sysconfig/network-scripts/ifup to bring the various network interfaces on-line • To disable DHCP change BOOTPROTO=dhcp to BOOTPROTO=none • In order for updated information in any of these files to take effect, one must issue the command: service network restart (or: /etc/rc.d/init.d/network restart)
Changing the host name • This is a three step process: 1. Issue the command: hostname new-host-name 2. Change network configuration file: /etc/sysconfig/network Edit entry: HOSTNAME=new-host-name 3. Restart systems which relied on the hostname (or reboot): * Restart network services: service network restart (or: /etc/rc.d/init.d/network restart) * Restart desktop: o Bring down system to console mode: init 3 o Bring up X-Windows: init 5 • One may also want to check the file /etc/hosts for an entry using the system name which allows the system to be self aware
Network IP aliasing • Assign more than one IP address to one ethernet card: ifconfig eth0 XXX.XXX.XXX.XXX netmask 255.255.255.0 broadcast XXX.XXX.XXX.255 ifconfig eth0:0 192.168.1.1 netmask 255.255.255.0 broadcast 192.168.1.255 ifconfig eth0:1 192.168.1.4 netmask 255.255.255.0 broadcast 192.168.1.255 route add -host XXX.XXX.XXX.XXX dev eth0 route add -host 192.168.1.1 dev eth0 route add -host 192.168.1.4 dev eth0 • n this example 0 and 1 are aliases in addition to the regular eth0
Network IP aliasing (cont.) • The result of the ifconfig command: eth0 Link encap:Ethernet HWaddr 00:10:4C:25:7A:3F inet addr:XXX.XXX.XXX.XXX Bcast:XXX.XXX.XXX.255 Mask:255.255.255.0 UP BROADCAST RUNNING MULTICAST MTU:1500 Metric:1 RX packets:14218 errors:0 dropped:0 overruns:0 frame:0 TX packets:1362 errors:0 dropped:0 overruns:0 carrier:0 collisions:1 txqueuelen:100 Interrupt:5 Base address:0xe400 eth0:0 Link encap:Ethernet HWaddr 00:10:4C:25:7A:3F inet addr:192.168.10.12 Bcast:192.168.10.255 Mask:255.255.255.0 UP BROADCAST RUNNING MULTICAST MTU:1500 Metric:1 Interrupt:5 Base address:0xe400 eth0:1 Link encap:Ethernet HWaddr 00:10:4C:25:7A:3F inet addr:192.168.10.14 Bcast:192.168.10.255 Mask:255.255.255.0 UP BROADCAST RUNNING MULTICAST MTU:1500 Metric:1 Interrupt:5 Base address:0xe400
Network IP aliasing (cont.) • Config file: /etc/sysconfig/network-scripts/ifcfg-eth0:0 DEVICE=eth0:0 ONBOOT=yes BOOTPROTO=static BROADCAST=192.168.10.255 IPADDR=192.168.10.12 NETMASK=255.255.255.0 NETWORK=192.168.10.0 ONBOOT=yes • Aliases can also be shut down independently. i.e.: ifdown eth0:0
Activating and De-Activating your NIC • Activate: /sbin/ifup eth0 (Also: ifconfig eth0 up - Note: Even if no IP address is assigned you can listen.) • De-Activate: /sbin/ifdown eth0 (Also: ifconfig eth0 down) • These scripts use the scripts and NIC config files in /etc/sysconfig/network-scripts/
GUI Interface control/configuration • /usr/bin/system-control-network
Adding a network interface card (NIC) • It can be permanently added to /etc/modules.conf alias eth0 3c59x insmod -v 3c59x (For a 3Com ethernet card) • Fedora Core has a hardware detection tool called kudzu which will detect any new hardware added to the system and will try to install it and configure it(with the user’s help)
Adding a network interface card (NIC) (cont.) • Define network parameters in configuration files /etc/sysconfig/network-scripts/ifcfg-eth1 DEVICE=eth1 BOOTPROTO=static IPADDR=192.168.1.1 NETMASK=255.255.255.0 GATEWAY=XXX.XXX.XXX.XXX HOSTNAME=firewall.mydomain.com DOMAIN=mydomain.com • Special routing information may be specified, if necessary, in the file /etc/sysconfig/static-routes
Adding a network interface card (NIC) (cont.) • Define network parameters using Unix command line interface: • Define IP address: ifconfig eth0 216.220.99.3 netmask 255.255.255.0 broadcast 216.220.99.255 ifconfig eth1 192.168.1.1 netmask 255.255.255.0 broadcast 192.168.1.255 • If necessary, define route with with the route command: • Examples: route add default gw XXX.XXX.XXX.XXX dev eth0 route add -net XXX.XXX.XXX.0 netmask 255.255.255.0 gw XXX.XXX.XXX.XXX dev eth0 • XXX.XXX.XXX.XXX is the gateway to the internet as defined by your ISP or network operator • If you make a mistake just repeat the route command substituting "del" in place of "add"
Routes • route - show / manipulate the IP routing table (Static route) • Examples: Show routing table: route -e Access individual computer host specified via network interface card eth1: route add -host 192.168.1.2 eth1 Access ISP network identified by the network address and netmask using network interface card eth0: route add -net 216.220.99.0 netmask 255.255.255.0 gw 216.220.99.254 eth0 Conversly: route del -net 216.220.99.0 netmask 255.255.255.0 gw 216.220.99.254 eth0 Specify default gateway to use to access remote network via network interface card eth0: route add default gw 216.220.99.254 eth0 (Gateway can also be defined in /etc/sysconfig/network) Specify two gateways for two network destinations: (i.e. one external, one internal private network. Two routers/gateways will be specified.) Add internet gateway as before: route add default gw 216.220.99.254 eth0 Add second private network: route add -net 192.168.1.0 netmask 255.0.0.0 gw 192.168.1.2 eth1 routed - network routing daemon. Uses RIP protocol to update routing table. ipx_route - show / manipulate the IPX routing table - IPX is the Novell networking protocol (Not typically used unless your office has Novell servers) ifuser - Identify destinations routed to a particular network interface.
Domain Name Server (DNS) configuration - Primary server (master) • File: /etc/named.conf options { version "Bind"; - Don't disclose real version to hackers directory "/var/named"; allow-transfer { XXX.XXX.XXX.XXX; }; - IP address of secondary DNS recursion no; fetch-glue no; - Bind 8 only! Not used by version 9 }; zone "your-domain.com"{ type master; file "named.your-domain.com"; notify yes; }; zone "0.0.127.in-addr.arpa"{ type master; file "named.local"; allow-update { none; }; };
Domain Name Server (DNS) configuration - Primary server (master) • File: /var/named/named.mydomain.com
$TTL 604800 - Bind 9 (and some of the later versions of Bind 8) requires $TTL statement. Measured in seconds. This value is 7 days. mydomain.com. IN SOA server.mydomain.com. hostmaster.mydomain.com. ( 2000021600 ; serial - Many people use year+month+day+integer as a system. Never greater than 2147483647 for a 32 bit processor. 86400 ; refresh - How often secondary servers (in seconds) should check in for changes in serial number. (86400 sec = 24 hrs) 7200 ; retry - How long secondary server should wait for a retry if contact failed. 1209600 ; expire - Secondary server to purge info after this length of time. 604800 ) ; default_ttl - How long data is held in cache by remote servers. IN A 192.168.1.2 - Note that this is the default IP address of the domain. I put the web server IP address here so that domain.com points to the same servers as www.domain.com ; ; Name servers for the domain ; IN NS server.mydomain.com. ; ; Mail server for domain ; IN MX 5 server - Identify "mail" as the node handling mail for the domain. Do NOT specify an IP address! ; ; Nodes in domain ; workstation1 IN A 192.168.1.3 - Note that this is the IP address of workstation1 workstation2 IN A 192.168.1.4 - Note that this is the IP address of workstation1 server IN A 192.168.1.2 - Optional: For hosting your own primary name server. Note that this is the IP address of server firewall IN A 192.168.1.1 - this is the IP address of the firewall IN MX 5 192.168.1.2 - Identify the IP address for mail server named server
Domain Name Server (DNS) configuration - Secondary server (slave) • File: named.conf options { version "Bind"; - Don't disclose real version to hackers directory "/var/named"; allow-transfer { none; }; recursion no; fetch-glue no; - Bind 8 only! Not used by version 9 }; zone "your-domain.com"{ type slave; file "named.mydomain.com"; - Specify slaves/named.your-domain.com for RHEL4 chrooted bind masters { 192.168.1.2; }; - IP address of primary DNS }; zone "0.0.127.in-addr.arpa"{ type master; file "named.local"; };
DNS GUI configuration • /usr/bin/system-config-bind
DNS • Most modern Linux distributions default to a "chrooted" installation. • This technique runs the Bind name service with a view of the filesystem which changes the definition of the root directory "/" to a directory in which Bind will operate. i.e. /var/named/chroot. • The latest Fedora bind updates run the named as user "named" to avoid a lot of earlier hacker exploits. • To chroot the process is to create an even more secure environment by limiting the view of the system that the process can access. • The process is limited to the chrooted directory assigned
Chrooted DNS configuration • Directory: /var/named/chroot • Configuration files: /var/named/chroot/etc • devices used by bind: /var/named/chroot/dev • /dev/null • /dev/random • /dev/zero • Zone files and configuration information: /var/named/chroot/var
More DNS HOWTO • http://langfeldt.net/DNS-HOWTO/BIND-9/