Download
1 / 10
100 likes | 116 Views
Learn animation fundamentals step by step, from creating a new project to drawing detailed movements for realistic animations using ActionScript 3.0. Explore how to animate a dog walking and implement creative techniques to make your animations smooth and engaging. Dive into the world of animation with this informative PowerPoint guide!

E N D
Animation 101 By: Lauren Brush
Getting Started • The first thing to remember when starting an animation is that it can get extremely frustrating and tedious at times, but don’t worry! This PowerPoint will help you understand at least the basic steps and concepts. Now let’s get started…
Creating a new project Click “ActionScript 3.0” to create your first project and it will bring you to this screen…
Now that you’re in your first project, you will want to draw your main screen, the main stage for the rest of your animation. To start you’re drawing, click the paint or pencil tools in your right tool bar. Now draw your starting screen like this one to the right.
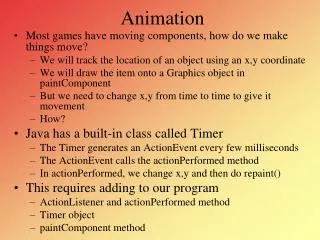
In order to make your animation look smooth, and save a lot of time, click the F6 button to copy your last screen to the next slide. Now move your ball accordingly to show movement on your screen. Although the ball doesn’t appear to be moving very far in each screen, when played; the animation looks smooth and believable. Make sure to use the shortcut F6 key to copy each frame!
On to the dog animation! First, find a dog online that looks like it would be easy to trace. Paste it into your drawing and trace every detail. Now you will learn to take each individual part to make it look like your dog is walking!
Then take each component of your main screen and put them into different layers using this button. Then when you click on each layer it will show which shapes it includes. Continued… When you finish drawing your dog, you will need to use the library on the right side of your screen. Using the button in your right tool bar, draw around individual parts and add each piece to your library like this. Be sure to name each part accordingly! Now when you move each leg or tail, more than one piece can move or rotate at a time!
Rotating individual parts • Now using this tool click on different parts of the body and rotate them to show movement. The white circle is the place that the part will rotate around, move the circle to where a normal leg or tail would move from. Where an actual leg would rotate around Here is the motion to use when move a back leg, now you must do this for each part of the body when the dog walks…
In 5 slides your dog has only made a few steps. Although this is tedious work, you’ll get the hang of it in no time! You will use the same method you used in the first assignment to do your name and the bouncy ball. Starting your name in the very right of the screen and slowly having it slide across throughout the entire animation.