Download
1 / 14
140 likes | 151 Views
Learn how to create a dynamic pizza ordering form with radio buttons, drop-down boxes, checkboxes, date and time selectors, text areas, and text fields using Rails controller. This comprehensive guide covers form creation, user input handling, and response page customization.

E N D
Forms Carol Wolf Computer Science
The Controller • To create a controller, type • rails generate controller pizza index order • This creates a controller called pizza_controller.rb. • Two routes in routes.rb: • “get pizza/index” and • “get pizza/order”. • The second one will have to be changed to a post. • “post pizza/order” • Two ERB files in views/pizza • index.html.erb • order.html.erb
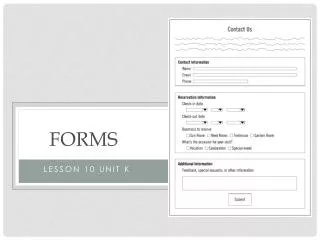
Example: Pizzeria • An order form for pizza will be used as an example to show different kinds of buttons. • radio buttons • select drop-down boxes • check boxes • date and time boxes • text areas • text fields • Each will have a place in the form on the index page, code in the controller to access the data and an output section on the response page, order.html.erb.
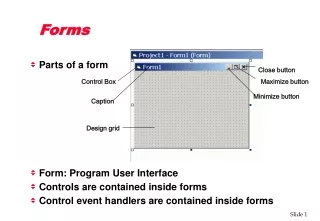
The Basic Form • The basic form has a name and action. The method is determined by the corresponding route in routes.rb. • It has a number of places for inputting data and a submit button. • The following comes from a pizzeria example. <%= form_for :pizza, :url => {:action => :order} do |form| %> … <p> <%= form.submit "Select your pizza order." %> </p> <% end %>
Radio Buttons • Radio buttons are used when only one answer may be given. • The erb code in the index file: <%= form.label :crust %>: <%= form.radio_button :crust, Plain White' %> <%= form.label :plain_white %> <%= form.radio_button :crust, 'Whole Wheat' %> <%= form.label :whole_wheat %> • The controller code that receives the data: @params = params[:pizza] @crust = @params[:crust] • The output code on the response page: <h3>The crust is <%= @crust %>.</h3>
Select Drop-down Boxes • The index page code: <%= form.label :size %>: <%= form.select :size, {:Small => "small", :Large => "large"} %> • The controller code: @size = @params[:size] • The response page code: <h3>The size is <%= @size %>.</h3> • The name of the parameter is size. • The values that will be stored in the drop down box are listed in a hash. The one selected will be sent in the parameters hash.
Check Boxes – Index page code • Check boxes allow the user to make several choices. <%= form.label 'toppings' %>: <%= form.check_box :mushrooms %> <%= form.label :mushrooms %> <%= form.check_box :pepperoni %> <%= form.label :pepperoni %> <%= form.check_box :vegetables %> <%= form.label :vegetables %>
Check Boxes – Controller code @toppings = Array.new if @params[:mushrooms] == "1" @toppings << "Mushrooms" end if @params[:pepperoni] == "1" @toppings << "Pepperoni" end if @params[:vegetables] == "1" @toppings << "Vegetables" end
Check Boxes – Response page code <h3>The toppings you chose are: <ul> <% @toppings.each do |topping| %> <li><%= topping %></li> <% end %> </ul> </h3>
Date and Time Boxes • The date and time boxes provide drop-down boxes with all the months, about 10 years, 31 days, 24 hours and 60 minutes. • Index file code: <%= form.label :delivery_date %> <%= form.date_select(:delivery_date) %> <%= form.label :delivery_time %>: <%= form.time_select :delivery_time %> • Controller code: @delivery_year = @params["delivery_date(1i)"] @delivery_month = @params["delivery_date(2i)"] @delivery_day = @params["delivery_date(3i)"] @delivery_hour = @params["delivery_time(4i)"] @delivery_minute = @params["delivery_time(5i)"] • Response page code: The delivery date is <%= @delivery_month %>/<%= @delivery_day %>/<%= @delivery_year %>, and the delivery time is <%= @delivery_hour %>:<%= @delivery_minute %>.
Text areas • Text areas are used to collect a section of text. They are sent to the controller as a string with lines separated by “\r\n”. • The index code: <%= form.label :address, :style => 'float: left' %> <%= form.text_area :address, :rows => 3, :cols => 40 %> • The controller code: @address = @params[:address] • The response page code: <h3>The address is <%= @address %>.</h3>
Text Fields • Text fields are probably used the most. The consist of a single box where users can type in data. • The index page code: <%= form.label :telephone %> <%= form.text_field :telephone %> • The controller code: @telephone = @params[:telephone] • The response page code: <h3>The telephone number is <%= @telephone %>.</h3> • Link to return to index page: <%= link_to “Back” pizza_order_path %>