Download
1 / 2
20 likes | 27 Views
EXACLEAR is ideally suited for both chairside and laboratory use, the injection moulding technique and clear stent fabrication for creation of provisional. Visit: www.gcindiadental.com

E N D
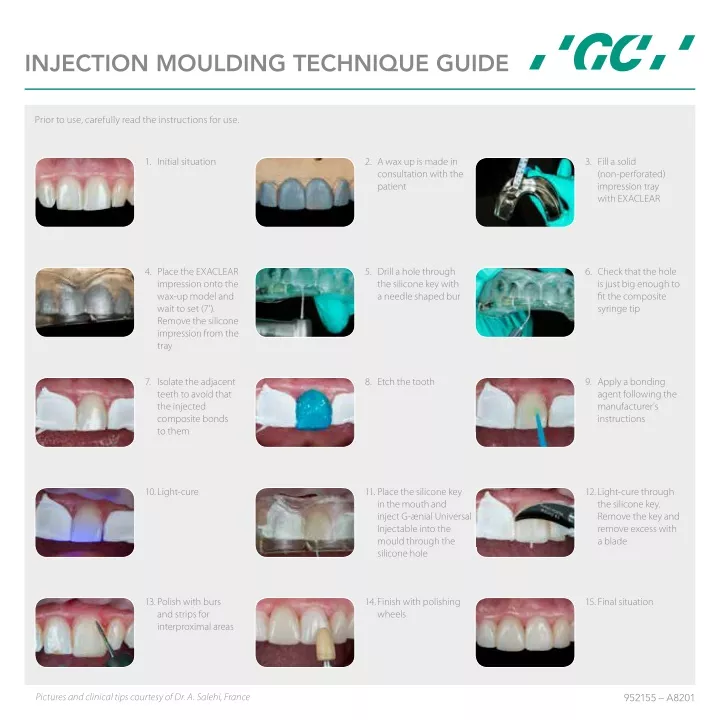
INJECTION MOULDING TECHNIQUE GUIDE Prior to use, carefully read the instructions for use. 3. Fill a solid (non-perforated) impression tray with EXACLEAR 1. Initial situation 2. A wax up is made in consultation with the patient 6. Check that the hole is just big enough to fit the composite syringe tip 5. Drill a hole through the silicone key with a needle shaped bur 4. Place the EXACLEAR impression onto the wax-up model and wait to set (7’). Remove the silicone impression from the tray 7. Isolate the adjacent teeth to avoid that the injected composite bonds to them 8. Etch the tooth 9. Apply a bonding agent following the manufacturer’s instructions 12. Light-cure through the silicone key. Remove the key and remove excess with a blade 10. Light-cure 11. Place the silicone key in the mouth and inject G-ænial Universal Injectable into the mould through the silicone hole 14. Finish with polishing wheels 15. Final situation 13. Polish with burs and strips for interproximal areas Pictures and clinical tips courtesy of Dr. A. Salehi, France 952155 – A8201
INJECTION MOULDING TECHNIQUE GUIDE Recommended as a simple procedure for: • Complex morphologies • Wear cases • Challenging aesthetic cases • Re-establishment of the occlusal vertical dimension Clinical Tips • Make sure that the silicone key is 3-4 mm thick around the preparations. • Take care not to press too hard on the silicone, so that all incisal edges are covered with a sufficiently thick layer. This will avoid potential tearing or deformation of the key. • Use a needle shaped bur to make the hole in the EXACLEAR impression. • Position the hole at the middle of the incisal edge of each tooth, half-way between the distal & mesial borders, and make it as small as possible but large enough to enable the tip of the composite syringe to pass through easily and fully. • Take care not to damage the vestibular part inside the silicone key with the bur, to maintain the information of surface texture that is created during the wax-up. • Make another hole close to the cervical area to allow for air to come out and avoid bubbles. It will also help to have less overflow. • Use a rubber dam whenever possible to achieve perfect isolation. In a posterior case total isolation with rubber dam should be achievable, as the margins are mostly located above the gingival level. • Trim the silicone key cervically to allow proper seating without any tension between the key and the rubber dam. • The silicone key should always extend far enough to include at least two teeth distally from the teeth to be treated on both sides. This ensures stability of the key when it is positioned in the mouth and a proper reproduction of the aesthetic project for a more predictable final result. • During the injection, a little bit of overflow is needed to ensure that all small voids at the margins and interproximal spaces are filled. • For excess removal use a blade #12. z O MA 3 69 EN 05/19