Download
1 / 22
330 likes | 734 Views
Image processing in Spectral Domain Optical Coherence Tomography (SD-OCT). Vasilios Aris Morikis Dan DeLahunta Dr. Hyle Park, Ph.D. Overview. Optical Coherence Tomography An Overview of OCT System Setup Sample Arm Galvanometer Project Overview Methodology Results Conclusions.

E N D
Image processing in Spectral Domain Optical Coherence Tomography (SD-OCT) Vasilios Aris Morikis Dan DeLahunta Dr. Hyle Park, Ph.D.
Overview • Optical Coherence Tomography • An Overview of OCT • System Setup • Sample Arm • Galvanometer • Project Overview • Methodology • Results • Conclusions
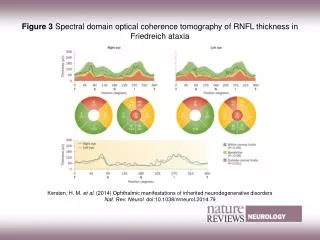
Overview of OCT • High resolution sub-surface imaging • Non-invasive • Not harmful to subject • Potential in many fields • Ophthalmology (RNFL thickness, AMD) • Dermatology (photoaging, BCC detection) • Cardiology (assessment of vulnerable plaques) • Gastroenterology (Barrett’s esophagus)
Optical Coherence Tomography • Time delay between reflected light is measured to determine depth of the reflecting structure • Due to the short time delays between signals OCT must use an interferometer to detect the reflected light. • Interference fringes are formed when the sample and reference arms are within a small range. • A depth profile is formed by the detection of the interference pattern between the reference and sample arm as the reference arm is scanned.
Optical Coherence Tomography • The intensity of the depth profile is encoded on a logarithmic scale. • A 2D cross section or even a 3D volume can made by scanning the beam across the sample.
System Setup: Sample Arm • Helped to construct the Sample Arm.
System Setup: Galvanometer • Built the box to power and control the Galvo • Video of the Galvo moving
Project Overview • Develop analysis/processing code in MATLAB • Objective: Mathematically focus raw data obtained from the 1310 nanometer system. • Adjust the incident angle, focal length, and the wavelength. • Increase the signal to noise ratio (SNR) to produce high resolution image.
MATLAB code Read the Image Flip Matrix (if necessary) Interpolate Zero Padding FFT Display Image
Raw Data • Raw data obtained when the reference and sample arm are 600 microns apart. • Image taken of the mirror. Intensity Pixel Number
MATLAB code: No Processing • Completely unprocessed data. • To create accurate image point spread function should be narrow and high (ignore all the noise in the middle). • Creates a blurred black line when the actual image is formed.
MATLAB code: Zero Padding • Splits the matrix and adds many 0’s in Fourier space. • Doubles the size of the original graph. • Used to increase the point density to interpolate more accurately. Intensity Intensity Pixel Number Pixel Number
MATLAB code: Interpolate • Used to find remap the data linearly in wave number (k) to improve the results of a subsequent FFT • Takes the Intensity vs. Pixel number graph and Intensity vs. k.
MATLAB code: FFT • Fourier transform switches one complex valued function into another. • Transforming k (wave number) into actual space.
Results • Now that the parameters are correct a much more focused image is created. • Dark line at the top is thin and not blurry
Conclusion • Image obtained form the 1310 nanometer system before processing (left) and after processing (right). • Image width:100 microns • Image height: 500 microns • Very first image acquired with either system.
Acknowledgements • I would like to thank NSF and the UC Riverside BRITE program for funding, as well as the University of California, Riverside and NIH (R00 EB007241), and Dr. Hyle Park and the rest of the Park Research Group for their guidance. • Mr. Jun Wang for organizing and Dr. Victor Rodgers for directing the program.