Download
1 / 42
420 likes | 508 Views
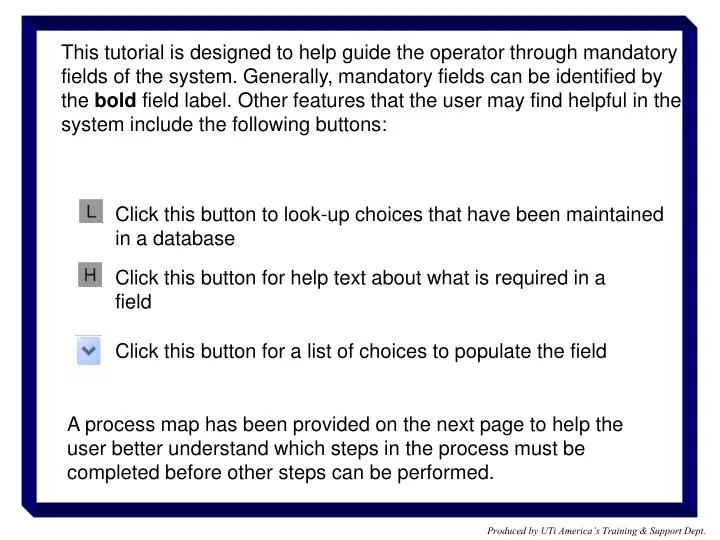
This tutorial is designed to help guide the operator through mandatory fields of the system. Generally, mandatory fields can be identified by the bold field label. Other features that the user may find helpful in the system include the following buttons:.

E N D
This tutorial is designed to help guide the operator through mandatory fields of the system. Generally, mandatory fields can be identified by the bold field label. Other features that the user may find helpful in the system include the following buttons: Click this button to look-up choices that have been maintained in a database Click this button for help text about what is required in a field Click this button for a list of choices to populate the field A process map has been provided on the next page to help the user better understand which steps in the process must be completed before other steps can be performed. Produced by UTi America’s Training & Support Dept.
Create Users Setup Vessels Setup Parties(Shipper, Consignee,& Notify) Create New Voyage Add Bills of Lading Submit Manifests & B/Ls 1 3 7 8 9 6 Assign Permissions Setup Ports(U.S. & Foreign) 2 4 Maintain Containers (May be done at the time of shipment) 5 Produced by UTi America’s Training & Support Dept.
Log In 1 Go to: www.tradegate2000.com 2 Click “Log In” 3 Enter you User name and Password and click “OK” Produced by UTi America’s Training & Support Dept.
User Setup Produced by UTi America’s Training & Support Dept.
User Setup Click “User Control” Click “Add” Create a User Name Create a password (Passwords are case- sensitive) Re-enter the password to confirm Enter user’s email address If the user will be an administrator, click the “Administrator” box Click “Save” Produced by UTi America’s Training & Support Dept.
User Setup – Assigning Permissions To assign permissions click on the newly created Username If you would like this user to have access to all functions click “All” Check any of the boxes of the functions to which you would like this user to have access. Assign the user to be able to enter manifests for a particular Port of Load and/or Port of Discharge. If this user is to have permission to enter manifests for all ports click “All Ports” Click “Add”. Click “Save”.
DatabaseSetup Produced by UTi America’s Training & Support Dept.
Port Setup It is intended that all U.S. and Foreign ports be pre-loaded. Use this tutorial if you can not find your port and must add it manually. Note: It is important that you add only true seaports to this database. 1 Click “Code Setup” Decide which type port you are setting up and click either “U.S. Ports” or “Foreign”. Click “Add” Create a code that matches the uTrac code to describe the port you are maintaining 2 Click on the type of port you are setting up Enter the code of the port you are setting up. If you are not sure of the code, click “L” to do a look-up of valid port codes. If you choose and select from the list of port codes, the “Port Name” will automatically populate the next field. If you know the port code and enter it in this field, you will have to enter the “Port Name” in the next field. Enter the name of the port you are setting up Click “Save” Produced by UTi America’s Training & Support Dept.
Port Setup Click “Close” Produced by UTi America’s Training & Support Dept.
Equipment Setup 1 Click “Add” Enter the number of the container broken into the required sections Choose a container type by clicking on the pull down button and highlighting the correct type container 2 Not required Not required. Produced by UTi America’s Training & Support Dept.
Equipment Setup Click “Close” Produced by UTi America’s Training & Support Dept.
Party Profile Setup - Shipper 1 Click “Party Profiles” Choose whether you want to maintain the “Shipper”, “Consignee” or “Notify Party” information by clicking on the pull down button and choosing the appropriate type Click “Add” 2 Create a code specific to the shipper that you are setting up Enter the name and address of the shipper you are setting up Enter the city where the shipper is located Enter the ISO country code where the shipper is located. For help with a list of country codes, click the “L” and enter the name of the country for which you need a code. Click “Save” Produced by UTi America’s Training & Support Dept.
Party Profile Setup - Shipper Click “Close” Produced by UTi America’s Training & Support Dept.
Party Profile Setup - Consignee 1 Click “Party Profiles” Choose whether you want to maintain the “Shipper”, “Consignee” or “Notify Party” information by clicking on the pull down button and choosing the appropriate type Click “Add” 2 Create a code specific to the consignee that you are setting up Enter the name and address of the consignee you are setting up Enter the city where the consignee is located Enter the State where the consignee is located Enter the Postal code of the consignee is located Enter the ISO country code where the shipper is located. For help with a list of country codes, click the “L” and enter the name of the country for which you need a code. Click “Save” Produced by UTi America’s Training & Support Dept.
Party Profile Setup - Consignee Click “Close” Produced by UTi America’s Training & Support Dept.
Vessel / Voyage Setup 1 Click “Voyage Setup” Click “Create New Voyage” Enter the code of the vessel if known. If not, click “L” to perform a look-up of codes in the vessel database 2 Enter a voyage number Choose the mode of transport by clicking on the pull down button and highlighting the appropriate mode Enter the code for the last foreign port of loading. If the code is not known, click “L” to perform a search for the correct code Enter the code for the first U.S. port of discharge. If the code is not known, click “L” to perform a search for the correct code If there will be more than one port where your containers will discharge from this vessel enter the code for those U.S. ports of discharge along with the dates the vessel will arrive at each port. If the code is not known, click “L” to perform a search for the correct code. If there is only one port, you must re-enter the code of the “First U.S. Port of Discharge” in this section. Click “Save” Produced by UTi America’s Training & Support Dept.
Vessel / Voyage Setup Click “Close” Produced by UTi America’s Training & Support Dept.
Vessel / Voyage Setup 1 Click “Add Ports of Load” 2 Enter the port code as maintained in “Port Setup” Enter the Date and Time of departure Click “Save” Produced by UTi America’s Training & Support Dept.
Vessel / Voyage Setup Click “Close” Produced by UTi America’s Training & Support Dept.
Manifest Entry Produced by UTi America’s Training & Support Dept.
Manifest Data Entry 1 Click “Manifest Data Entry” 2 Choose a vessel from the pull down list of vessels maintained in “Vessel Setup”. Click the “L” for a list of Vessels Choose a voyage from the pull down list of voyages maintained in the “Voyage Setup” Choose a Port of Load from the pull down list of ports maintained in the “Port Setup” Choose a Port of Discharge from the pull down list of ports maintained in the “Port Setup” Click “Add Bill of Lading” Produced by UTi America’s Training & Support Dept.
Manifest Data Entry – General Information Enter your B/L nr (free text) Enter Unitainer/UTi’s SCAC code *Always “UNPC” Enter the port code for the “last foreign Port of Load” This is the last port before the vessel calls a U.S. port Enter the place of receipt of the cargo by the carrier. Choose a “Status Indicator” from a pull down list of choices. This will generally be “Regular Bill of Lading”. However “Freight remaining on Board” (FROB) must be used when goods destined for a foreign port are on board a vessel that is calling a U.S. port (Even if the goods will not be unloaded at a U.S. Port.) For FROB cargo the port of discharge maintained in the vessel schedule would be the first U.S. port that this vessel is calling, even if your cargo is not unloading at that port. An “Amendment Code” must be chosen if you make a change to a HB that has already been submitted via AMS Enter SCAC code of the international carrier who owns the vessel on which your goods will be loaded Enter the Shipper Code. If you are unsure of the code click “L” to perform a look-up of possible codes Enter the Consignee Code. If you are unsure of the code click “L” to perform a look-up of possible codes Enter the type shipping units (Free text) Enter the total gross weight of the shipment and whether the weight is in kg or lbs. If you are loading a container or containers click the “Equipment” tab. If not click the “Items” tab Produced by UTi America’s Training & Support Dept.
Equipment Details Make sure that the “Equipment” tab is clicked. Enter the container number. Do not include any spaces or “-” in the number. If the container has not been maintained in the “Equipment” database, you will be allowed to set one up here. Enter the seal number or numbers. Indicate whether the container is being tendered “Load” (full) or “Empty”. Optional field. Choose to add additional containers by clicking “Add Equipment”. Click the “Items”. Produced by UTi America’s Training & Support Dept.
Manifest Data Entry – Line Items Enter the number of pieces for this item on the b/l. This should be the number of pieces of the smallest external “package”. Eg if you are loading a container, this should be how many pieces are in the container. Choose a “Package Type” for this item on the b/l by clicking on the pull down button and choosing form the list. If you know the type you may enter it manually. Optional fields Choose a container number that this item from the pull down list. See the section on “Equipment Details” for information on how to add containers to the list. You must enter at least one line item of detailed description of goods. Additional line items may be entered by clicking on the “More…” button. You must enter at least one line of marks and numbers. (Those marks on the outside of the packages). You may add more marks by clicking on the “More…” button This section is for shipments of vehicles. Enter the Vehicle identification number. If more than one number click the “More…” button If this item is hazardous, click “Add”. See the section on “Hazardous Cargo Information” for help. Click “Save Bill of Lading” Produced by UTi America’s Training & Support Dept.
Manifest Data Entry – General Information Click “Close” Produced by UTi America’s Training & Support Dept.
Hazardous Cargo Information Choose the governing body whose code you are using to classify the hazardous material. Generally for ocean freight, this will be “International Maritime Organization (IMO) Code”. Enter the identification number assigned to the hazardous material. This number is dependent on the “Qualifier” chosen in the next field Enter the IMO class or division of the hazardous commodity. Enter the technical description of the hazardous material Enter the 24 hour emergency contact phone number Enter the UN Page number out of the IMDG code If Flammable, enter the Flashpoint in degrees Celsius/Centigrade Indicate if the flashpoint is negative Enter type label(s) required Enter a description of the hazard class, division, or label information (Free text) Enter the unit of measurement for the flashpoint. (Always “CE” – Celsius/Centigrade) Click “Save Bill of Lading” Produced by UTi America’s Training & Support Dept.
Copying Bills of Lading From any tab on the Manifest Entry screen you can perform the copy function. This can be a time-saving feature when most of the manifest information for the new bill of lading is the same as an existing bill of lading. Click “Copy Bill of Lading” 1 2 Enter the new Bill of Lading number Choose to either create a new B/L with the same vessel information or with different vessel information If creating a new B/L with different vessel information, enter the new Vessel Code, Voyage number, and Port of Discharge Click “Continue” and the new B/L will be saved. You may change other information such as item detail after the new B/L has been saved Produced by UTi America’s Training & Support Dept.
Manifest Management – Submitting Manifests 1 Click “Manifest Mgmt.” Send a manifest or manifests from only your Port of Load to customs by Selecting a port of load and leaving the Port of Disch blank, or by selecting both. Click Submit Manifest 2 When asked to verify that you would like to submit the manifest, click “Submit Manifest”. Produced by UTi America’s Training & Support Dept.
Manifest Management – Submitting Manifests Click “Close” Produced by UTi America’s Training & Support Dept.
Manifest Management – Reviewing Statuses 1 Choose a Vessel, Voyage, Port of Load, and if necessary, Port of Disch. And click “View Bills of Lading” View the statuses of each B/L on a manifest 2 a) b) c) 3 To “action” a B/L or B/Ls on the manifest, a) check the box next to that B/L or B/Ls and then b) choose the action you would like to take from the pull down list and c) click “Go” Click “Submit Bills of Lading” Produced by UTi America’s Training & Support Dept.
Manifest Management – Submitting Manifests Click “Close” Produced by UTi America’s Training & Support Dept.
Making Changes to a B/L after submission to AMS Produced by UTi America’s Training & Support Dept.
This section covers the steps required to make ANY change to the B/L after it has been submitted to AMS (the current status = “AMS Accepted”). • There are two different processes detailed in this section depending on the type change that you wish to make: • “Diverting” B/Ls (making changes to only the vessel details) See pages • Making changes other than vessel changes to the B/L Produced by UTi America’s Training & Support Dept.
Process for “Diverting” B/Ls (making changes to only the vessel details) • Delete B/L from AMS • Divert B/L • Resubmit Manifest Produced by UTi America’s Training & Support Dept.
Deleting from AMS 1 Click “Manifest Data Entry” 2 Choose a vessel from the pull down list of vessels maintained in “Vessel Setup”. Click the “L” for a list of Vessels Choose a voyage from the pull down list of voyages maintained in the “Voyage Setup” Optional: Choose a Port of Load from the pull down list of ports maintained in the “Port Setup” Choose a Port of Discharge from the pull down list of ports maintained in the “Port Setup” Click “View Bills of Lading” Produced by UTi America’s Training & Support Dept.
Deleting from AMS 3 Click the box next to the B/L that you would like to change Choose the action “Delete Bill(s) from AMS” from the pull-down list Click ”Go” 4 Confirm that you wish to delete this B/L from AMS by clicking “Delete Bills of Lading” 5 Click ”Close” Produced by UTi America’s Training & Support Dept.
Diverting B/Ls 1 Click “Manifest Data Entry” 2 Choose a vessel from the pull down list of vessels maintained in “Vessel Setup”. Click the “L” for a list of Vessels Choose a voyage from the pull down list of voyages maintained in the “Voyage Setup” Optional: Choose a Port of Load from the pull down list of ports maintained in the “Port Setup” Choose a Port of Discharge from the pull down list of ports maintained in the “Port Setup” Click “View Bills of Lading” Produced by UTi America’s Training & Support Dept.
Diverting B/Ls 3 Click the box next to the B/L that you would like to change Choose the action “Divert Bill(s)” from the pull-down list Click ”Go” 4 If the vessel name has changed choose the code for the new vessel to which you want to divert the B/L. Enter the new voyage number Enter the new Port of Discharge if this has changed. Click ”Divert Bills of Lading” 5 Click ”Close” Produced by UTi America’s Training & Support Dept.
Re-submitting B/Ls 1 Click “Manifest Data Entry” Enter a B/L number and click “Go” 2 Click “Submit Bill to AMS” Click “Go” 3 Click “Close” Produced by UTi America’s Training & Support Dept.
Process for making changes other than vessel changes to a B/L • Retrieve the B/L • Make changes to the B/L • Select an Amendment Code • Save the B/L • Re-submit B/L Produced by UTi America’s Training & Support Dept.
Changes to a B/L (Other than diverting) 1 Click “Manifest Data Entry” Enter a B/L number and click “Go” 2 Click “Edit Bill of Lading” 3 Make any changes that you need to the B/L Choose an Amendment Code from the drop-down list Click “Save Bill of Lading” Produced by UTi America’s Training & Support Dept.
Re-submitting B/Ls 1 Click “Manifest Data Entry” Enter a B/L number and click “Go” 2 Click “Submit Bill to AMS” Click “Go” 3 Click “Close” Produced by UTi America’s Training & Support Dept.