Download

1 / 32
320 likes | 459 Views
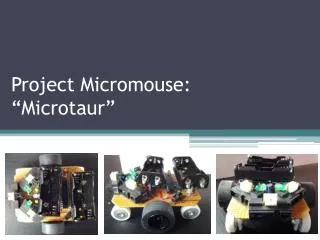
MicroMouse @ The University of Bolton. Key features of the Buggy. Key features of the Buggy. Key features of the Buggy. Using the Buggy’s IR sensors as a Proximity Sensor.

E N D
Using the Buggy’s IR sensors as a Proximity Sensor • This exercise develops a series of ‘Decisions’ so that the Buggy’s Right Hand Side Infra Red Sensor (Connected to pins RA4 & RA5 of the chip) senses when there is an object at different distances from the right hand side. • The closer the object to the sensor the more of the Buggy’s LED’s are lit. • This illustrates a simple distance measuring sensor. • There are then some ideas for further experimentation with flow-code available to modify or develop.
Getting up and runningOpen MatrixMultiMedia Flowcode v3 application:-Start All Programs MatrixMultimedia FlowcodeV3 Click “Open an existing FlowCode Flowchart”… More files… OK Find the start-file “IR-Test1.fcf” from Folder:- C:\ Program Files\ MatrixMultimedia\ ManSciFest\ Walk-thru’s\ InfraRed Detection\ IR-Test1.fcf and click OPEN
Your screen should look like:- • Save the code as “Distance” in folder C:\Temp\.
Lets create some flow-code • From the left hand column menu, drag and drop the Component Macro icon in between the Begin and End blocks.
Double click on the Call Component Macro block to open up the properties box • Click on the Formula Flowcode (0) under Component to bring up the Macro menu. Scroll down then select ‘ReadIRSensor’. • Replace ‘Call Component Macro’ in the Display Name box with ‘Read IR Right sensor’.
Now click on the Variables button • Select the IRR variable then click USE VARIABLE to add IRR to the sensors parameter box. Pull down the menu at the end of the ‘Return Value’ box and select IRR again. Click OK to give:-
Add a Decision Box • From the left hand column menu, drag and drop the Decision icon after the Component Macro block and before the End. • Decision icons allow you to test a condition and re-direct the flow according to the outcome.
Double click on the Decision block to open up its properties box • Remove the ‘0’ from the IF box. • Click on the “Variables.” button to open the variable manager. • Click on IRR under variable name then click USE VARIABLE
Now define the condition to force the Decision one way or the other • After the IRR in the ‘If’ entry-box add:- >= 240 This reads as “If IR-Right sensor value is greater than or equal to a value of 240”. • Change the Display Name to read Furthest Detection Distance (DON’T click the Swap Yes and No box). • Now click OK.
First Distance Detection • Now we will output a pattern to the Buggy’s LED’s to signal when the decision statement goes the YES path • And we will switch the LED’s off when the decision taken follows the NO path
Call Component Macro • From the left hand column menu, drag and drop the Component Macro icon in the right hand route of the decision block
Double click on the Call Component Macro block to open up the properties box • Click on the Formula Flowcode (0) under Component to bring up the Macro menu. Scroll down then select ‘WriteLED’s’. • Replace ‘Call Component Macro’ in the Display Name box with ‘No LED’s ON’. • In the ‘Parameters: byte out box’ type in 0x00 which enters the value of 0 (0x means:- written in hex format) • Click OK to accept these properties
Now add another component macro • Double click on this new Call Component Macro block to open up the properties box. • Click on the Formula Flowcode (0) under Component to bring up the Macro menu. Scroll down then select ‘WriteLED’s’
Switch 1 LED ON • Replace ‘Call Component Macro’ in the Display Name box with ‘1 LED ON’. • In the ‘Parameters: byte out box’ type in 0x01 to enter the value of 1 to switch the first LED on. • Click OK to accept these properties
What exactly does this code do:- • It gets the reading from the IR right sensor on the Buggy, it then checks to see if that sensor finds an object within the set-range. (If there is an object within range, one LED will light. If there is no object within range no LED will light!) • It does it ONCE, then stops!
Add a repeating loop • To add the “forever loop”, drag & drop the loop icon releasing it when the mouse is over the ‘beginblock’at the top of the code. • It should now look like this:-
Put all code within the Loop • “Drag and Drop” all the blocks of Flow-Code into the forever loop (keeping them in the same order). • Try this for yourself – you can either move each block ‘one at a time’ or draw a box around the code and move it as ‘one group’
Save the code & Download it to the Buggy to test it • Connect the USB cable to the Buggy and note the green LED light near the socket. • Switch on the Buggy and if the two red LED’s are flashing, it is ready to program. (If the LED’s are not flashing, switch the Buggy off, then on again.) • Select “Chip” from the top Menu and click on “Compile to Chip” (This converts the flowcode to machine code and sends it to the chip on the Buggy. When the red lights stop flashing, the code download is complete. • Switch off the Buggy at the switch and remove the USB lead. • Switch on the Buggy and it will now run according to the code within the chip.Check that the 1 LED lights up.
Now add a closer distance check • Right Mouse on the Furthest Detection Distance block and select COPY • Then right mouse on the ‘1 LED ON block’ • And PASTE to insert an exact copy of the first decision block within the first one.
Now modify the NEW blocks • First DELETE the ‘1 LED ON’ block which is IN-BETWEEN the two decision-blocks as this is not necessary. • Double click on the lower (NEW) decision block and edit the properties giving it the Decision Name of 2nd Distance Detection and amend the If box to read:- • ‘IRR >= 239’ • Then click OK.
Now move the 1LED ON component macro box (on the ‘NO’ arm of the 2nd Decision block), to the ‘YES’ arm of the same block. • And move the NO LED’s block (on the ‘YES’ arm of the 2nd Decision block), to the ‘NO’ arm of the same block.
Edit the No LED’s ON block • Edit this ‘No LED’s ON’ block below the 2nd Decision block and change the Display Name to read ‘2 LED's ON’ • and change the Parameters byte out to ‘0x03’, to switch two LED’s ON.
Save the code & Download it to the Buggy to test it • Connect the USB cable to the Buggy and note the green LED light near the socket. • Switch on the Buggy and if the two red LED’s are flashing, it is ready to program. (If the LED’s are not flashing, switch the Buggy off, then on again.) • Select “Chip” from the top Menu and click on “Compile to Chip” (This converts the flowcode to machine code and sends it to the chip on the Buggy. When the red lights stop flashing, the code download is complete. • Switch off the Buggy at the switch and remove the USB lead. • Switch on the Buggy and it will now run according to the code within the chip.Check that the 2 LED’s lights up.
How about a third distance? • Right Mouse on the 2nd Detection Distance block and select copy, then right mouse on the 2 LED’s ON block and paste to insert an exact copy of the 2nd decision block within the 2nd one. • First delete the ‘2 LED’s ON’ block which is IN-BETWEEN the two lower decision-blocks as this is not necessary. • Double click on the lower (NEW) decision block and edit the properties giving it the Decision Name of 3rd Distance Detection and amend the If box to read:- • ‘IRR >= 237’ then click OK.
Save the code & Download it to the Buggy to test it • Connect the USB cable to the Buggy and note the green LED light near the socket. • Switch on the Buggy and if the two red LED’s are flashing, it is ready to program. (If the LED’s are not flashing, switch the Buggy off, then on again.) • Select “Chip” from the top Menu and click on “Compile to Chip” (This converts the flowcode to machine code and sends it to the chip on the Buggy. When the red lights stop flashing, the code download is complete. • Switch off the Buggy at the switch and remove the USB lead. • Switch on the Buggy and it will now run according to the code within the chip.Check that the 3 LED’s lights up.
Produce more distance sensors? • Can you continue in this fashion to produce a distance sensor that can distinguish between 7 or 8 different distances away from the buggy? • The following slide gives some tips to help with coding the remaining 5 decisions.
For other distances try using:- • 4th Distance Detection IRR >= 230 • 5th Distance Detection IRR >= 210 • 6th Distance Detection IRR >= 190 • 7th Distance Detection IRR >= 150 • 8th Distance Detection IRR >= 120 For lighting up the number of LED’s :- • – to display 4 LED’s lit - 0x0F to Parameter byte • – to display 5 LED’s lit - 0x1F to Parameter byte • – to display 6 LED’s lit - 0x3F to Parameter byte • – to display 7 LED’s lit - 0x7F to Parameter byte • – to display 8 LED’s lit - 0xFF to Parameter byte