Download
1 / 54
540 likes | 623 Views
PSP 9. Workshop on Retouching Digital Photos.

E N D
PSP 9. Workshop on Retouching Digital Photos Since the advent of the cheap digital camera and high quality scanners, billions of digital pictures get taken each year. Not everyone is an award winner but many common mistakes can be corrected with new software and many pictures can be recast to increase the interest or to improve the ascetics.
Sources of Digital Imagery • Until recently Scanners were the most common method to create digital images. • Drugstores and copy stores offer Kodak’s Photo CD to convert film to digital CDs • Digital cameras have arrived at a quality and price point that makes them now very common
Sources of Digital Imagery(more) • Cell phone with cameras, i.e. picture phones have quickly become a source of family and business digital pictures and video clips. • Recently they have been used as a tool to fight crime and terrorism, e.g. to ID the London subway bombers (July 2005). • News media are setting up web sites to receive amateur digital pictures and video via email. • Picture phone typically are lower resolution and need more work than regular digital cameras to get quality photos (click Fixing Photos Taken on Camera Phone tutorial below) http://www.adobe.com/tips/phsel3fixlowrezm/main.html
Sources of Digital Imagery(more) • Digital video cams, web cams, and security cams are now the source for the newest rage in blogging, i.e. video blogs(vlogs)
Using the Digital Camera For Digital Camera Tutorial Click http://www.dddi.org/html/digitalcamera.html
Going Digital: 10 Tips for Beginners • Batteries: Keep Spares on Hand • StorageIt’s not that hard to stop at a store to pick up an extra roll of film, but you may not find a memory card for your digital camera as easily. So, be sure to plan ahead. For example, if you’re going on a long trip, you might want to check to see if someone you’re visiting will be able to transfer photos from your memory cards to a CD, thus freeing up your cards for more photos. Many photo shops are now offering that service for a small fee. -- Frank Riddell, Edinburgh, Scotland • Shoot and Delete • Experiment: Try New ThingsDigital photography is very liberating because you have instant feedback and you don’t have to print anything you don’t like. Before digital cameras came along, you had to wait for the film to be processed before you could see if something you tried was successful. With a digital camera’s LCD screen, you can immediately get some idea if you have the right exposure of that spinning merry-go-round or of the fireworks on the 4th of July. -- Mary Ann Robertson, California. • Make Prints • Don’t Travel with a Brand New Digital CameraAlways get to know a new camera before you entrust it with treasured vacation photos of the family in far away places. Digital cameras can have many powerful features that take a little getting used to, so plan to spend a good bit of time with your new camera, along with the instruction manual, before you head off on that vacation. -- Tom Cattrall, rural Oregon http://channels.netscape.com/ tech/package.jsp?name=computing/cpvert/goingdigital&floc=ns-tos-mant-h-03
Going Digital: 10 Tips for Beginners(more) • Use the Camera’s Viewfinder and the LCD screen • Organize and Backup your OriginalsMost people are happy to leave their originals on their computer without thinking of a backup strategy for those precious files. Since many personal computers today come equipped to make CDs, writing backup copies immediately is easy and a good habit to develop. Then you can use software like Adobe’s Photo Album to catalog and organize those CDs, with keywords that make it easy to retrieve photos in logical groups. Making a duplicate set of CDs to store at another location is also an excellent idea. -- Mohit Chadha, Avon, Connecticut • Learn to "half-press and hold" your shutter buttonBy doing this, you give the camera a chance to focus on your subject and do anything else it must to be ready to make an exposure. Then when you press the shutter the rest of the way, you are much more likely to catch the exact moment you want. That technique can go a long way toward reducing the frustration often attributable to “shutter lag,” a slight delay in the shutter release that is common to even some of the better digital cameras on the market today. -- Woody Windischman, Romeoville, Illinois • Don’t Stop LearningAfter you get your feet wet and have fun taking those “free” digital photos, it’s a good idea to take the time to learn a little about the way a digital sensor differs from film in the way it sees and records light. For instance, an overexposed negative can often be printed just by putting more light through it, while overexposed digital photos will have little or no detail in the highlight areas. On the other hand, underexposed film will have little or no shadow detail, but underexposed digital shots can often produce very good photographs when the various tonal values are adjusted in a computer. -- Mike Wilmer, Folsom, California
Printers • Hand in hand with the digital camera is the growth in printers that support them. • These printers can be: • connected to the camera thru a USB port • allow the digital storage device to be inserted • connected to the computer for upload and download. • The printers now support photo grade paper and have a variety of optional inks to provide a range of quality and shelf life options. • Newer models have sophisticated software for image enhancement and retouching. • Printer costs are driven by inks and paper over their life cycle.
Develop Good Work Habits to Avoid Tragedy • Always Start by saving the photo to a backup directory or use [File]/SaveCopy As.. This will allow you to work on a copy of the original. • When downloading images from the camera’s storage device, make sure that the image is stored properly and backed up before you erase it from the camera’s storage. This should be obvious but…
Some Basic Information Paint Shop Pro and Photoshop are becoming similar in their user interface. The tools, concepts, and procedures follow as similar pattern.
Solving some common problems • Photo too dark or too bright • Red eyes • Background is too busy • Noisy • Removing the uninvited guest or former significant others. • Removing photo backgrounds http://www.corel.com/ servlet/Satellite?pagename=Corel3/Section/Display&sid=1047024315119&gid=1047024331836&cid=1047024353448
Using the One Stop Photo fix tool • Many pictures are not correctly lighted. • For the amateur photographer the one stop fix is a picture saver. • Click the [Adjust]/One stop photo fix and see the result.
Background is too busy or item of interest is lost .. • Illustration of the cropping tool • Here the chipmunk is lost in the background. • Using the cropping tool • Click • Move the window of interest over the feature (it is highlighted) • Double click the left mouse button inside the highlight.
Removing Photo Background Sometimes a good picture is ruined by a dull, busy, or uninteresting background.
The Selection Tool • The selection tool allows the user to define an area of the image for further processing • There are three major options: • Selection • Use geometric shapes • The Lasso or Freehand • Draw a freehand figure • The magic wand • Define areas by closely related colors
Selection: Allows user to select of regular shapes: Squares and rectangles Circles and ellipses Stars, etc.
Selection Simple to use: • Click Selection Icon choose Selection option • Pick Shape from Toolbar and set parameters • Drag mouse to center of the selection • Hold left mouse AND Shift key down and drag to size desired • Double click to cause selection
Example using ellipse • Select ellipse as the shape in the toolbar • Place mouse on the setting sun • Hold down the Shift and the LMB and drag to the right size. • Release the mouse and Shift key • The Selection will show up as dashed lines.
Layers Concepts and Usage with examples. Layers are like sheets of transparent materials stacked on background layer. Layers allow for the develop of a complex image and allows the working on separate layers without disturbing the other parts of the image. Without layers a change could be very difficult and time consuming.
Picture Tubes Creating picture tubes Using them effectively
Masks http://jinnysplace.com/ws04/mask101.html
What is a mask? • Think of it as a stencil • The mask is black, grey, or white. • The black areas mask or hide the areas in the layers below it. • The white areas are transparent, and • The Grey areas are semi- transparent. The lighter the gray the more transparent.
A simple example Create a mask with a white rounded rectangular center. • First create a new 400x 400 image, 16 m colors, Black, nontransparent • Select a Round rect. (50,50)-(350,350) feather 25, anti-alias chk. • Fill with white paint.
Use Mask created in last slide. • First open picture that will be masked. • Copy it to duplicate layer. • Layer/New Mask Layer/ Select from Image • Use dialog box select mask image created in last slide • Layer/Merge/Merge All (flatten) • See and save result. • Note the feather creates the soft edge.
Introduction to Useful Web Tools Image Maps Image Slicer Rollovers
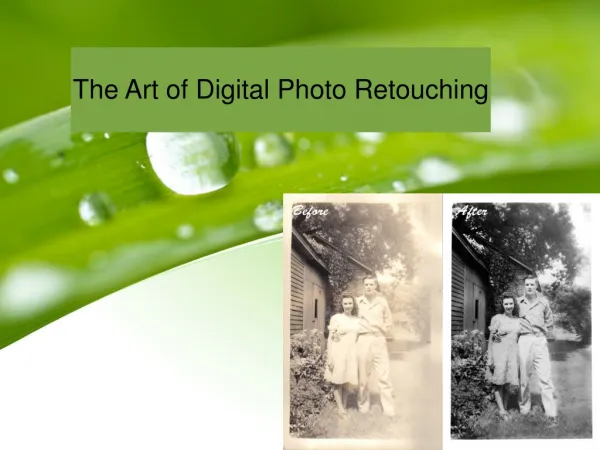
A Sample of Applications using the PSP Photo tools Creating a coloring book Restoring old photos Artistic effects
The Coloring Book Frequently we have children or grandchildren that learn art through the use of coloring books. This tutorial will allow you to use your favorite photos to create pages for a coloring book.
Step One • Select pictures that have clear edges with not a lot of shadows for your first efforts. • Use the selection tool to capture the main subject(s) and do not have a great deal of clutter and fine detail. • Crop the picture. In this example we used the lasso tool with smart edge. Cut and pasted as new image and used the next steps to get this result.