Download

1 / 43
440 likes | 530 Views
Presentation 2 – The Power Supply. Objectives. At the end of this presentation, you will be able to:. Identify the input and output voltages of the power supply. Demonstrate the proper method to measure the DC output voltages of the power supply.

E N D
Objectives At the end of this presentation, you will be able to:
Identify the input and output voltages of the power supply. • Demonstrate the proper method to measure the DC output voltages of the power supply. • Explain how power is distributed throughout the computer. • Demonstrate the proper method to remove and replace the power supply in the computer. • Compute the power consumption of the PC.
intel pentium II The Power Supply.
The Power Supply AC Receptacle FAN On/Off Switch
Power Supply Input Voltage • 100 to 125 VAC @ 60 Hz • 200 to 250VAC @ 50 Hz
Motherboard Form Factors • AT-Type • ATX-Type
AT Motherboard 13.5” 12”
9.6 ” intel pentium II ATX Motherboard 12 ”
Power Supply Output VoltagesATX-Type • +5 Volts • +12 Volts • -12 Volts • -5 Volts • +3.3 Volts
20-Pin Power Connector
24-Pin Power Connector
2 X 2 Connector 2 X 10 ATX Connector
A Second 2 X 2 Motherboard Power Connector Supplies Processor Core Power (+12 Volts)
Power Supply Output VoltagesAT-Type • +5 Volts • +12 Volts • -12 Volts • -5 Volts
Motherboard Power Connectors Black Wires P8 P9
+5V -5V +5V Ground +5V Ground P9
-12V +12V +5V Ground Power Good Ground P8
The Power Good Signal • +5 Volt signal generated by the power supply. • It indicates that the power supply has passed its self test and that its output voltages have stabilized. • Usually occurs within first 0.5 seconds. • Prevents the system from running under bad or unstable power conditions.
4-Pin Molex Connector +12V Ground +5V
4-Pin Berg Connector +12V Ground +5V
Grasp the connector by the shell… Never by the leads.
Disconnect the AC Power Cord.
On-Off Switch
Power to Motherboard
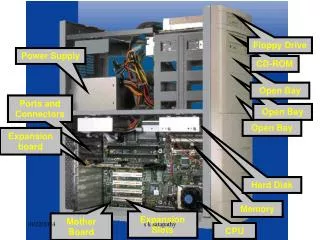
The Power Supply is held in place by four screws.
Power Supply