Download
1 / 25
250 likes | 375 Views
Collecting Geographic Coordinates Using GPS Devices. <date of training> . Overview. Purpose Presentation of maps from previous PLACE studies Data collection process Fundamentals of GPS operation Saving and exporting spatial data

E N D
Collecting Geographic CoordinatesUsing GPS Devices <date of training>
Overview • Purpose • Presentation of maps from previous PLACE studies • Data collection process • Fundamentals of GPS operation • Saving and exporting spatial data • Practice using GPS devices, recording coordinates, and downloading points with their unique venue numbers to computer • Conclusion: How spatial data will be used in this project
Purpose • Create maps illustrating PLACE findings • Allows for visual interpretation of results • Valuable component of Step 3 of PLACE (Venue Verification) • Common types of maps: • Map 1: Venues, condoms and prevention activities • Map 2: Venues by venue types • Map 3: Venues by venue size and type
Illustrative Map Produced with PLACE Data Venue Types Eat/Drink/ Dance/Sleep Transportation/Public/ Commercial Events Other
This guide illustrates how to make the five types of maps suggested by PLACE: • 1. Map of venues in the priority prevention area by type of venue (4 general categories from B19*) • 2. Map of venues by venue size (number of men from B35a*) and type of venue (5-7 categories for size) • 3. Map of venues with condoms available on day of visit and shown to interviewer (B40*=2) • Alternate to 3: Onsite outreach (B38d*=1) • Priority Sites for Action Plan. ??? Decide criteria. *Question numbers correspond to Uganda questionnaires
Illustrative Map Produced with PLACE Data Condom Availability during Site Visit No Condoms Condoms
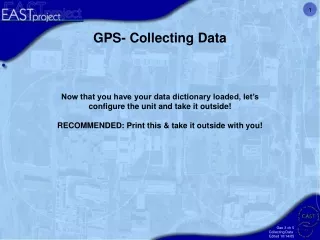
Data Collection Process • PLACE • Collected at venues at the same time Form B is completed • Individual interviewers may be assigned to collect spatial data
Using a GPS Device • Demonstrate Pages • Hands-on
Garmin 72H GPS Antenna Control Buttons Display Screen
Garmin GPS • Step 1: Turn on Unit After a couple of seconds, the GPS unit will start looking for satellites. Off/On Button
Search for Satellites • Step 2: Wait for Satellites Satellites Located (lock indicated by black box around number) North Indicator Outer circle represents horizon, inner circle represents 45 degrees above horizon Signal Strength for each satellite (if bar is grey it is not yet locked in) Current date, time, and lat/long coordinates Satellite Acquisition Page
Satellite sky view (detail) Outer circle represents horizon, inner circle represents 45 degrees above horizon
Acquire Position • Step 3: Once enough satellites have been located, the GPS unit will provide you with a position. Position Example in digital degree format: N 0.18123 E 31.50385
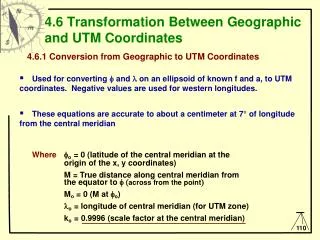
Lat/Long Formats: Be aware that the most common formats for latitude and longitude coordinates are: dd.dddddd (decimal degrees) ddmm.mmm (decimal minutes) dd mm ss (degrees, minutes, seconds) The symbol for degrees: The symbol for minutes: ’ The symbol for seconds: ’’ Kampala is near the equator. It’s important to note whether your latitude is N or S. You can denote this with a (+) or (-), too.
Conversions: There are 60 seconds in a minute, and 60 minutes in a degree. Thus to convert from: Lat. 00 24.019’ Long. 32 02.918’ 24.019/60 = 0.40032 + 0 = 0.40032 degrees N 2.918/60 = .04863 + 32 = 32.04863 degrees E
Set it up right first! The least confusing format, and that which is most “GIS-friendly” is decimal degrees. This can be set ahead of time to avoid a lot of confusion and guesswork later on. “Units” tab Setup Menu
Collect a Point • Step 4: Press and hold the Mark button and begin collecting data (in this case, a Waypoint). Mark Button MARK H Name of waypoint (could be venue ID) Mark Waypoint Page
Record Point • Step 5: Press “Enter” while highlighting “OK” to record point Waypoint ID (very important; this ID ties the location to the survey data!) Position MARK H OK button puts point into memory Rocker Button Enter Button Waypoint Page
Step-by-Step for Spatial Data Collection • Turn on the receiver. • Initialize the receiver, if needed. • Acquire satellites until a 3D GPS LOCATION is obtained. • Press the ENTER button until the WAYPOINT screen appears. • Enter the appropriate ID value in the WAYPOINT ID field. • Record the coordinate displayed on the GPS survey form. • SAVEthe averaged coordinate by highlighting OK (use Rocker if necessary) and pressing ENTER. • Turn off the GPS receiver.
Saving and Exporting Spatial Data (for Supervisors) • Download the downloading software before you go into the field • Each day, download coordinates from GPS device onto laptop • Make sure they’re in decimal degrees! • See the Mapping Toolkit for more details • Save the coordinates in a file on your laptop • Send to the Study Coordinator as soon as you are able