Download
1 / 27
570 likes | 2.52k Views
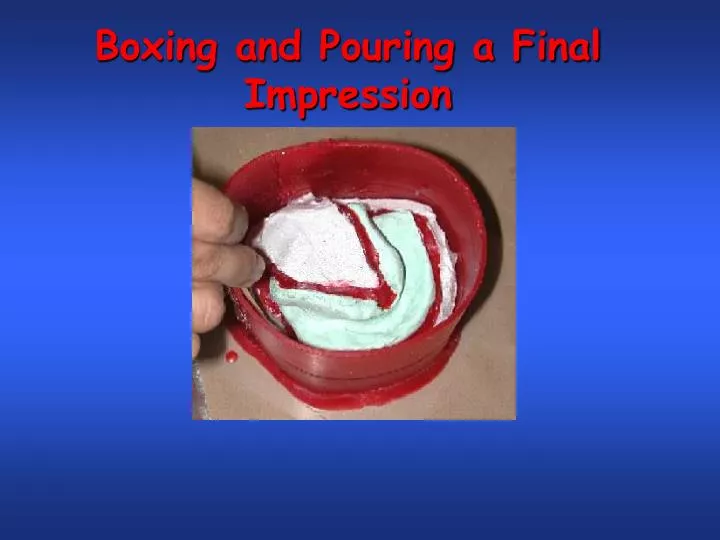
Boxing and Pouring a Final Impression. Boxing. Definition: Enclosing an impression to produce a base, to preserve the vestibular contours of the final impression, and to create a land area to protect the cast Techniques: Wax Alginate Play-Doh or clay Plaster/Pumice.

E N D
Boxing Definition: Enclosing an impression to produce a base, to preserve the vestibular contours of the final impression, and to create a land area to protect the cast Techniques: • Wax • Alginate • Play-Doh or clay • Plaster/Pumice
The putty or clay method may seem neater, but it does not support the impression like a plaster/pumice matrix will, so the stone fill may force out the sides when poured with vibration, therefore students are discouraged from using it here. The same thing goes for using wax by itself or alginate, since they both lack the support that the plaster/pumice mixture affords.
Pumice H2O Plaster The method we will use in the clinic is the 1:1 plaster/pumice mixture. Students must become knowledgeable and proficient with this method while here. Equal parts of plaster and pumice are mixed together dry, then enough water is added for the mix to become smooth and creamy.
Boxing and Pouring an Impression Place a band of sticky wax around the entire periphery of the impression. Then affix sufficient rope wax to the sticky wax approximately 2-3 mm below the border of the impression to serve as a guide to position the plaster/pumice mix or putty the correct height on the impression.
Boxing and Pouring an Impression After the plaster/pumice mix is placed, the wax can be smoothed with a hot #7 wax spatula before trimming the base to the desired size.
Boxing and Pouring an Impression Trim the plaster/pumice mix on the model trimmer. The acrylic handle will be trimmed down also, allowing an even reduction of the base.
Boxing and Pouring an Impression These bases were poured in 1:1 (50/50) plaster/pumice mixture prior to the boxing procedure. These bases were trimmed to about 4mm from the border to establish the land area. Notice the tray handle is trimmed off to be flush with this dimension.
Boxing and Pouring an Impression When a defect exists in the base, just patch the hole with plaster/pumice and move on.
Boxing and Pouring an Impression The same is true for the wax spacer. Just add wax where needed and smooth it up.
Better yet, add wax to the lingual area. It is an effective separating medium and it will be easier to separate the cast from the plaster/pumice support base.
Use the Hanau torch to flame the wax and a hot instrument to make it very smooth. Your poured cast will only be as smooth as the form of the mould it is poured into. A little work on the wax now when you have access saves al lot of difficult finishing of the stone cast when access is limited.
Boxing and Pouring an Impression If the wax at the joint does not overlap sufficiently, take a piece of boxing wax and press it against the area of the joint and fold it over the edge of the box, then lute it in place with a hot instrument. There must be a tight seal at this junction if the stone is to be contained.
Seal the wax of the land area to the box containing the plaster/pumice bases with sticky wax to make them ready to pour in yellow dental stone. The land area should be about 4mm wide and about 3 mm down from the border to allow for trimming. The wax rim should extend at least 15 mm above the impression to allow sufficient thickness for the base of the cast.
Lubricate the plaster/pumice bases with VaselineR, Model Release AgentR, or other separating medium so that the poured cast will separate from the plaster/pumice matrix.
Vibrate the stone mixture on the vibrator at medium vibration, flexing the bowl and bouncing it up and down to eliminate bubbles. Better yet, use a vacuum spatulator to mix the stone and bubbles will be minimized.
Pour the mixed stone into the boxed impression. Turn it on its side and move it around under vibration to spread the stone on the surface of the impression. This will minimize any bubble formation.
Pour the boxed impression, let it set for at least 30 minutes or until the heat of the setting disappears, whichever comes first, before attempting to separate the cast from the impression.
Peel the boxing wax border from the poured impression when the set stone has cooled.
Immerse the entire cast and plaster/pumice matrix in a container of hot water to soften the compound of the impression and the utility wax used to define the land area. The water should be about 140o F, the same heat as the tempering bath used during the border-molding procedure.
Use a sharp knife to pry the plaster pumice matrix loose from the cast. The impression may not come off easily, so the impression and cast will need to be re-immersed in the hot water bath for a few more minutes.
Continue to remove the plaster/pumice matrix until it is all off the cast and impression. If the cast has cooled down, immerse the impression and cast in the hot water bath for a few more minutes.
After the cast is separated from the impression, it is trimmed on the model trimmer so that the base is about 13 mm thick and 4 mm of land area is left.
Finish the land area of the master cast by reducing its height to 2 mm from the depth of the vestibule all around the border, then trim the cast on the model trimmer set to cut at a 90o angle so that the land area is 4 mm in width. The red-handled compound knife or a scalpel should not be used for this. Use a sharp knife with a stiff blade which will not break.
The base of the cast should be about 10-15 mm thick. A thinner cast may break in processing or be significantly weakened by the remount index cut into the base of the cast. A thicker cast may not fit in the processing flask and have to be thinned, thereby removing the remount index and eliminating the possibility of doing an accurate laboratory remount.
Master Casts for Complete Dentures • The master cast is an accurate replica of the residual ridge areas, and other parts of the dental arch upon which a complete denture prosthesis can be fabricated. This cast must be protected by blocking out all undercuts before making the baseplate.
The end Photo by Dr. Tom Ward