Download
1 / 9
90 likes | 278 Views
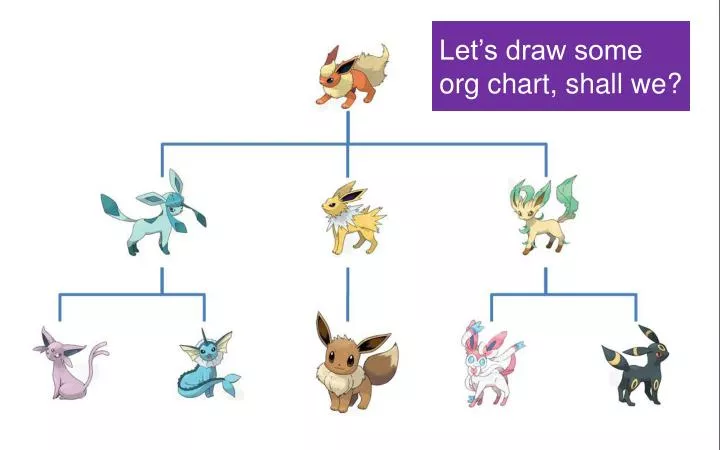
Let’s draw some org chart, shall we?. Design>Page Setup>In the box “Slides sized for”, choose “16:10”. This gives you more space. See?. When you want to line up things in the center, don’t drag with the mouse. Select the box you want in the middle. Format>Align>Align Center

E N D
Design>Page Setup>In the box “Slides sized for”, choose “16:10”. This gives you more space. See? When you want to line up things in the center, don’t drag with the mouse. Select the box you want in the middle. Format>Align>Align Center Left and right alignments apply the same. Never use the mouse to move things along. Use it only to make selections (holding Ctrl or Shift if necessary) and then move boxes and/or their connectors using only the arrow keys. 1
Elbow connectors Box Lines We can connect boxes using lines, as shown above, but things get tricky when we have to move them. See? Now let’s have a look at what elbow connectors do. 2
See? With EC’s, you only have to move the boxes. And when you use elbow connectors, anchor points appear in red dots. All you have to do is connect. 3
B A Both the length and height of the connectors adjust themselves but if the default adjustments do not fit your need (i.e., if you don’t want the horizontal line to be halfway between the verticals, as in C), you can adjust manually by moving the diamond which appears when you select the connector. C A = default B = horizontal adjustment C = vertical adjustment D D = manual adjustment 4
Along the way, you might find the “Duplicate” command (Ctrl + D) heavily useful. This is what it does. Select… Ctrl + D Tada! 5
1. Duplicate this part. 1 2. With the duplicate selected, move it with the arrow keys until it perfectly overlaps its parent(s). Unfortunately, this is where most professionals tend to “skip”. Trust me, having boxes aligned straight earns you respect. Hold Ctrl during the move for fine touches. 2 3 6 3. Place the duplicate where it belongs and join the connector’s edge to the desired anchor point.
With just this piece of skill, you can draw almost any respect-worthy OC without using the dreaded DumbArt…umm I mean, SmartArt. 7