Download
1 / 9
140 likes | 424 Views
Start up- Ooval pressure reducing valve Oz series model: OZ-RD 1. To adjust the PRV make sure that there is constant flow through the valve, by opening any consumption downstream to the PRV . 2. Close the PRV manually by turning the three way mini valve(3) to close position.

E N D
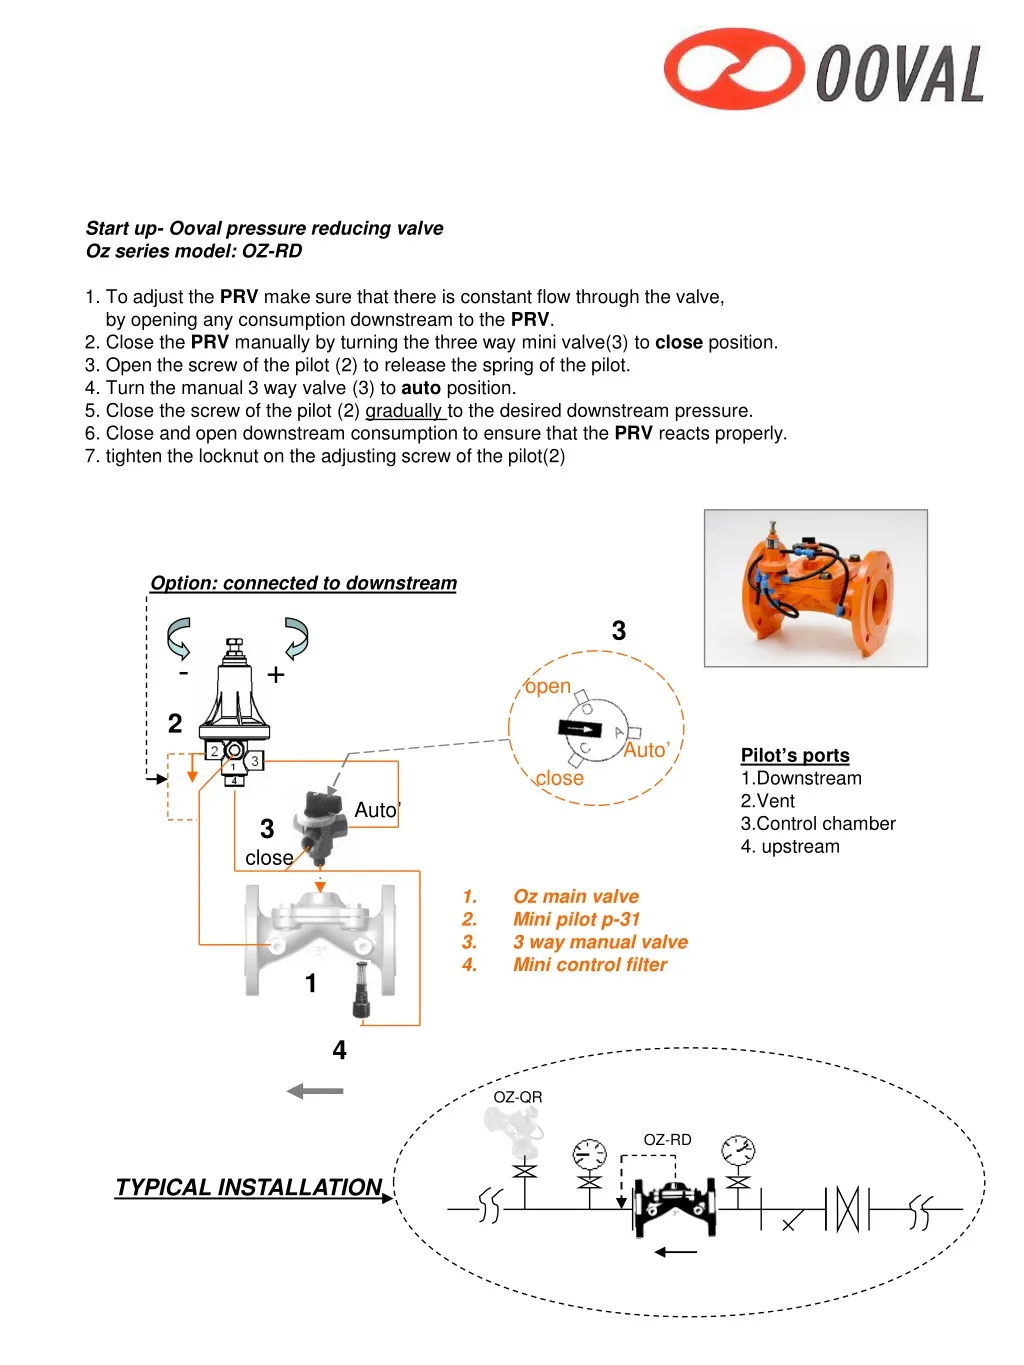
Start up- Ooval pressure reducing valve Oz series model: OZ-RD 1. To adjust the PRV make sure that there is constant flow through the valve, by opening any consumption downstream to the PRV. 2. Close the PRV manually by turning the three way mini valve(3) to close position. 3. Open the screw of the pilot (2) to release the spring of the pilot. 4. Turn the manual 3 way valve (3) to auto position. 5. Close the screw of the pilot (2) gradually to the desired downstream pressure. 6. Close and open downstream consumption to ensure that the PRV reacts properly. 7. tighten the locknut on the adjusting screw of the pilot(2) Option: connected to downstream 3 - + open 2 Auto’ close Auto’ 3 close • Oz main valve • Mini pilot p-31 • 3 way manual valve • Mini control filter 1 1 4 4 OZ-QR OZ-RD TYPICAL INSTALLATION Pilot’s ports 1.Downstream 2.Vent 3.Control chamber 4. upstream
QR Port 4 needle valve QR Port 5 Port 3 - + 3 open 2 Port 1 or 2 Auto’ Auto’ close 3 close 2 1 4 OZ-QR OZ-RD Start up- Ooval pressure sustaining/quick relief valve Oz series model: OZ-SU/QR 1. Make sure upstream pressure is available by opening water supply source. 2. Close the QR/SU by turning the screw of the pilot(2) as far as possible clockwise. 3. Make sure that the system with network pressure. 4. Turn the adjusting screw of the pilot counterclockwise until the QR starts to open 5. Check valve function by increasing and decreasing network pressure the QR/SU should open and close in response. SU SU Pilot’s ports 1.upstream 2.upstream 3.Control chamber 4. vent 3 • Oz main valve • Mini pilot p-31 • 3 way manual valve • Mini control filter TYPICAL INSTALLATION- Quick Relief OZ-SU TYPICAL INSTALLATION- Pressure Sustaining
Start up- Ooval pressure sustaining valve with N.C electric control the valve is in normally close mode Oz series model: OZ-SUOE 1. Make sure upstream pressure is available by opening water supply source. 2. Check solenoid characteristics and ensure that it fits the electronic control system 3. Close the SU by turning the screw of the pilot(2) as far as possible clockwise. 4. Make sure that the system with network pressure. 5. Turn the adjusting screw of the pilot counterclockwise until the SU starts to open 6. Check valve function by increasing and decreasing network pressure (when the solenoid is energized) the SU should open and close in response. - + 2 • Oz main valve • Mini pilot p-31 • Solenoid 3 way N.C • Mini control filter Pilot’s ports 1.upstream 2.upstream 3.Control chamber 4. vent 1 4 TYPICAL INSTALLATION- Pressure Sustaining OZ-SU
Start up- Ooval Pressure Reducing with Hydraulic Remote Control Oz series model: OZ-RD-LC 1. Make sure that there is flow and pressure through the pressure reducing valve, by opening any consumption downstream to the PRV. . 2. Close the PRV manually by turning the (Galit) override to close position. 4. Open the screw of the pilot (2) to release the spring of the pilot. 5. Turn the (Galit) override to open position. 6. Close the screw (2) of the pilot gradually to the desired downstream pressure and tighten the locknut on the adjusting screw of the pilot (2). 7. Close and open downstream consumption to ensure that the PRV reacts properly. 8. Apply hydraulic pressure to the sense port, the PRV should regulate the downstream pressure. - PRESSURE – REGULATING MODE + 2 NO NO PRESSURE – CLOSE MODE s 3 C 5 1 • Oz main valve • Mini pilot p-31 • Hydraulic remote control feature • Mini control filter • Hydraulic remote control command 4 Pilot’s ports 1.Downstream 2.Vent 3.Control chamber 4. upstream OZ-QR TYPICAL INSTALLATION- Pressure Reducing with hydraulic remote control OZ-RD
Start up- Ooval Pressure Reducing Electric Remote Control Valve Oz series model: OZ-RD-OE 1. Make sure that there is flow and pressure through the pressure reducing valve, by opening any consumption downstream to the PRV. 2. Check solenoid characteristics and ensure that it fits the electronic control system. 3. Close the PRV manually by the three way manual valve(4) to close position. 4. Open the screw of the pilot (2) to release the spring of the pilot. 5. Turn the manual 3 way valve (4) to auto position. 6. Close the screw (2) of the pilot gradually until it reaches the desired downstream pressure. 7. Tighten the locknut on the adjusting screw of the pilot(2). 8. Close and open downstream consumption to ensure that the PRV reacts properly. 9. Send electric signal to regulating mode. Pilot’s ports 1.Downstream 2.Vent 3.Control chamber 4. upstream open - + 2 Auto’ close 3 Auto’ 4 close • Oz main valve • Mini pilot p-31 • Solenoid N.O. • 3 way manual valve • Mini control filter 1 5 OZ-QR TYPICAL INSTALLATION- Pressure Reducing with Electric Control OZ-RD
Start up- Ooval Pressure Reducing Electric Remote Control valve N.C Oz series model: OZ-RD-OE (without 3 way manual valve - sagiv) 1. Make sure that there is flow and pressure through the pressure reducing valve, by opening any consumption downstream to the PRV. 2. Check solenoid characteristics and ensure that it fits the electronic control system. 3. When the solenoid de-energize, the main valve is in “close position”. 3. Open the PRV manually by the solenoid override. 4. Open the screw of the pilot (2) to release the spring of the pilot. 5. Close the screw (2) of the pilot gradually until it reaches the desired downstream pressure. 6. Tighten the locknut on the adjusting screw of the pilot(2). 7. Close and open downstream consumption to ensure that the PRV reacts properly. 8. Send electric signal to regulating mode. Pilot’s ports 1.Downstream 2.Vent 3.Control chamber 4. upstream - + 2 3 • Oz main valve • Mini pilot p-31 • Solenoid N.O. • Mini control filter 1 4 OZ-QR TYPICAL INSTALLATION- Pressure Sustaining OZ-RD
Start up- Ooval 2 WAY (brass pilot) Pressure Reducing Valve Oz series model: OZ-RD2wm Make sure that there is flow and pressure through the pressure reducing valve, by opening any consumption downstream the PRV. Manually: To open the Ooval valve open isolation valves 5 and 6.. To close the Ooval valve closedownstream isolation valve 6. upstream isolation valve 5 should be open Automatic: make sure that isolation valves 5 & 6 are open. When the downstream pressure is lower than that of the pilot spring, the control chamber drains into the downstream and the valve opens. In this case there is a connection between port 3 (inlet upstream), port 1 or 2 (outlet downstream) and the control chamber. When the downstream pressure rises above the preset spring load, the pilot’s diaphragm is forced upwards closing port 1 or 2 (outlet downstream). The valve then begins closing and downstream pressure decreases. Close and open downstream consumption to ensure that the PRV reacts properly. Pilots ports 1 or 2 downstream/pressure gauge. 3 upstream (pressure) 4 control chamber. 2 3 1 OR 2 3 4 • Oz main valve • Metal pilot p-21(pressure reducing 2 way) • Needle valve / orifice (2 mm) • Mini control filter metal • Isolation valve • Isolation valve • Sleeve 7 6 1 4 5 OZ-QR PRESSURE FOR DRIPERS OZ-RD2WM TYPICAL INSTALLATION- Pressure Reducing 2 way PRESSURE FOR SPRINKLERS
Start up- Ooval 2 WAY (brass pilot) Pressure Reducing with Electric Control Valve Oz series model: OZ-RDOE2WM Make sure that there is flow and pressure through the pressure reducing valve, by opening any consumption downstream to the PRV. Manual: in normal position the prv is close, To open the Ooval valve open isolation valves 5 and 6 and make sure that the solenoid is energized . To close the Ooval valve (solenoid is energized) close onlydownstream isolation valve 6. upstream isolation valve 5 should be open. Automatic: make sure that isolation valves 5 & 6 are open and the solenoid is energize . When the downstream pressure is lower than that of the pilot spring, the control chamber drains into the downstream and the valve opens. In this case there is a connection between port 3 (inlet upstream), port 1 or 2 (outlet downstream) and the control chamber. When the downstream pressure rises above the preset spring load, the pilot’s diaphragm is forced upwards and closes port 1 or 2 (outlet downstream). The valve then begins closing and downstream pressure decreases. Close and open downstream consumption to ensure that the PRV reacts properly. Pilots ports 1 OR 2 downstream/pressure gauge. 3 upstream (pressure) 4 control chamber. 2 9 8 1 OR 2 3 • Oz main valve • Metal pilot p-21(pressure reducing 2 way) • Needle valve / orifice (2 mm) • Mini control filter metal • Isolation valve • Isolation valve • Sleeve • 2 way relay • Solenoid N.O 3 4 7 6 1 4 5 OZ-QR PRESSURE FOR DRIPERS OZ-RD2WM TYPICAL INSTALLATION- pressure reducing 2 way PRESSURE FOR SPRINKLERS
open Auto’ close Start up- Ooval 3 WAY (mini pilot) Pressure Reducing & sustaining with Electric Remote Control valve ,Oz series model: OZ-RSOE3WP Make sure that there is flow and pressure through the pressure reducing valve, by opening any consumption downstream the RSV. Check solenoid characteristics and ensure that it fits the electronic control system Manual: in normal position the RSV is closed. To open the Ooval valve use the three way selector to close or open by turning the handle to C(CLOSE) or O (open) , make sure that the solenoid is energized. The electric remote control enables to operate the Ooval valve in automatic reducing & sustaining mode Automatic: Position the three-way selector handle to A (automatic) and make sure that the solenoid is energized . When the upstream pressure is low, the pilot’s membrane is in its lowest position. The valve’s control chamber is exposed to line pressure through ports 2-3 of the pilot. The Ooval closes to sustain the upstream pressure. When the upstream pressure is higher than preset, it overcomes the pilot spring and forces the pilot diaphragm to move upwards. The connection between ports 3-4 opens and port 2 closes. The control chamber drains and the valve opens to relieve the excessive pressure downstream. In 3-way configurations, the control chamber drains out to atmosphere, permitting the valve to open entirely. P.RD’ P.SU’ 2 2 3 close • Oz main valve • Mini pilot p-31 • 3 way manual valve • Mini control filter 1 4 OZ-RSEL