Download
1 / 1
10 likes | 25 Views
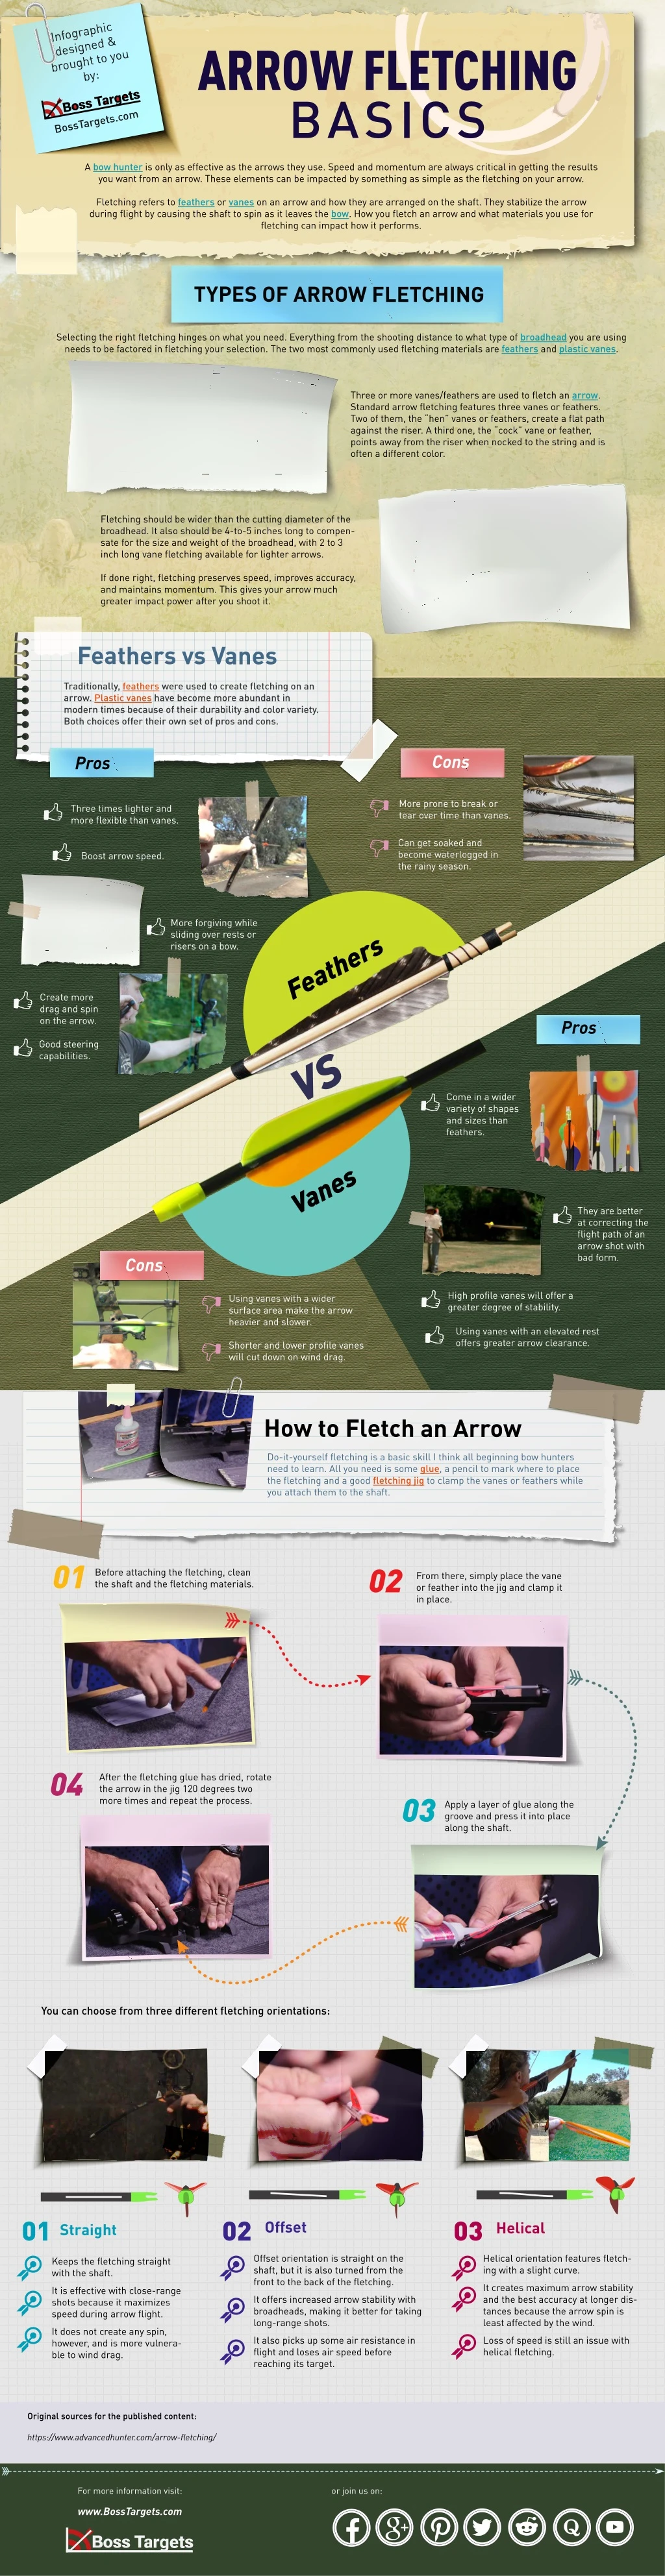
In this infographic, we have explained some of the arrow fletching basics which will help you to do the arrow fletching effectively.

E N D
Infographic designed & brought to you by: ARROW FLETCHING BASICS BossTargets.com A bow hunter is only as effective as the arrows they use. Speed and momentum are always critical in getting the results you want from an arrow. These elements can be impacted by something as simple as the fletching on your arrow. Fletching refers to feathers or vanes on an arrow and how they are arranged on the shaft. They stabilize the arrow during flight by causing the shaft to spin as it leaves the bow. How you fletch an arrow and what materials you use for fletching can impact how it performs. TYPES OF ARROW FLETCHING Selecting the right fletching hinges on what you need. Everything from the shooting distance to what type of broadhead you are using needs to be factored in fletching your selection. The two most commonly used fletching materials are feathers and plastic vanes. Three or more vanes/feathers are used to fletch an arrow. Standard arrow fletching features three vanes or feathers. Two of them, the “hen” vanes or feathers, create a flat path against the riser. A third one, the “cock” vane or feather, points away from the riser when nocked to the string and is often a different color. Fletching should be wider than the cutting diameter of the broadhead. It also should be 4-to-5 inches long to compen- sate for the size and weight of the broadhead, with 2 to 3 inch long vane fletching available for lighter arrows. If done right, fletching preserves speed, improves accuracy, and maintains momentum. This gives your arrow much greater impact power after you shoot it. Feathers vs Vanes Traditionally, feathers were used to create fletching on an arrow. Plastic vanes have become more abundant in modern times because of their durability and color variety. Both choices offer their own set of pros and cons. Cons Pros More prone to break or tear over time than vanes. Three times lighter and more flexible than vanes. Can get soaked and become waterlogged in the rainy season. Boost arrow speed. More forgiving while sliding over rests or risers on a bow. Feathers Create more drag and spin on the arrow. Pros VS Good steering capabilities. Come in a wider variety of shapes and sizes than feathers. Vanes They are better at correcting the flight path of an arrow shot with bad form. Cons High profile vanes will offer a greater degree of stability. Using vanes with a wider surface area make the arrow heavier and slower. Using vanes with an elevated rest offers greater arrow clearance. Shorter and lower profile vanes will cut down on wind drag. How to Fletch an Arrow Do-it-yourself fletching is a basic skill I think all beginning bow hunters need to learn. All you need is some glue, a pencil to mark where to place the fletching and a good fletching jig to clamp the vanes or feathers while you attach them to the shaft. 01 02 Before attaching the fletching, clean the shaft and the fletching materials. From there, simply place the vane or feather into the jig and clamp it in place. 04 After the fletching glue has dried, rotate the arrow in the jig 120 degrees two more times and repeat the process. 03 Apply a layer of glue along the groove and press it into place along the shaft. You can choose from three different fletching orientations: 01 02 03 Offset Helical Straight Offset orientation is straight on the shaft, but it is also turned from the front to the back of the fletching. It offers increased arrow stability with broadheads, making it better for taking long-range shots. It also picks up some air resistance in flight and loses air speed before reaching its target. Helical orientation features fletch- ing with a slight curve. It creates maximum arrow stability and the best accuracy at longer dis- tances because the arrow spin is least affected by the wind. Loss of speed is still an issue with helical fletching. Keeps the fletching straight with the shaft. It is effective with close-range shots because it maximizes speed during arrow flight. It does not create any spin, however, and is more vulnera- ble to wind drag. Original sources for the published content: https://www.advancedhunter.com/arrow-fletching/ For more information visit: or join us on: www.BossTargets.com