Download
1 / 4
40 likes | 165 Views
N-Rack Installation – Part 1 Concrete Footings. Lay a concrete base covering the whole footprint of the array:. Dig two strip horizontally, for the feet of the array:. 3) Dig strips vertically for the fee of the array:.

E N D
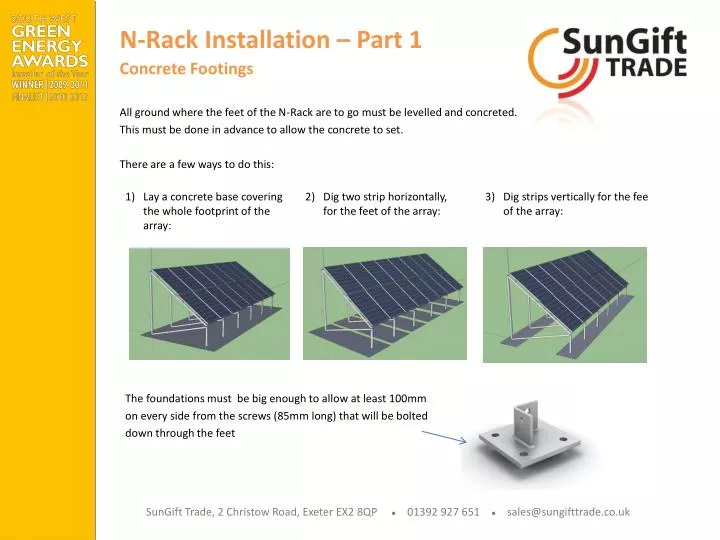
N-Rack Installation – Part 1 • Concrete Footings Lay a concrete base covering the whole footprint of the array: Dig two strip horizontally, for the feet of the array: 3) Dig strips vertically for the fee of the array: All ground where the feet of the N-Rack are to go must be levelled and concreted. This must be done in advance to allow the concrete to set. There are a few ways to do this: The foundations must be big enough to allow at least 100mm on every side from the screws (85mm long) that will be bolted down through the feet SunGift Trade, 2 Christow Road, Exeter EX2 8QP ● 01392 927 651 ● sales@sungifttrade.co.uk
N-Rack Installation – Part 2 • Building the Frame • U Shape Bar (V. Long) • Large L Bar • Pointy Connector • Small L Bar • Feet N racks only allows panels to be mounted in portrait and they have to be in two rows. The ‘N’ on the N-rack comes as four bars and two feet. All bars and feet have pre-drilled holed where they overlap with each other An allen bolt, washer and nut are put through the overlapping sections to hold together the structure Each ‘N’ is sold as one piece, and we sell at £122.40 + VAT SunGift Trade, 2 Christow Road, Exeter EX2 8QP ● 01392 927 651 ● sales@sungifttrade.co.uk
N-Rack Installation – Part 3 • Completing the Frame • Medium Rail • 1.4m • Wind Braces • The U-shaped bar (V Long) has pre-drilled holes which the medium rail can be put on top of and secured with a T-nut and bolt. • This process is repeated and rail connector sets used if needed. Whether rail connectors are needed will depend on the size of the N-rack. • In the middle section of the N Rack a wind brace must be installed. This is essentially a cross brace which runs across the back of the array (as shown below). It is important to make sure that the ‘N’’s are 1.4m apart so that the wind brace fits. • A wind brace must be fitted across the back and the front of the array, in the central part of the array. Once the ‘N’s are made, they are screwed into the pre-levelled concrete floor, 1.4m apart: SunGift Trade, 2 Christow Road, Exeter EX2 8QP ● 01392 927 651 ● sales@sungifttrade.co.uk
N-Rack Installation – Part 4 Putting on panels How to design an N-Rack System • Work out the dimensions of the array, i.e. Work out how many panels you will be installing and the size of the combined array. • Work out how many ‘N’s you will need, i.e. Divide the length of the array by 1.4m. On a typical 4kW installation, using panels which are roughly 1m wide you will need six ‘N’s. • Work out which rail fittings you need to mount the panels, always using medium rail to make sure rail tolerances are adhered to. Again, on a typical 4kW installation, with two rows of eight panels in portrait, you will need 8 lengths of medium rail. • Get a quote from SunGift Trade! Call 01392 927 651 or email sales@sungifttrade.co.uk • A Typical 4kW system will require: 6 x N’s, 8 x Medium rail 4.35m, 4 x medium connector sets, 24 x T nut + bolt set, 8 x end clamps, 39-41mm, 28 x mid clamp sets 34-41mm Panels are placed on top of the medium rail and clamped into position using mid and end clamps, much like a roof mounted installations. SunGift Trade, 2 Christow Road, Exeter EX2 8QP ● 01392 927 651 ● sales@sungifttrade.co.uk