Download
1 / 20
200 likes | 217 Views
Learn how to design a clickable map for the Mini Trivia Challenge game. Explore topics like scorekeeping, asking for answers, billboards, and multi-layered objects.

E N D
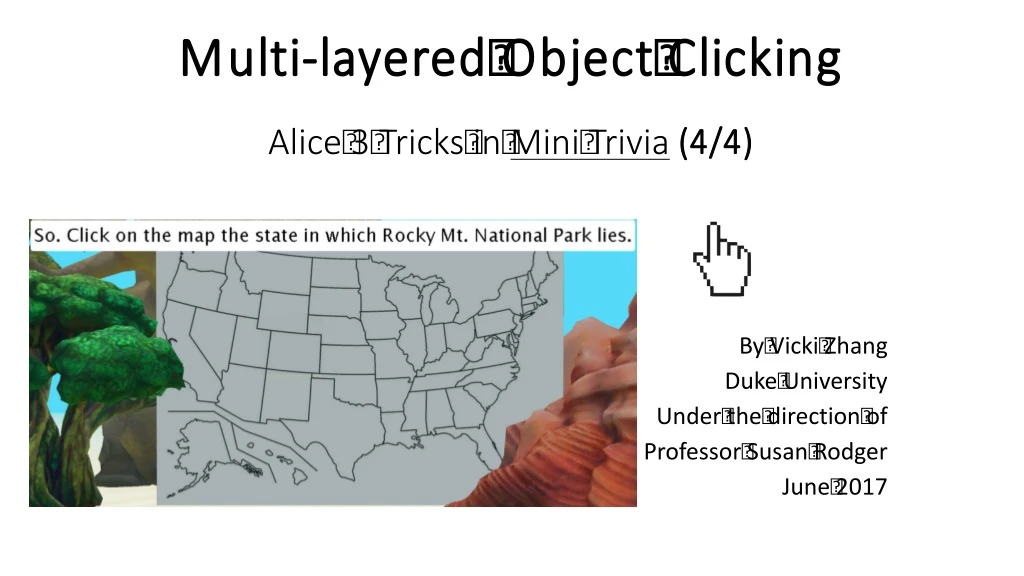
About the Mini Trivia Challenge Mini Trivia is a four-question game created by Vicki Zhang. The author explains four useful topics involved in separate tutorials: scorekeeper asking user for an answer billboard multi-layered object clicking This tutorial explains how to design a clickable map. Start by downloading Mini Trivia Challenge 4_Multi-layer Click_Startandmapjpg.
Palm tree leads to question B: Find the state of Rocky Mt. Park. That will require the entire map to be clickable and discerning (to decide correctness and thereby +/- the score).
Setting up the scene 2 • Shiftthe camera view to cameraMarker2through steps 1 and 2 illustrated on the right. • You should see • Add four objects from Shapes/Text folder, more explanations later: a billboard, two discs, and a starfish. 1
1.Billboard • CheckoutMiniTriviaTutorial#3fordetailsofaddingabillboard. • Goaheadandaddthemappictureincludedinthepacket.Adjusttillhappy. You could find the demo on next slide. • Note: Don’t be afraid to move the view around. Remember that camera marker is your friend.
1. Billboard I tilted the map a little bit using Rotation for greater contrast.
2. Discs • Let’s first add one disc and name it correctState. Discs are in the Shapes/Text folder. • Shift the view. Use Resize and Move alternatively to cover Colorado. Make sure you can see the disc from cameraMarker2. • Set its paint to red for now.
2. Discs • Now, add another disc and name it otherStates. • This is where “multi-layered” comes in. • Shift the view. Use Resize and Move alternatively to cover the entire map. Make sure you place this disc in between the map and the Colorado disc (shown on next page).
The reason behind is simple. We want to create a discerning map. With the two discs, the map is. When the red disc is clicked on, add score; when the gray disc is clicked on, reduce score. This multi-layered spatial relation disables users from clicking on the Colorado part of the gray disc.
3. Lastly, a starfish SearchGalleryforastarfishandaddit.Ichangedthepainttoblue. Placeandresizeituntilitcoversroughlytheuppersideofthereddisc. WewillusethisstarfishtoindicatethepointofRockyMt.park.
Finish up setting the scene • Forthetwodiscs, set paint to white and opacity to 0.1 • Forthestarfish,setopacityto0.0 • Notes: • We want to make theminvisible, but 0.0 opacity will make the objects difficult to click on. • Makesuretheobjectsstandfromneartofarinthisorder:starfish,smalldisc,largedisc,map.
Edit code • Believe it or not, we have actually already completed the more complicated part! • Now, go to Edit Code >> Initial Event Listeners • We’ll add two mouseClicked listeners for • (1) clicking on the correct state, i.e. on starfish or small disc • (2) clicking on rest of the map, i.e. on large disc • Recall that due to our multi-layered structure, there’s no way users can click on the Colorado part of the large disc!
If clicked on the correct state • First, let’s add an event listener, and specifically, MouseClickOnObject Listener. • Second, we want to add details. Both features are needed in our case.
If clicked on the correct state • Add details • >> Set of visuals: add starfish and correctState. • >> Multiple event policy: ignore
If this clicking event is heard, we need to award the user. Feel free to improvise but make sure to include the following lines. The first line is to update the scorekeeper. Check Tutorial #1 for more. The second line makes the starfish (pinpoint) appear. The palm tree disappears to prevent the user from clicking on the question again. The fourth line allows users to go back to the menu.
Try it out! • Run the program >> select palm tree >> click on Colorado!
If clicked on the incorrect state • Similarly, we need a MouseClickOnObjectListener for the large disc. If clicked, we’ll tell the user they got the wrong spot and then reduce their score. • Try it out yourself first!
If clicked on the incorrect state Make sure to include these:
Done! Good job!