Download

1 / 66
660 likes | 676 Views
Explore Bank-Stability Model Version 5.4 with features for assessing bank stability, tension cracks, hydraulic toe erosion, and vegetation effects. Use the tool to analyze bank profiles and assess protection measures efficaciously.

E N D
Bank-Stability and Toe-Erosion Model Andrew Simon, Robert Thomas, Andrea Curini and Natasha Bankhead USDA-ARS National Sedimentation Laboratory, Oxford, MS andrew.simon@ars.usda.gov
Bank-Stability Model Version 5.4 • 2-D wedge- and cantilever-failures • Tension cracks • Search routine for failures • Hydraulic toe erosion • Increased shear in meanders • Accounts for grain roughness • Complex bank geometries • Positive and negative pore-water pressures • Confining pressure from flow • Layers of different strength • Vegetation effects: RipRoot • Inputs: gs, c’, f’, fb , h, uw, • k, tc shear surface Tensiometers (pore pressure) Confining pressure WATER LEVEL, M
Model Structure • Introduction page: provides general background • Technical Background page: provides equations for stability analysis including positive and negative pore-water pressures, effects of vegetation, and the toe-erosion algorithm. • Model Use and FAQ page: provides methodology for application of model features including hints for working with bank geometry, selecting the shear surface, soil layers, pore-water pressure/water table, vegetation, and the toe-erosion algorithm.
Model Structure (cont’d) • Input Geometry page: Enter coordinates for bank profile, soil layer thickness, and flow parameters. • Bank Material page: Enter bank-material properties (geotechnical and hydraulic) • Bank Vegetation and Protection page: Run root reinforcement (RipRoot) model and to input default values of bank and toe protection. • Bank Model Output page: Enter water-table depth and obtain results.
Model Structure (cont’d) • Toe Model Output page: Run shear stress macro and obtain toe-erosion results. • Unit Converter page: Imperial (English) to metric units
Modeling Steps • Model the current bank profile by first evaluating the effect of hydraulic erosion at the bank toe. • Take the resulting new profile and run this in the bank- stability model to see if the eroded bank is stable. • Investigate the effects of water-table elevation, stage, tension cracks, vegetation, and toe protection.
Operational Steps • Open Excel file “BSTEM-5.4” • Click on “Enable Macros”…to “Introduction” sheet
Operational Steps • Open Excel file “BSTEM-5.4” • Click on “Enable Macros”…to “Introduction” sheet • Click on “Input Geometry” sheet
Operational Steps • Open Excel file “BSTEM-5.4” • Click on “Enable Macros”…to “Introduction” sheet • Click on “Input Geometry” sheet • Select EITHER Option A or Option B forbank geometry and input geometry data. For this first example select Option B.
Input Geometry Sheet National Sedimentation Laboratory
Starting with Option B • Select: Option B • 5m high bank • 85 degree angle • 1m toe length • 25 degree toe angle If you don’t know failure-plane angle, search routine will solve for it.
Operational Steps • Open Excel file “BSTEM-5.4” • Click on “Enable Macros”…to “Introduction” sheet • Click on “Input Geometry” sheet • Select EITHER Option A or Option B to input bank geometry • Enter Bank-layer Thickness
Enter Bank Layer Thickness: Detail For this example, enter 1m thicknesses for all five layers Layer 5 should (but does not have to) end at or below the base of the bank toe. Therefore, the basal elevation of layer 5 should be equal to or less than the elevation of point V (base of bank toe) if Option A is selected or 0 (zero) if Option B is selected.
Operational Steps • Open Excel file “BSTEM-5.4” • Click on “Enable Macros”…to “Introduction” sheet • Click on “Input Geometry” sheet • Select EITHER Option A or Option B to input bank geometry • Enter bank-layer thickness • Enter channel and flow parameters, and check cross section inputs: a. View Geometry b. Bank Geometry Macro
Channel and Flow Parameters: Detail Input the above values for this example
Check Geometry and Flow Level • Model will direct you to the Bank Material sheet • Click on Bank Model Output sheet
Operational Steps • Open Excel file “BSTEM-5.4” • Click on “Enable Macros”…to “Introduction” sheet • Click on “Input Geometry” sheet • Select EITHER Option A or Option B to input bank geometry • Enter Bank-layer Thickness • Enter channel and flow parameters • Enter Bank-material Properties: Click on “Bank Material” sheet
Select Bank Materials by Layer Select bank materials by layer from drop down boxes. For this case: Layer 1 = Moderate soft clay, Layer 2 = Moderate soft clay, Layer 3 = Moderate silt, Layer 4 = Erodible silt, Layer 5 = Moderate silt, Bank Toe Material = Own data
Selecting Bank Materials Enter values (2.00 and 0.071) Input value (2.00) and hit enter
Operational Steps • Open Excel file “BSTEM-5.4” • Click on “Enable Macros”…to “Introduction” sheet • Click on “Input Geometry” sheet • Select EITHER Option A or Option B to input bank geometry • Enter Bank-layer Thickness • Enter channel and flow parameters • Enter Bank-material Properties: Click on “Bank Material” sheet • Select “Toe Model Output” sheet and Click on “Run Toe-Erosion Model”
Results of Toe-Erosion Model Click this button to export eroded profile to Option A in “Input Geometry” worksheet
Operational Steps • Open Excel file “BSTEM-5.4” • Click on “Enable Macros”…to “Introduction” sheet • Click on “Input Geometry” sheet • Select EITHER Option A or Option B to input bank geometry • Enter Bank-layer Thickness • Enter channel and flow parameters • Enter Bank-material Properties: Click on “Bank Material” sheet • Select “Toe Model Output” sheet and Click on “Run Toe-Erosion Model” • Export Coordinates to Model (Returned to “Input Geometry” sheet)
Profile Exported into Option A(Model Directs you to “Input Geometry” sheet) For this case select Point Q Check profile (View Geometry) and select top of bank toe Either: (1) Select shear emergence elevation and shear angle or (2) leave blank for search routine
Operational Steps • Open Excel file “BSTEM-5.4” • Click on “Enable Macros”…to “Introduction” sheet • Click on “Input Geometry” sheet • Select EITHER Option A or Option B to input bank geometry • Enter Bank-layer Thickness • Enter channel and flow parameters • Enter Bank-material Properties: Click on “Bank Material” sheet • Select “Toe Model Output” sheet and Click on “Run Toe-Erosion Model” • Export Coordinates to Model (Returned to “Input Geometry” sheet) • Run “Bank Geometry Macro” and Click on “Bank Model Output” sheet; Set water-table depth and Click “Run Bank Stability Model”
Data for Pore-Water Pressure In “Bank Model Output” worksheet In this case select option to use water table depth, and enter a value of 3.0m below the bank top Or
Bank Model Output: No Tension Crack Set water-table depth to 3.0 m Bank is Unstable Fs < 1.0 Click “Run Bank-Stability Model” (No tension crack)
Bank Model Output: Specific Results Failure dimensions (loading) Failure plane from search routine Save your file under a different name
Operational Steps • Open Excel file “BSTEM-5.4” • Click on “Enable Macros”…to “Introduction” sheet • Click on “Input Geometry” sheet • Select EITHER Option A or Option B to input bank geometry • Enter Bank-layer Thickness • Enter channel and flow parameters • Enter Bank-material Properties: Click on “Bank Material” sheet • Select “Toe Model Output” sheet and Click on “Run Toe-Erosion Model” • Export Coordinates to Model (Returned to “Input Geometry” sheet) • Run “Bank Geometry Macro” and Click on “Bank Model Output” sheet; Set water-table depth and Click “Run Bank Stability Model” • Save file under different name
How can you make this bank more stable or more unstable? Try experimenting with the following parameters to get a feel for the model: • Water surface elevation (Input Geometry Sheet) • Shear angle (Input Geometry Sheet) • Water table height (Bank Model Output sheet) • Bank material types (Bank Model Output sheet) We’ll work with the effects of vegetation later…
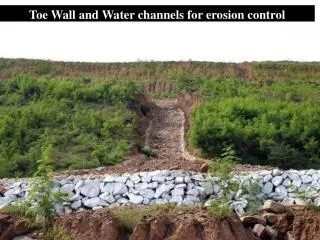
Hydraulic Protection Geotechnical Protection Distinguish Between Hydraulic and Geotechnical Bank Protection • Hydraulic protection reduces the available boundary hydraulic shear stress and increases the shear resistance to particle detachment • Geotechnical protection increases soil shear strength and decreases driving forces
Hydraulic Protection Geotechnical Protection Distinguish Between Hydraulic and Geotechnical Bank Protection • Toe armoringrock, LWD, live vegetation, fiberschines • Bank face armoringmattresses, vertical bundles, geotextiles • Bank reinforcementpole and post plantings, bank top vegetation, brush layers, drainage
Operational Steps • Open Excel file “BSTEM-5.4” • Click on “Enable Macros”…to “Introduction” sheet • Click on “Input Geometry” sheet • Select EITHER Option A or Option B to input bank geometry • Enter Bank-layer Thickness • Enter channel and flow parameters • Enter Bank-material Properties: Click on “Bank Material” sheet • Select “Toe Model Output” sheet and Click on “Run Toe-Erosion Model” • Export Coordinates to Model (Returned to “Input Geometry” sheet) • Run “Bank Geometry Macro” and Click on “Bank Model Output” sheet; Set water-table depth and Click “Run Bank Stability Model” • Save file under different name • Open file and Click on “Bank Vegetation and Protection” sheet
Incorporating Vegetation Effects and other Protection Root Reinforcement: RipRoot (from measured data) Bank and Toe Protection (from literature values)
Operational Steps • Open Excel file “BSTEM-5.4” • Click on “Enable Macros”…to “Introduction” sheet • Click on “Input Geometry” sheet • Select EITHER Option A or Option B to input bank geometry • Enter Bank-layer Thickness • Enter channel and flow parameters • Enter Bank-material Properties: Click on “Bank Material” sheet • Select “Toe Model Output” sheet and Click on “Run Toe-Erosion Model” • Export Coordinates to Model (Returned to “Input Geometry” sheet) • Run “Bank Geometry Macro” and Click on “Bank Model Output” sheet; Set water-table depth and Click “Run Bank Stability Model” • Save file under different name • Open file and Click on “Bank Vegetation and Protection” sheet • Click “Run Root-Reinforcement Model”
Root Reinforcement using RipRoot 1. Select “Meadow, Wet” 2. Enter age and percent contribution to stand 3. Click when finished Simple Case: 1 species
Operational Steps • Open Excel file “BSTEM-5.4” • Click on “Enable Macros”…to “Introduction” sheet • Click on “Input Geometry” sheet • Select EITHER Option A or Option B to input bank geometry • Enter Bank-layer Thickness • Enter channel and flow parameters • Enter Bank-material Properties: Click on “Bank Material” sheet • Select “Toe Model Output” sheet and Click on “Run Toe-Erosion Model” • Export Coordinates to Model (Returned to “Input Geometry” sheet) • Run “Bank Geometry Macro” and Click on “Bank Model Output” sheet; Set water-table depth and Click “Run Bank Stability Model” • Save file under different name • Open file and Click on “Bank Vegetation and Protection” sheet • Click “Run Root-Reinforcement Model” • Return to “Bank Model Output” sheet
Still Unstable with Vegetation Revised strength and Fscalculated automatically
Conditionally Stable with Lower Water Table Change water-table depth to 3.75 m Revised pore-water pressures and Fscalculated automatically
Further Simulations…Tension Cracks Maximum based on cohesion and unit weight 1. Click “Run-Bank Stability Model” 2. Click “Yes” for tension crack 3. Enter depth of tension crack We often use ½ the value or observed vertical-face heights