Download
1 / 1
10 likes | 155 Views
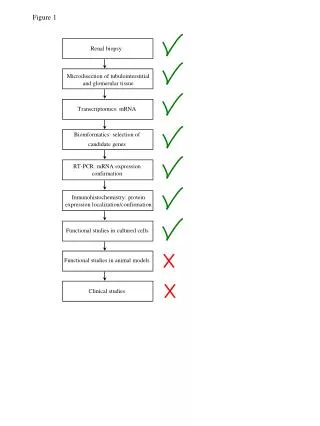
Figure 1. #1562002. 2” Piece from 1st Unit. (Piece with Brass Nozzle). On/off Valve. Figure 2. Try to get tubing up to this point. IMPORTANT: Locksleeve needs to go onto tubing, before tubing is pushed onto the on/off valve. Tubing to bottle. 2-inch Piece.

E N D
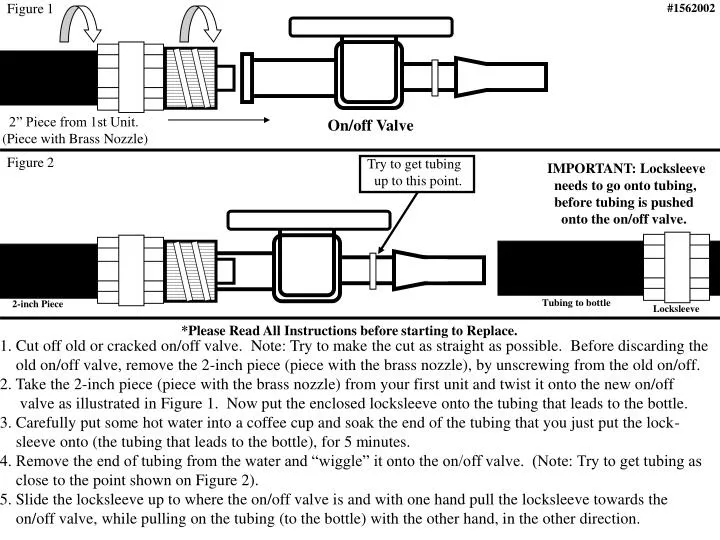
Figure 1 #1562002 2” Piece from 1st Unit. (Piece with Brass Nozzle) On/off Valve Figure 2 Try to get tubing up to this point. IMPORTANT: Locksleeve needs to go onto tubing, before tubing is pushed onto the on/off valve. Tubing to bottle 2-inch Piece Locksleeve *Please Read All Instructions before starting to Replace. 1. Cut off old or cracked on/off valve. Note: Try to make the cut as straight as possible. Before discarding the old on/off valve, remove the 2-inch piece (piece with the brass nozzle), by unscrewing from the old on/off. 2. Take the 2-inch piece (piece with the brass nozzle) from your first unit and twist it onto the new on/off valve as illustrated in Figure 1. Now put the enclosed locksleeve onto the tubing that leads to the bottle. 3. Carefully put some hot water into a coffee cup and soak the end of the tubing that you just put the lock- sleeve onto (the tubing that leads to the bottle), for 5 minutes. 4. Remove the end of tubing from the water and “wiggle” it onto the on/off valve. (Note: Try to get tubing as close to the point shown on Figure 2). 5. Slide the locksleeve up to where the on/off valve is and with one hand pull the locksleeve towards the on/off valve, while pulling on the tubing (to the bottle) with the other hand, in the other direction.