Download
1 / 20
260 likes | 461 Views
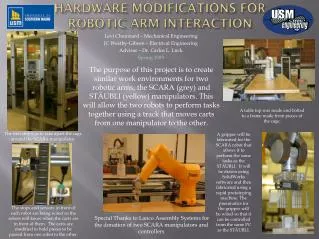
Robotic Arm 1. Wilmer Arellano. Hardware. Next slide shows sensor connection to analog pin 0 and Motor 1 connection. H-Bridge. H-Bridge .r obotroom.com/HBridge.html.

E N D
Robotic Arm 1 Wilmer Arellano
Hardware • Next slide shows sensor connection to analog pin 0 and Motor 1 connection.
H-Bridge.robotroom.com/HBridge.html This is just an example, we prefer to use the TC4422 in the T0-220 package which has higher Current capability but is single channel. You can order free samples from microchip
Precautions • The Robotic Arm is a delicate device that may be damaged if operated beyond the mechanic limits • If while you program the arm operation you observe a motion behavior that may compromise the robot integrity disconnect power immediately. Center the arm with the manual remote and make any corrections necessary to your program
Installation • Download Library from: • http://web.eng.fiu.edu/~arellano/1002/Microcontroller/Arm.zip • Unzip library and drop it in: • The libraries folder of your arduino installation. In my case: • C:\arduino-1.0.1-windows\arduino-1.0.1\libraries
Include in your final report: • An explanation of a gear box operation. Particularize for the gear boxes you are using • How to measure power in a DC motor. Include several power measurements on the arm’s motors under different operating conditions
#include <Arm.h> // Create an instancve of Arm Arm arm(0); // Backward direction, Left and Down int LEFT = 0, DOWN = 0; // Forward direction, Right and Up int RIGHT = 1, UP = 1; int control = 1, temp; void setup() { Serial.begin(9600); Serial.println("Hello"); } void loop() { arm.checkData(); while(control > 0){ arm.moveMotor(1, LEFT, 5, 10); arm.moveMotor(1, RIGHT, 5, 10); control = control - 1; temp = arm.distance(); Serial.print("Distance: "); Serial.println(temp); } }
Constructor • Include the library: • #include <Arm.h> • Create an instance of the class: • Arm arm(int); • “int” tells the library where the distance sensor is connected. • #include <Arm.h> • // Create an instancve of Arm • Arm arm(0);
Create Mnemonics • // Backward direction, Left and Down • int LEFT = 0, DOWN = 0; • // Forward direction, Right and Up • int RIGHT = 1, UP = 1;
Initialize • int control = 1, temp; • void setup() { • Serial.begin(9600); • Serial.println("Hello"); • }
Execute • void loop() { • arm.checkData(); • while(control > 0){ • arm.moveMotor(1, LEFT, 5, 10); • arm.moveMotor(1, RIGHT, 5, 10); • control = control - 1; • temp = arm.distance(); • Serial.print("Distance: "); • Serial.println(temp); • } • }
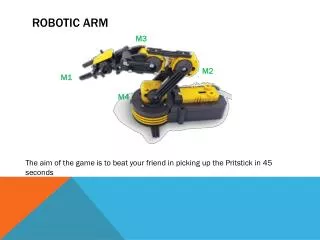
Motor Control 1 • arm.moveMotor(int motorID, int Direction, int Speed, int time) • Motor ID = 1, 2, 3, 4, 5 • Direction = RIGHT, LLEFT • 0 < Speed < 11 • 0 < time < 40 • You may need to invert your motor connection for proper operation
Motor Control 2 • arm.checkData() • This function with no arguments checks for serial data from the computer • Use the serial monitor of the Arduino IDE to control the arm • Type one or more commands and hit enter
Motor Control 2 • Commands • Selection • a or A moves motor towards left • Motion • s or S moves motor towards right • w or W moves motor up • z or Z moves motor down • a, z and s, w are interchangeable • A single motion command will produce a small movement a sequence of several motion commands of the same type will produce an ampler motion
Distance measurement • temp = arm.distance(); • When this function is called an integer is returned with approximate distance between the sensor and an object • Limitations • Max distance 80 cm • Object with a distance less than 10 cm will appear to be farther away
Functions • Next we will modify the original code to: • Include functions • Add some delay to manually position the griper • Lines highlighted in red have change please read the comments.
#include <Arm.h> Arm arm(0); // Creates an instance of Arm int LEFT = 0, DOWN = 0; // Backward direction, Left and Down int RIGHT = 1, UP = 1; // Forward direction, Right and Up int control = 1, temp; unsigned long start, finish; // variables to measure time void setup() { // We use this loop only as we want a single execution of the program Serial.begin(9600); Serial.println("Hello"); start = millis()/1000; // "millis()" returns current time in milliseconds finish = millis()/1000;// "start" and "finish" measure time in seconds. Why? while((finish - start) < 20){ // Wait for 20 seconds Serial.println(finish-start); arm.checkData(); // Use this time to position your grip manually finish = millis()/1000; // finish will increase in each iteration } home(); // "home()" is a function call it will execute the code between the braces of "void home()" // Program will return here after executing the code of home() } void loop() { } void home(){ temp = arm.distance(); while(temp > 20){ // Replace the next comment lines with appropriated code // Move right motor #1 temp = arm.distance(); Serial.print("Distance: "); // This line is optional if you want to monitor distance in the computer Serial.println(temp); // This line is optional if you want to monitor distance in the computer } }
void setup() { // We use this loop only as we want a single execution of the program Serial.begin(9600); Serial.println("Hello"); start = millis()/1000; // "millis()" returns current time in milliseconds finish = millis()/1000;// "start" and "finish" measure time in seconds. Why? while((finish - start) < 20){ // Wait for 20 seconds Serial.println(finish-start); arm.checkData(); // Use this time to position your grip manually finish = millis()/1000; // finish will increase in each iteration } home(); // "home()" is a function call it will execute the code between the braces of "void home()" // Program will return here after executing the code of home() // add more functions, like find(); } void loop() { } void home(){ temp = arm.distance(); while(temp > 20){ // Replace the next comment lines with appropriated code // Move left motor #1, determine speed and time temp = arm.distance(); Serial.print("Distance: "); // This line is optional if you want to monitor distance in the computer Serial.println(temp); // This line is optional if you want to monitor distance in the computer } // Replace the next comment lines with appropriated code // Move right motor #1, determine speed and time } void find(){ temp = arm.distance(); while(temp > 40){ // Replace the next comment lines with appropriated code //Move right motor #1, determine speed and time temp = arm.distance(); Serial.print("Distance: "); // This line is optional if you want to monitor distance in the computer Serial.println(temp); // This line is optional if you want to monitor distance in the computer } }