Download

1 / 43
430 likes | 523 Views
CGS 2585: Desktop/Internet Publishing Spring 2010 Cascading Style Sheets – Page Layout - Part 3. Instructor : Dr. Mark Llewellyn markl@cs.ucf.edu HEC 236, 407-823-2790 http://www.cs.ucf.edu/courses/cgs2585/spr2010. School of Electrical Engineering and Computer Science

E N D
CGS 2585: Desktop/Internet Publishing Spring 2010 Cascading Style Sheets – Page Layout - Part 3 Instructor : Dr. Mark Llewellyn markl@cs.ucf.edu HEC 236, 407-823-2790 http://www.cs.ucf.edu/courses/cgs2585/spr2010 School of Electrical Engineering and Computer Science University of Central Florida
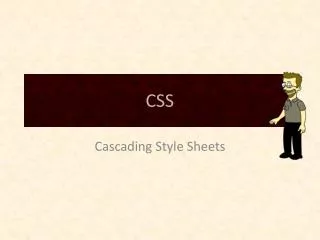
The CSS Box Model top margin top border top padding left border left padding right padding right border right margin left margin Content bottom padding bottom border bottom margin
Floating and Clearing • In addition to managing boxes, another powerful technique you can use to organize your layout on the page involves combining floating and clearing using the float and clear properties. • Floating an element is a way of moving it out of the normal flow of the document. Elements that follow a floated element will move up and set next to the floated element if there is room. • The clear property enables you to stop elements moving up next to a floated element.
Floating and Clearing • Suppose that you have two paragraphs and only want the first one to set next to a floated element, even though both paragraphs would fit next to the floated element, you can “clear” the second one so it will be positioned under the floated element rather than along side of it. • Over the next few pages we’ll look at these two properties more closely.
The float Property • The float property is primarily used to flow text around images, however it is also the basis for one of the ways to create multi-column layouts. • Let’s start by looking at an example of how to flow text around an image. In the CSS for the img element we’ll set the float property to be left as follows: img {float:left; margin:0 4px 4px 0;} • This will float the image to the left, so that the text will wrap around it to its right.
The image is floated to the left of its parent element, which in this case is the paragraph.
The <p> element does not see the floated <img> element as preceding it in the normal flow. So the <p> element takes the top left corner position of its parent (<body>). However, its content, the text of the paragraph, wraps itself around the floated image.
This time the image is floated to the right of its parent element, which in this case is the paragraph.
The float Property • In short, when you float an image or any element, you are asking for it to be pushed as far as possible up and to the left (or right – in the case of a float:right) of the parent (containing) element. • To see an illustration of this, look carefully at the next version of the markup, which is identical to the previous version (version 2) except that the image appears before the paragraph element. • This means that the parent element of the <img> is now the <body> element and thus the image will be pushed as far as possible up and to the right in the body of the document.
The image comes before the paragraph so the containing element of the image is now the body and thus the image is pushed as far up and to the right in the body of the document as is possible.
The paragraph width is still 400px, and the image is now floated up and to the right in the body element and not in the paragraph element.
The float Property • Once you understand how the float property works in relation to its containing element, it’s a simple step to use the float property to form columns. • In the next version of the floating example, we’ve added the float property to the paragraph element as well as to the image element. (I modified the width of the paragraph element to make it more narrow to more closely resemble a column for this example.)
The second paragraph is styled identical to the first and thus will float as far up and to the left as it can inside the <body> element. In this case, since there are already two floated elements it will appear after them.
The second paragraph floats up and to the left as far as it can relative to the other already floated elements.
The image is relocated in the XHTML to appear after the first paragraph. Where will it appear in the rendered version?
The image appears where you would expect it following the first paragraph. It has floated into its position out of normal flow, but it was not positioned absolutely, so it still appears as the second element in this document.
We’ve added a third paragraph to the document. Where will this third paragraph go? Will it be along side paragraph 2, or underneath it?
In this case, the browser window was wide enough to fit it along side the second paragraph. If the browser window had been narrower, it would have been placed under the picture (see next slide.) The total width of all element is: 4px + 200px + 4px + 3* 175px = 733 px
In this case, the browser window wasn’t wide enough to fit it along side the second paragraph, so the third paragraph was pushed below the image (but realize that it is still pushed as far up and to the left inside the <body> that it can be relative to the other elements which have already been positioned.
In this case, the browser window wasn’t wide enough to even allow the second paragraph to fit along side the first, so even it moved below the image. How come the second paragraph doesn’t extend to the edge of the image? Because the image and paragraphs are styled with different widths and margins.
In this version, the paragraph and image elements have been styled the same in terms of their width, border, and margins. Notice now (on the next slide) how things line up nice and neat!
The clear Property • The other property that is frequently used with float is clear. • Any element that has room to do so will move up next to a floated element, but sometimes, you don’t want this to happen; you want to clear – that is, to set below (not beside) the floated element. • For demonstrating the clear property we’ll need a slightly different document to work with, so get familiar with the XHTML/CSS on the next page.
An Aside – Contextual Selectors • In the interest of expanding your horizons a bit and also making your life easier when it comes to CSS, I’ve taken this opportunity to introduce the concept of contextual selectors in CSS. • By now you are quite familiar with writing CSS rules such as: p { color: red; }, which would style every paragraph in the document to have red text. • But what if you want only one particular paragraph to be red. While we’ve used classes for this before, there is yet another way to do this in CSS using contextual selectors.
An Aside – Contextual Selectors • As an example, we could do: div p {color: red;} • In this case only paragraphs that appear within a <div> element would have red text. Any paragraph occurring outside of a <div> element would have the default text color (black). • A contextual selector uses more than one tag name in the selector. • DO NOT confuse contextual selectors with multiple selectors! • Contextual selector: div p {color: red; } • Multiple selector: h1, p {color: red;}
An Aside – Contextual Selectors • When using a contextual selector, the rule is applied only to the last tag listed, and then only if the selectors that precede it appear in the same order somewhere in the hierarchy above it. • As an example, we could do: div p span {color: red;} • In this case only paragraphs that appear within a <div> element would have red text. Any paragraph occurring outside of a <div> element would have the default text color (black).
An Aside – Contextual Selectors • So, getting back to our original floating and clearing example, the contextual selector that I used in the CSS was: p img {float: left; margin: 0 4px 4px 0; } • Thus any <img> elements which appear inside a <p> element will be styled using this rule. Any <img> elements appearing outside of a <p> element will have a default style applied, since there are no other rules in the CSS that apply to <img> elements.
The clear Property • Getting back to the original floating and clearing example, now that you understand contextual selectors, the layout of the page as shown on slide 28 doesn’t really look all that good, because the text associated with the second picture (the one of Cat Osterman) wasn’t long enough to force the third image (of Alex the parrot) to appear below the second image. • Since there was room for it and the float property was being applied to the third image, it floated up to appear next to the second image. Probably not the effect we were looking for. We probably want each image to float next to its associated text down the page.
The clear Property • The “fix” is to add a non-floated element into the markup that has a clear property applied to it to force the third element to start below the second. • The XHTML document on the next page shows this modification and the resulting effect in the rendering on the following page.
The clear Property • The new “cleared” element (the <div> element in this case) added between the second and third paragraphs is now positioned (invisibly, because it has no content associated with it) beneath the second image. • Because the third image and paragraph follow this cleared element in the markup, they are positioned below it, and the desired layout is achieved.
Practice Problems • Modify the markup and styles for the floating and clearing demo (page 37) to achieve the affect shown on the next page. Do not use absolute positioning, use only floating and clearing to achieve the layout. The markup for the layout shown on page 38 along with the image files are on the course webpage just below the link to this document.
Practice Problems • Modify the markup and styles for the floating and clearing demo (page 37) to achieve the affect shown on the next page. Do not use absolute positioning, use only floating and clearing to achieve the layout. The markup for the layout shown on page 38 along with the image files are on the course webpage just below the link to this document.