Download

1 / 12
130 likes | 191 Views
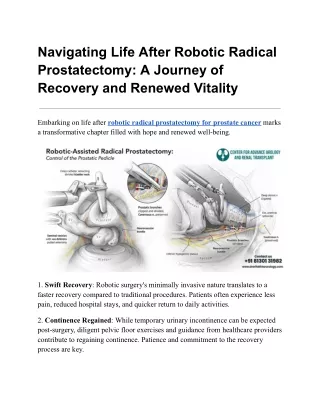
Learn about patient selection, equipment required, patient positioning, port placement, and step-by-step procedure for this advanced surgical technique led by Dr. Thomas E. Ahlering. Detailed technical tips and caveats are provided to ensure successful outcomes.

E N D
Robotic-Assisted Laparoscopic Radical Prostatectomy Thomas E. Ahlering, MD Professor of Urology University of California, Irvine
Patient Selection • Indications • Organ-confined prostate cancer • Life-expectancy > 10 years • Contraindications • Significant medical comorbidities • Metastatic disease • Multiple prior abdominal surgeries (relative)
Equipment Required • da Vinci Robot • 18 F foley catheter (2) • Knife with 15 blade • Kelly clamp • Trocars: 12 mm (2), 5 mm, 8 mm for robotic instruments (2) • Robotic instruments • Electrocautery scissors • Bipolar forceps • Needle driver (2) • Laparoscopic instruments • Suction-irrigator with long (25 cm) tip • Atraumatic bowel forceps • Scissors • Grasping forceps with teeth (locking handle) • Needle driver • EndoGIA stapler (45 mm vascular load, articulating handle) • 10 mm specimen retrieval bag • Bulldog clamps (straight & curved) with applicator • Suture: 3-0 monocryl, 4-0 vicryl
Patient Positioning • Supine position, arms tucked at sides • Legs placed on spreader bars • Abducted 30 • Lowered 45 • Extreme (25) Trendelenburg position
Port Placement • Veress needle placed 6 cm lateral to umbilicus to insufflate to 20 mm Hg • Draw lines between umbilicus and femoral artery to estimate position of medial umbilical ligaments • 12 mm camera port cephalad to umbilicus (<22 cm from pubis) • 12 mm assistant port 2 cm cephalad to iliac crest • Robotic instrument ports (8 mm) 14.5-17 cm from pubic symphysis, >10 cm from camera port, and >8 cm lateral to midline • Suction port (5 mm) ¼ distance between robotic instrument port and camera port and 30 cephalad from camera port
Port Placement HEAD FEET
Steps of the procedure(click to play video clip) 1. Placing the ports 2. Dropping the bladder 3. Defatting the prostate 4. Opening endopelvic fascia 5. Stapling the dorsal vein complex 6. Transecting the bladder neck 7. Dissecting the vas and seminal vesicles 8. Preserving the neurovascular bundles 9. Transecting the urethra 10. Suturing the vascular pedicles 11. The vesicourethral anastomosis
Technical points: Tips • Cautery with the scissor jaws open is more effective than with them closed • Use the bipolar forceps like a mini-retractor to expose tissue planes • If there is some oozing from the stapled edge of the dorsal vein complex, apply a small (2 cm) sponge. A little pressure combined with the pneumoperitoneum will stop most bleeding • Frequent irrigation helps clear the field, especially during transection of the bladder neck and urethra and during nerve sparing
Technical points: Caveats • Ensureexcellenthemostasisasabloodyfieldwillabsorblightandmakevisualizationdifficult • Bewareofdamagingthepelvicsidewallwiththeroboticarmsoutsideofthefieldofvision • Whentransectingthebladderneck,avoidthetemptationtostartinthemidline;rather,workfromalateraltomedialdirectiononeachside
Credits Surgeon: Thomas Ahlering, MD Professor of Urology Director of Urologic Oncology UC Irvine Medical Center Orange, CA 92868 714-456-6068 tahlerin@uci.edu Bedside assistant and video editor: James F. Borin, MD Clinical Instructor Laparoscopy/Endourology fellow UC Irvine Medical Center 714-456-3431 jborin@aya.yale.edu