Download

1 / 40
400 likes | 508 Views
1. Begin with one of these: Blank presentation Plain background with simple text treatments and minimal color use. Theme A background design with uniform colors and font styles, and placeholder positioning for a unified and professional appearance. Template

E N D
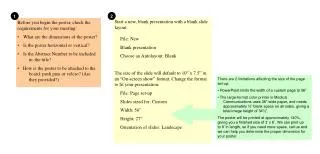
1 Begin with one of these: • Blank presentation • Plain background with simple text treatments and minimal color use. • Theme • A background design with uniform colors and font styles, and placeholder positioning for a unified and professional appearance. • Template • A theme that also include sample content to guide in developing a presentation.
Exercise 2-1 1 • Start PowerPoint. A blank title slide appears, ready for your text input. If PowerPoint is already open, • Click the File tab and choose New. • Choose Blank Presentation and click Create. Figure 2-1
Add New Slides and Use Slide Layouts Exercise 2-2 1 Use one of these methods to insert a new slide: • From the Home tab, • in the Slides group, click the New Slide button. • Press <Ctrl> + <M>. • When a placeholder is selected, press <Ctrl> + <Enter> one or more times. Figure 2-2
Add New Slides and Use Slide Layouts Exercise 2-2 1 To select slide layouts: • From the Home tab, in the Slides group, click the down arrow on the New Slide button. • Click the slide layout thumbnail. Slide layouts Figure 2-3
Change the Font Face and Font Size 2 • A font is a set of characters with a specific design. • The font face (such as Times New Roman, Garamond, Corbel, or Arial). Most fonts are TrueType shown by the icon in front of the name Figures 2-4 and 2-6
Change the Font Face and Font Size Exercise 2-3 2 • The font size is measured in points (72 points to an inch) indicating how tall a font is. Font command buttons Figures 2-5 and 2-7
Exercise 2-4 2 • Apply text attributes to change the appearance of text. • text style (such as bold or italic) • text effect (such as underline or shadow) • Click the Font Color button to change text colors. Font Group Theme Colors Theme Color Percentages Standard Colors Font Color Gallery Figure 2-8
Exercise 2-5 2 • The Change Case button can change any text to: • Sentence case • Lowercase • UPPERCASE • Capitalize Each Word • tOGGLE cASE Figure 2-9
Exercise 2-6 2 • Bulleted items are considered paragraphs. • Default spacing is 1.0; larger numbers increase space to spread text. • Increased line spacing can make text easier to read. • The Line Spacing button will change the space by increments of 0.5 lines. Figure 2-10
Exercise 2-7 2 • Click within a bulleted item then, in the Paragraph group, click the Dialog Box Launcher to open the Paragraph dialog box. • Change the Before and After spacing. Controls spacing above and below bulleted text lines or paragraphs Figure 2-11
Exercise 2-8 2 • Open the Font dialog box by clicking the Font group Dialog Box Launcher. Figure 2-12
Exercise 2-9 3 • Click the border of an active placeholder with the four-pointed arrow. • Press <Esc> while a placeholder is active (when the insertion point is in the text). • Press <Tab> to select the next placeholder (only when a text box or text placeholder is not active).
Exercise 2-9 3 Dashed line indicates text can be edited Solid line indicates the entire placeholder can be edited Figure 2-13
Exercise 2-9 3 • Press <Esc> to deselect a placeholder or other object. • (Press <Esc> twice if active for editing text.) • Click an area of the slide where there is no object.
Exercise 2-10 3 • Align paragraphs • with either the left or right placeholder borders. • center them within the placeholder. • justify long paragraphs so both margins are even. • Change text alignment for • all the text in a placeholder. • for just one line, depending on what is selected. Center alignment
Exercise 2-11 3 • Drag a sizing handle to change the size and shape of a text placeholder. • Placeholder size and position settings can also be changed using the Format Shape dialog box. Sizing handles Figure 2-14
Exercise 2-12 3 • Drag the placeholder border to move the text to a new position. Border shows new size and new position Four-pointed arrow Figure 2-15
Exercise 2-13 4 • Select the body text placeholder. • From the Home tab, in the Paragraph group, click the Bullets button to turn bullets off for an entire placeholder and move the text to the left. • Click the Bullets button again to reapply the bullets.
Exercise 2-14 4 • To indent listed text by moving it to the right: • Click the Increase List Level button. • Press <Tab>. • To remove an indent in listed by moving it to the left: • Click the Decrease List Level button. • Press <Shift> + <Tab>. Increase list level Decrease list level
Change the Color and Shape of a Bullet Exercise 2-15 4 • Choose bullets from the gallery. • Click Bullets and Numbering to open the Bullets and Numbering dialog box. Choose a bullet Figure 2-16
Change the Color and Shape of a Bullet Exercise 2-15 4 • Click Color button to select a different bullet color • Change bullet size by increasing or decreasing the percentage number. Choose bullet size as a percentage of the font size Figure 2-17
Change the Color and Shape of a Bullet Exercise 2-15 4 • Fonts that contain potential bullet characters include Symbol, Wingdings, and Webdings. • The Geometric Shapes subset includes bullet characters. Selected bullet character Figure 2-18
Exercise 2-16 4 • From the Home tab, in the Paragraph group, click the Bullets button and choose Bullets and Numbering. • Click the Picture button. • Key an appropriate search word and then click Go. • Click the picture to select it and then click OK. Selected picture bullet Figure 2-19
Exercise 2-17 4 • Use the Numbered tab in the Bullets and Numbering dialog box. • apply a variety of numbering styles, including numbers, letters, and Roman numerals. • Create a numbered list automatically while you key body text.
Adjust Paragraph Indents Exercise 2-18 4 Types of Paragraph Indents: • Normal indent—All the lines of the paragraph are indented the same amount from the left margin. • Hanging indent—The first line of the paragraph extends farther to the left than the rest of the paragraph. • First-line indent—Only the first line of the paragraph is indented.
Adjust Paragraph Indents Exercise 2-18 4 Use the dialog box: • From the Home tab, in the Paragraph group, click the Dialog Box Launcher to open the Paragraph dialog box. • Use the list box to choose a different indent type. Paragraph indent types Figure 2-20
Adjust Paragraph Indents Exercise 2-18 4 Use the Ruler: • Move indent markers • Increase space after bullet for even word wrapping Horizontal ruler Indent markers Vertical ruler Figures 2-21 and 2-22
Exercise 2-19 5 • From the Insert tab, in the Text group, click the Text Box button. • Position the pointer, click, and a small text box containing an insertion point appears so you can enter text. Text box Figures 2-23 and 2-24
Exercise 2-20 5 • Select the text box and change the font and font color using the same methods as with text placeholders. Text box Figure 2-25
Exercise 2-21 5 • Rotate an object by dragging the green rotation handle that appears at the top of a selected object. • To constrain the rotation of an object to 15-degree increments, press <Shift> while rotating. Rotated text box Figure 2-26
Exercise 2-22 5 • In a text box, word wrapping is automatically turned on so the insertion point automatically jumps to a new line when it gets to the right side of the box. • The height of the box automatically adjusts to accommodate additional text lines. Right alignment Figure 2-27
Lesson 2 Presentation Text must always be easy to read. Once sizing, color use and alignment techniques are established, use them consistently throughout a presentation.