Download
1 / 74
800 likes | 1.21k Views
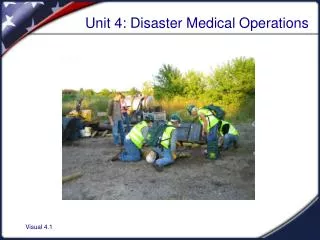
C ERT. Disaster Medical Operations Part 1. Unit 3. First Aid. Airways Bleeding/Wound Care Shock Burns Fractures, dislocations, splinting Head-To-Toe Assessment. Why Disaster Medical Ops?. Need for CERT members to learn disaster medical operations is based on two assumptions:

E N D
CERT Disaster Medical OperationsPart 1 Unit 3
First Aid • Airways • Bleeding/Wound Care • Shock • Burns • Fractures, dislocations, splinting • Head-To-Toe Assessment
Why Disaster Medical Ops? • Need for CERT members to learn disaster medical operations is based on two assumptions: • Number of victims could exceed local capacity for treatment • Survivors will assist others • They will do whatever they know how to do • They need to know lifesaving first aid or post- disaster survival techniques
3 Phases of Death from Trauma • Phase 1 – Death within minutes due to overwhelming injuries to major organs • Phase 2 – Death within hours due to excessive bleeding • Phase 3 – Death in days/weeks due to infection or multiple organ failure – complications from an injury Peter Safer’s research after earthquakes in Chile, Peru, and Italy indicated that more than 40 percent of disaster victims in the second and third phases of death from trauma could be saved by providing simple medical care.
Treatment of Life-Threatening Conditions The “Killers”: • Airway obstruction • Excessive bleeding • Shock
START • STart = Simple Triage • Victims sorted based on priority of treatment • stART = And Rapid Treatment • Rapid treatment of injuries assessed and prioritized in first phase Greatest good for the greatest number.
Public Health Considerations • Maintain proper hygiene • Maintain proper sanitation Main Goal: Prevent the spread of disease!
Steps to Maintain Hygiene • Wash hands frequently using soap and water • OR use alcohol based hand sanitizer • Wear latex gloves; change or disinfect after each patient • Wear a mask and goggles • Keep dressings sterile • Avoid contact with body fluids • “If it is warm, wet, and not yours, DON’T TOUCH IT!!!
Water Sanitation Methods • Boil water for 1 minute • Water purification tablets • Non-perfumed liquid bleach • 8 drops/gal of water • 16 drops/gal if water is cloudy • Let stand for 30 minutes before use
Glove Use DEMONSTRATION
How to Approach a Victim • Be sure victim can see you • Identify yourself • Your name and name of your organization • Request permission to treat, if possible • Respect cultural differences
Airway Obstruction Components of a respiratory system: • Lung • Bronchus • Larynx • Pharynx • Nasal Air Passage • Trachea
Opening the Airway Head-Tilt/Chin-Lift
Opening the Airway Jaw Thrust
Look, Listen and Feel • “Look” for the chest to rise • “Listen” for air exchange • “Feel” for air exchange
Triage - Are they breathing? YES NO • Maintain Open Airway • Walking wounded, or • Elevate shoulders • Reposition: • Return to neutral • Re-tilt (further back) Are they breathing? Tag “Immediate” and move on YES NO Tag “Deceased” and move on
Circulatory System Main Function • Transport oxygen to cells
Shock • Result of ineffective circulation of the blood • Primary cause in a disaster: blood loss • Remaining in shock will result in Cell, Tissue and Organ death • Important to continually re-evaluate and monitor victims for symptoms of shock
Recognizing Shock • Rapid Breathing • >30 breaths per minute • Inadequate circulation • Capillary blanch >2 seconds • Mental Status • Unconscious, or • Unable to follow simple command, “squeeze my hand” Symptoms of shock are easily missed… pay careful attention to your patient!
Treating for Shock • Lay victim on back • Maintain open airway • Elevate feet • Control bleeding • Maintain body temperature
Treating for Shock ALL shock victims, except for……. Head injury DifficultyBreathing Unconscious: must be left alone or vomiting Spinal Cord injury/ Unsure/leg fracture
Excessive Bleeding Three Types of Bleeding: • Arterial – spurting • Venous – flowing • Capillary – oozing
Controlling Bleeding 3 Main Methods to Control Bleeding: • Direct Pressure • Pressure bandage • Elevation • Above heart • Pressure Points • Arm, leg
Wound Care • Control bleeding • add dressings over existing dressings • maintain pressure - use pressure dressing • Elevate/pressure points • Tourniquet • Prevent infection: • Clean wound • Apply dressing & bandage
Cleaning and Bandaging Wounds • Clean by irrigating with clean, room temperature water • NEVER use hydrogen peroxide • Irrigate but do not scrub • Apply dressing and bandage • Dressing applied directly to wound • Bandage holds dressing in place
Rules of Dressing • If active bleeding: • Redress OVER existing dressing • If no active bleeding: • Remove bandage and dressing to flush wound • Check for infection every 4-6 hours
Rules of Dressing • In the absence of active bleeding, remove dressing and flush, check wound at least every 4-6 hours. • If there is active bleeding, redress over existing dressing and maintain pressure and elevation. • Check for signs of infection • swelling • discoloration - redness • discharge (pus) from wound
Signs of possible infection Swelling around wound site Discoloration Discharge from wound Red striations from wound site Signs of Infection
Treating Amputations • Control bleeding • Clean wound • Treat for shock • Save tissue parts, wrapped in clean cloth and place in a plastic bag • Keep tissue cool, but NOT directly on ice • Keep severed part with the victim • Tag Immediate during Triage!
Treating Impaled Objects • Immobilize affected body part • Don’t move or remove • Control bleeding at entrance wound • Clean and dress wound making sure impaled object is stabilized
Impaled Objects USC Drill Oklahoma Tornado - Teacher
Nasal Bleeding • Causes: • Blunt force • Skull fracture • Nontrauma-related conditions – sinus infection, high blood pressure, and bleeding disorders • Blood loss can lead to shock – may not know how much blood has been lost because victim will swallow some • Victims may become nauseated and vomit if they swallow blood.
Control nasal bleeding: Pinch nostrils or put pressure on upper lip under nose Have victim sit with head forward, NOT back Ensure that airway remains open Keep victim calm Treatment of Nasal Injuries
Burns • Skin • protection from infection • retains body water • maintains body temperature • Causes • Heat • Radiation • Chemical • Electrical current
Burn Severity • Factors that affect burn severity: • Temperature of burning agent • Period of time victim exposed • Area of body affected • Size of area burned • Depth of burn
Classifications of Burns 3rd Degree 1st Degree 2nd Degree
Burn Treatment: DOs • When treating a burn victim, DO: • Cool skin or clothing if they are still hot • Cover burn loosely with dry, sterile dressings to keep air out, reduce pain, and prevent infection • Elevate burned extremities
Burn Treatment: DON’Ts • When treating a burn victim, DO NOT: • Use ice • Apply antiseptics, ointments, or other remedies • Remove shreds of tissue, break blisters, or remove adhered particles of clothing
Treatment for Chemical Burns • Remove cause of burn + affected clothing/jewelry • If irritant is dry, gently brush away as much as possible • Always brush away from eyes, victim, and you • Flush with lots of cool running water • Apply cool, wet compress to relieve pain • Cover wound loosely with dry, sterile or clean dressing • Treat for shock if appropriate
Sudden loss of consciousness Evidence of respiratory distress or upper airway obstruction Soot around mouth or nose Singed facial hair Burns around face or neck Inhalation Burns Signs and Symptoms
Indicators of Injury • Labored or shallow breathing • Bleeding • Bruising • Swelling • Severe pain • Disfigurement/Deformity • How the person may have been hurt • Signs of a head, neck, or spinal injury…
Treating Muscle/Bone/Joint Injuries • Objective: Immobilize the joints above and below the injury. • If questionable, treat as a fracture.