Download
1 / 29
290 likes | 549 Views
Creating a Research Poster. Original materials created by Jennifer Springsteen Maternal & Child Public Health University of Minnesota. Purpose of a Research Poster:. Present research project data: Very specific scope Data not sufficient for formal publication

E N D
Creating a Research Poster Original materials created by Jennifer Springsteen Maternal & Child Public Health University of Minnesota
Purpose of a Research Poster: • Present research project data: • Very specific scope • Data not sufficient for formal publication • Relevant to poster session topic
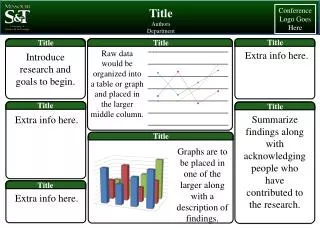
Contents of a Research Poster: • Title & Authors • Abstract • Research Objectives • Materials & Methods • Results/Data • Conclusions/Discussion • Future Directions • Literature Cited • Acknowledgements
Title & Authors: • Title: • Short, Succinct, Specific • Authors: • Discuss with mentor, collaborators to determine appropriate inclusions and name order • Include institutional affiliations • Formatting: • Centered across top • Large, bold font • Different sizes, colors to set off • Can highlight presenter’s name
Mast Cells in Oral Lichen Planus: Comparison of Two Methods for Histologic Detection J. Springsteen, N.L. Rhodus, S. Kaimal, & S.L. Myers University of Minnesota School of Dentistry, Minneapolis, MN University of Minnesota School of Dentistry Examples of Title/Author Lines:
Abstract: • Briefsummary of your research: • Background information • Objectives and/or hypotheses • Abridged materials & methods • Overview of findings • Use text submitted for poster registration! • Formatting: • Upper left corner • Smaller font than rest of poster • Can italicize text
Background: • Introduce reader to your subject: • Why is the issue important? • What has other research shown? • Basic facts/information about subject • Formatting: • Standard font size and style as rest of poster text • Brief prose, don’t bullet • Images are helpful
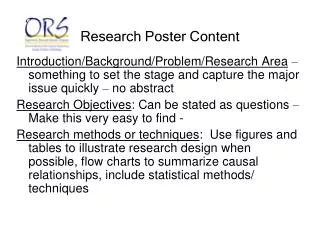
Research Objectives: • Clearly state why you did the project: • Specific research question(s) • Coordinate with your data & conclusions - questions here are answered in those sections • “Aims”, “Goals”, “Hypotheses”, etc. • Keep these short and succinct • Formatting: • Standard font size and style as rest of poster text • Bullets or numbered sentences
Materials & Methods: • Exactly what you did and how you did it. • Tables and diagrams are helpful and visually engaging • Describe each effort individually: • subject selection, recruitment, randomization,etc. • type of data collected, how collected, statistical analysis • No data in this section! • Formatting: • Standard font size and style as rest of poster text • Images, diagrams • Sub-titles
Results: • Present your data: • Tables & graphs when possible - don’t hide numbers in text • Statistical test results • Do not explain your data in this section! • Formatting: • Standard font size and style as rest of poster text • Use tables & figures; limit prose • Sub-titles
Conclusions: • Explain your data: • Address your specific research objectives • Summarize statistically significant data • Report unexpected or abnormal findings • Discuss problems encountered or suspected • Formatting: • Standard font size and style as rest of poster text • Images, diagrams • Sub-titles
Future Directions: • Outline future research: • Improvements to study design • Ways to address unexpected findings • New objectives developed from this project • Formatting: • Standard font size and style as rest of poster text • Bulleted lines, 1.5 - 2.0 spacing
Literature Cited: • Format as directed by poster guidelines, if specified -or- • Use a standard, consistent format as observed in current scientific journals • Numerical endnotes • Parenthetical author’s name and year • Formatting: • Numbered as listed in text, or • Alphabetical, chronological • 1.5 - 2.0 line spacing • Don’t use bullets
Acknowledgements: • Thank your supporters -- Important! • Who funded your project? • Did you receive any donations? • Is your research part of a larger project? • Did someone else do your data collection? Analysis? Writing? Design? • Formatting: • Lower right corner • Small, italicized font • Multiple, separated lines for multiple acknowledgements
Suggested Section Headers: • You are not limited on section headers! • Choose what fits your project - different words may fit different subjects, disciplines better than others! • You may need to discuss unique types of information that don’t fit generic headers. • Examples: • “Background Information” • “Project Summary” • “Demographic Information” • “Measurements • “What we know” • “What we found” • “Where are we going”
Choosing A Format: • Many Small Panels • Less expensive • Easier to transport • Can update for new data and correct mistakes • Single Large Page • Currently more common • Impressive presentation • Careful! Can’t easily correct mistakes!
Designing Your Poster: • Make it clear and easy to read! • Large block fonts • Contrasting colors • “White” spaces, margins • Bold titles, sub-titles • Short paragraphs • Bulleted points Can you read this? How about this? Is this better? Make it easy to read!
Designing Your Poster: • Create logical flow! • Top left to bottom right • Set off each section • Bold sub-titles • Different colors • Direct reader’s eye • Arrows • Highlights
Designing Your Poster: • Make it interesting! • A picture is worth a thousand words! • Graphs and tables make data easy to interpret
Know The Specifics: • Poster guidelines • The organization hosting the poster session should provide specific details including: • Size limitations • How poster will be hung (pins, tape, velcro) • Time of your presentation • If details are not provided, use general rules: • Size typically ranges from 3’x5’ to 4’x6’ • Pins are usually o.k. unless specified • Plan to stand at your poster for 1 or 2 hours
Using Power Point: • General Tips: • Create consistent page design • Format one text box exactly as you want it, then copy and paste new ones so that all are consistent. • Keep colors, fonts, styles, consistent or coordinated • Outline objects • Add a black or colored line around text boxes and images to create a more defined edge. • Use different backgrounds to set off tables, figures • Images • View the image at the actual size at which it will be printed - make sure it is not pixilated or blurry • Use high-resolution (.tif) formats • Caution - large files can slow/freeze your computer - Save often!
Using Power Point: • Multiple Small Panels: • Be consistent with fonts, sizes, colors • Options: • Can create a slide presentation and simply print the slides as panels • Printer can enlarge panels - be aware that font sizes will increase • If you want different sized panels, don’t print some at 100% and others at 200% - font’s won’t match • You will have to create multiple Power Point documents with customized sizes and make sure your design is consistent.
Using Power Point: • Single Large Page • Create custom-sized slide • File, page set up, slide sized for… “custom” • Power Point has a maximum size of 56”x56” • You can create a poster half as wide/tall as you want your final version to be, then have it printed at 200% size. • Use alignment tools • Center objects relative to page • Align text boxes along tops, sides • Group objects to keep them together • Arrows overlayed on images • Text boxes associated with figures • Use “Fit” view size and then zoom in on areas to do work
Printing your poster: • See help.pop.psu.edu for the latest information.
Help Materials For You help.pop.psu.edu