Download
1 / 16
170 likes | 317 Views
Setup: Receiver Antennas. Determine area of operation of transmitters. Determine receiver antenna locations for best line-of-sight to transmitters. Locate receiver antennas no closer than 15 feet to nearest transmitter. Elevate receiver antennas well above the audience or other obstructions.

E N D
Setup: Receiver Antennas • Determine area of operation of transmitters. • Determine receiver antenna locations for best line-of-sight to transmitters. • Locate receiver antennas no closer than 15 feet to nearest transmitter. • Elevate receiver antennas well above the audience or other obstructions. • Locate diversity antennas at least two feet apart • Keep antennas at least one foot away from other metal objects. • Keep antennas at least two feet away from RF noise sources such as digital audio processors, video devices, CD/DVD players, computers, etc.
Setup: Receivers • Programming receivers: • Within a given band, ALL systems should be set to the same Group and different CHANNELS within that Group. DO NOT MIX GROUPS! • DO NOT USE LETTER GROUPS: A1-A9, B1-B4 unless specifically instructed • Set output mic/line switches as necessary. • Set front panel output level controls fully clockwise
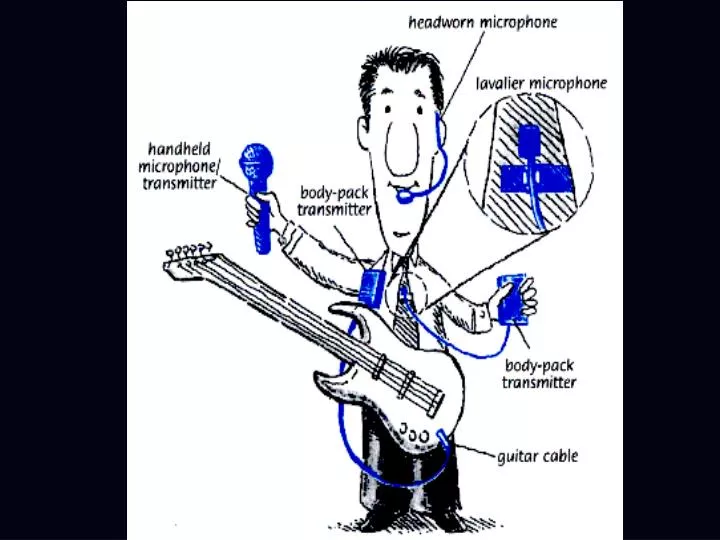
Setup: Transmitters • Program transmitters to match receiver Group and Channel set. • Set transmitter audio levels • Bodypack transmitter: set input attenuation accordingly for lavalier microphone, headworn microphone. • Handheld transmitter and bodypack transmitter: adjust gain control in battery compartment so that red LED peak light on receiver just flashes on LOUDEST sound
Pre-show Checkout • Verify good batteries in each transmitter • Turn OFF all transmitters • Turn ON all receivers • Observe RF signal LED strings on receivers: • 0-2 LEDs on either side: channel is OK • 3 or more LEDs on either side: channel has excessive interference. Change to another compatible channel • Turn on each transmitter ONE at a time to verify signal at corresponding receiver • Turn on all transmitters to verify signals at all receivers
Pre-show Checkout • Conduct a walk around test for each transmitter throughout the performance area • If locations of low RF are found, reposition receiver antennas to compensate if possible. • If set pieces or other fixed obstructions are problematic, the allowable performance area may have to be modified.
Show Operation: • Turn on required receivers. • Mute or turn off unused receivers • Turn on required transmitters. Transmitters must be at least 15 feet from nearest receiver antenna. • Verify reception at receivers • Place transmitters with participants • Attach to participant as high on the body as possible: breast pocket of jacket, belt, etc. • Do not fold or shorten bodypack antenna • Position lapel microphone as close as possible to mouth: knot of tie, collar, lapel, etc. • Aim directional microphones toward mouth
Show Operation: • Position omnidirectional head-worn microphone at corner of mouth • Position unidirectional head-worn microphone slightly forward and to the side of mouth • Power lock transmitter if desired (press and hold “Mode” and “Set” buttons together). • Monitor RF levels during show on the receivers front panels • Monitor audio directly on headphone outputs on receiver front panels
General tips: • TURN OFF ALL mobile phones, Blackberrys, Trios, etc.) in the performance area • In particular… participants. Units must be COMPLETELY OFF, not just on silent. • Do not cue up un-occupied receivers in the sound system. Receivers without active transmitters should be muted or turned off. • Do not set up system with some transmitters very close to receiver antennas and other transmitters far away. The nearby transmitters can desensitize ALL receivers.
General tips: • In the UHF range, line-of-sight is critical: elevate receiver antennas as high as necessary to “see” the transmitters at all times.