Download
1 / 47
470 likes | 662 Views
生物技术综合实验 Comprehensive Experiments of Biotechnology. 主要内容 Contents : 一、课程简介 核酸的分离与纯化 Isolation and Purification of Nucleic Acid 二、电泳技术 Agarose Gel Elrctrophoresis and SDS-PAGE 三、聚合酶链式反应技术 Polymerase Chain Reaction 四、 DNA 序列测定 DNA Sequencing

E N D
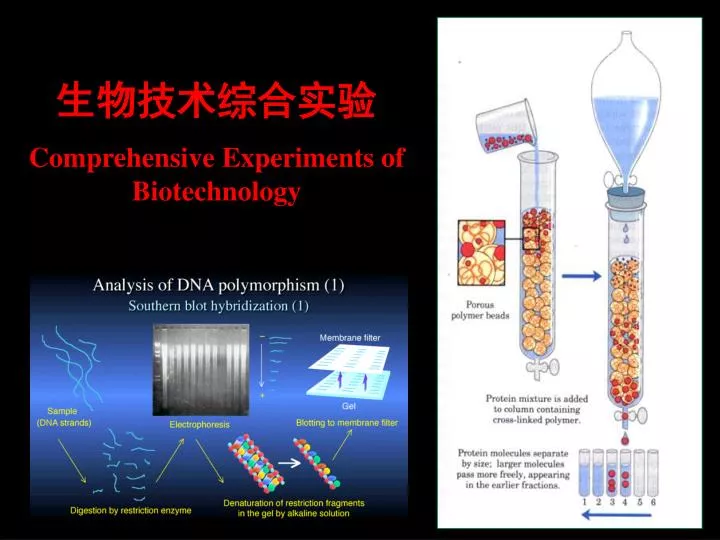
生物技术综合实验 Comprehensive Experiments of Biotechnology
主要内容 Contents: 一、课程简介 核酸的分离与纯化 Isolation and Purification of Nucleic Acid 二、电泳技术 Agarose Gel Elrctrophoresis and SDS-PAGE 三、聚合酶链式反应技术 Polymerase Chain Reaction 四、DNA序列测定 DNA Sequencing 五、分子杂交技术 Molecular Hybridization - Southern,Northern and Western Blot 六、基因文库和cDNA文库的构建 Construction of cDNA Library and DNA Library 七、外源基因的克隆与表达Heterogenic Gene Cloning and Expression 八、蛋白质的分离、纯化技术 Isolation and Purification of Protein
一 .电泳的概念 • 带电质点在电场中向带有异相电荷的电极移动,这种现象称为电泳。 • 区带电泳是在半固相或胶状介质上加一个点或一薄层样品溶液,然后加电场,分子在支持介质上或支持介质中迁移。支持介质的作用主要是为了防止机械干扰和由于温度变化以及大分子溶液的高密度而产生的对流。 • 区带电泳使用不同的支持介质,早期有滤纸、玻璃珠、淀粉粒、纤维素粉、海砂、海绵、聚氯乙烯树脂;以后有淀粉凝胶、琼脂凝胶、醋酸纤维素膜,现在则多用聚丙烯酰胺(PAGE)和琼脂糖凝胶。
二. 实验目的 1 学习agarose gel electrophoresis的原理 及操作方法 掌握从琼脂糖凝胶中回收DNA片 段的方法。 2 学习SDS-PAGE测定蛋白质分子量的原理。 3 掌握垂直板电泳的操作方法。 4 运用SDS-PAGE测定蛋白质分子量及染色鉴定。
一、琼脂糖凝胶电泳Agarose gel electrophoresis 不仅仅是一种DNA分析手段 纯化特定DNA的常规手段
(一)琼脂糖凝胶电泳的原理 • 琼脂糖是由琼脂分离制备的链状多糖。其结构单元是D-半乳糖和3.6-脱水-L-半乳糖。许多琼脂糖链依氢键及其它力的作用使其互相盘绕形成绳状琼脂糖束,构成大网孔型凝胶。因此该凝胶适合于免疫复合物、核酸与核蛋白的分离、鉴定及纯化。 • 琼脂糖凝胶电泳分离核酸的基本技术在一定浓度的琼脂糖凝胶介质中,DNA分子的电泳迁移率与其分子量的常用对数成反比;分子构型也对迁移率有影响,如共价闭环DNA>直线DNA>开环双链DNA。当凝胶浓度太高时,凝胶孔径变小,环状DNA(球形)不能进入胶中,相对迁移率为0,而同等大小的直线DNA(刚性棒状)可以按长轴方向前移,相对迁移率大于0。
(二)琼脂糖凝胶电泳的应用 • 质粒DNA限制性酶切图谱的分析; • DNA限制性酶切图谱的分析; • PCR产物的分析; • 纯化特定的DNA片段;
(三)影响电泳泳动率的四大因素 1. 样品的物理性状 Plasmid DNA I 型 ( 闭环CC ), II型 (单链开环 OC) , III型(线性 L)。 I 型 III型 II型 2. 支持物介质(argrose, PAGE) 3. 电场强度 4. 缓冲液离子强度
核酸电泳的指示剂 • 溴酚蓝(bromophenol blue) • 二甲苯青蓝FF(xylene cyanol )
琼脂糖凝胶电泳的观察 • 在琼脂糖凝胶中加入溴化乙锭(ethidium bromide, EB)或Golden ware 。在紫外光下就可观察到明显DNA的荧光谱带。
(五)琼脂糖凝胶电泳的基本步骤和注意事项 1 制胶 2 上样 3 观察 4 拍照 EB — Carcinogen Ultra Violet— hurt your eyes
As mentioned in the text, more agarose means a firmer gel, and a more difficult matrix for the DNA to move through. Gels are often mixed at 0.8-1.0% agarose. This concentration will separate a wide range of fragment sizes, ranging from around 500 base pairs (bp) to around 20,000 bp.
The solvent used to dissolve the agarose. Rather than just use water, we use buffered solutions which allow the DNA to run smoothly through the gel. These solutions optimize the pH and ion concentration of the gel and will also bathe the gel as it is subjected to the electric current which actually moves the DNA through the gel. Perhaps you have seen the terms TBE or TAE. These are names of two commonly used buffers in electrophoresis. The "T" stands for Tris, a chemical which helps maintain a consistent pH of the solution. The "E" stands for EDTA, which itself is another anacronym. EDTA chelates (gobbles up) divalent cations like magnesium. This is important because most nucleases require divalent cations for activity. Finally, the "B" or "A" stand for Boric acid or Acetic acid, which provide the proper ion concentration for the buffer.
After the agarose has been weighed and the buffer measured, the two are mixed. it must be boiled. The fastest way to do this is by putting the flask in the microwave.
The casting apparatus consists of 3 parts--the tray, the support, and the comb. The tray is the actual mold which provides a shape for the gel as it polymerizes. In order to make our DNA migrate through the gel, we need to make sure the agarose polymerizes with small "wells" in it in which to put the DNA. This is the job of the comb, The comb is placed into slots in the tray, with the "teeth" down, when the agarose cools and hardens, the comb is gently lifted up out of the gel, leaving the spaces occupied by the teeth. This gives us several places to load different samples.
Here you see the hot agarose was poured into the casting tray. The glass support is preventing the agarose from leaking out through the holes in the bottom of the tray. You can see the molten agarose advancing across the surface of the support as it is poured. At room temperature, this gel will have polymerized enough to use within 10-15 minutes. The casting tray could hold 2 gels at once, although only one is being poured at this time.
In both of these photos, a gel which has completely polymerized is now ready to use. Notice the spaces (called "wells") left by the removal of the comb. This can be seen better in the second photo. • Both gels are resting on the glass support. The higher the agarose percentage, the bluer the gel.
The "running tank" was filled with buffer. If TBE was used to make the gel, it should also be used as the running buffer. The gel will be completely submerged as it is run. Notice the two metal pins marked by the arrows. These are the connection plugs for the power supply cables. It is this current that moves the DNA through the gel. Is DNA positively or negatively charged? Toward which electrode do you think it will migrate?
When the DNA sample had been digested with a Restriction Enzyme at 37ºC for one hour, Is the DNA ready to load on the gel we poured? Not yet--there are several things we have to do first, First, we need to stop the Restriction Digestion completely. EDTA will stop the enzyme from working by combining the divalent cations it needs. Next, Glycerol is indeed used, because it has a density greater than water. Lastly, to monitor our DNA as it migrates across the gel. we can used dyes, that are of two different sizes and colors. We can therefore assume that our sample is somewhere in between the dyes. Now the DNA sample is mixed with Loading Buffer, Our sample is now ready to load.
This is a view from the top of the running tank as the agarose gel is loaded with the DNA samples. although only one is being run at this time. The space for the second gel is occupied by a block of plastic to take up volume so less buffer can be used. • The instrument being used to load the samples is called a Micropipettor and can pipette very small volumes. In fact, 5-10 µl is typically loaded into each well.
Once the gel has been loaded, the electrical leads on the running tank are connected to a power supply like the one shown in the photo. The power supply has 3 needle gauges on it, showing what the voltage, current, and power levels are. Power supplies like this can be run in constant mode for any of the 3 variables, and the dials below the knobs are used to set the constant level.
Well, our gel has now finished running. A gel this size probably ran about 30 minutes at roughly 100 V in TBE buffer. • The blue arrow shows the location of the "leading dye". The red arrow marks the location of the "trailing dye," the dye that ran more slowly. Our DNA lies hopefully somewhere in between those markers.
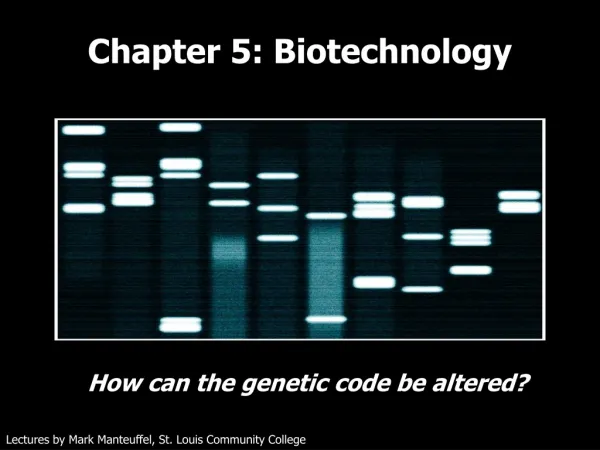
After we have removed our gel from the running tank, we need to use ultraviolet light to visualize the DNA and verify that our Restriction Digest was successful. • EtBr is an Intercalating Agent, meaning it wedges itself into the grooves of DNA and stays there. More base pairs mean more gooves, which in turn means more EtBr can insert itself. EtBr also has the property of fluorescing under UV light. So if we soak our gel in a solution of EtBr, it will intercalate into the DNA, then if we place our gel on a UV source, we can "see" the DNA by actually detecting the fluorescence of the EtBr.
This photo shows that white bands represent DNA of a particular size. Can you think of two reasons one band is brighter than another? • In this particular photograph, Lanes 1-3 contain our DNA samples, perhaps from the same stock of DNA digested with 3 different Restriction Enzymes, When we want to calculate the size of these bands. How can we do this? We use the information in lanes 4 and 5, and a little math. • Lanes 4 and 5 are called Standard Lanes, or Molecular Weight Markers. Lane 5 is DNA from the Lambda DNA, digested with Hin dIII. The DNA exists in equal amounts, but one fragment is larger than the other On a molar level, much more DNA of one size is present in that band than in a different band, although the lesser amount may be a larger fragment
To visualize the DNA and verify that Restriction enzymes digest
二、丙烯酰胺凝胶电泳Polyacrylamide Gel Electrophoresis 丙烯酰胺单体在催化剂N,N,N’,N’-四甲基乙二胺(TEMED)和过硫酸胺(ammonium persulfate, AP)的作用下,丙烯酰胺就发生聚合反应,形成长链,在交联剂N,N’-亚甲双丙烯酰胺(bisacrylamide)的作用下,聚丙烯酰胺链就交联形成凝胶。
丙烯酰胺凝胶电泳的注意事项 • 配胶 • 灌胶 • 冲洗胶孔 • 预热 • 取胶 • 干胶 ( 自显影) • Acrylamide—Toxicity to Nervous System • Isotope — dangerous to health
二. 实验原理 • PAGE根据其有无浓缩效应,分为连续系统和不连续系统两大类,连续系统电泳体系中缓冲液pH值及凝胶浓度相同,带电颗粒在电场作用下,主要靠电荷和分子筛效应。不连续系统中由于缓冲液离子成分,pH,凝胶浓度及电位梯度的不连续性,带电颗粒在电场中泳动不仅有电荷效应,分子筛效应,还具有浓缩效应,因而其分离条带清晰度及分辨率均较前者佳。
二. 实验原理 • SDS-聚丙烯酰胺凝胶电泳,是在凝胶系统中引进SDS(十二烷基磺酸钠), SDS能断裂分子内和分子间氢键,破坏蛋白质的二级和三级结构,强还原剂能使半胱氨酸之间的二硫键断裂,蛋白质在一定浓度的含有强还原剂的SDS溶液中,与SDS分子按比例结合,形成带负电荷的SDS-蛋白质复合物,这种复合物由于结合大量的SDS,使蛋白质丧失了原有的电荷状态形成仅保持原有分子大小为特征的负离子团块,从而降低或消除了各种蛋白质分子之间天然的电荷差异,由于SDS与蛋白质的结合是按重量成比例的,因此在进行电泳时,蛋白质分子的迁移速度取决于分子大小。当分子量在15KD到200KD之间时,蛋白质的迁移率和分子量的对数呈线性关系,符合下式:logMW=K-bX,式中:MW为分子量,X为迁移率,k、b均为常数,若将已知分子量的标准蛋白质的迁移率对分子量对数作图,可获得一条标准曲线,未知蛋白质在相同条件下进行电泳,根据它的电泳迁移率即可在标准曲线上求得分子量。
二. 实验原理 • SDS电泳的成功关键之一是电泳过程中,待别是样品制备过程中蛋白质与SDS的结合程度。影响它们结合的因素主要有三个: • 溶液中SDS单体的浓度,当单体浓度大于1mmol/L时大多数蛋白质与SDS结合的重量比为1:1.4,如果单休浓度降到0.5 mmol/L以下时,两者的结合比仅为1: 0.4这样就不能消除蛋白质原有的电荷差别,为保证蛋白质与SDS的充分结合,它们的重量比应该为1:4或1:3 • 样品缓冲液的离子强度。SDS电泳的样品缓冲液离子强度较低,通常是10~100mmol/L • 二硫键是否完全被还原
二. 实验原理 • 采用SDS-聚丙烯酰胺凝胶电泳法测蛋白质分子量时,只有完全打开二硫键, 蛋白质分子才能被解聚,SDS才能定量地结合到亚基上而给出相对迁移率和分子量对数的线性关系。因此在用SDS处理样品同时往往用巯基乙醇处理,巯基乙醇是一种强还原剂,它使被还原的二硫键不易再氧化,从而使很多不溶性蛋白质溶解而与SDS定量结合。 • 有许多蛋白质是由亚基(如血红蛋白)或两条以上肽链(如胰凝乳蛋白酶)组成的,它们在SDS和巯基乙醇作用下,解离成亚基或单条肽链,因此这一类蛋白质,测定时只是它们的亚基或单条肽链的MW。 • 已发现有些蛋白质不能用SDS-PAGE测定分子量。如电荷异常或构象异常的蛋白质,带有较大辅基的蛋白质(某些糖蛋白)以及一些结构蛋白,如胶原蛋白等。
二. 实验原理 • 采用SDS-聚丙烯酰胺凝胶电泳法测蛋白质分子量时,往往采取2种以上测定方法结合使用。目前其他常用测定相对分子量的方法有: • 聚丙烯酰胺梯度凝胶电泳法测定蛋白质的相对分子量(有浓缩样品特点,可分次加样;不需解离亚基,适宜测定球蛋白,而对纤维蛋白有误差。电泳需2000伏特小时) • 凝胶层析法测定蛋白质相对分子量(特点方法简单,样品用量少,而且有时不需纯物质,一般不引起生物活性物质的变化。局限性是pH6-8的范围内,线性关系比较好,但在极端pH时,蛋白质有可能因变性而偏离。)
三. 实验试剂和器材 1.材料: 低分子量标准蛋白试剂盒: 低分子量标准蛋白: 兔磷酸化酶B MW=97,400 血清白蛋白 MW=66,200兔肌动蛋白 MW=43,000牛碳酸酐酶 MW=31,000胰蛋白酶抑制剂 MW=20,100鸡蛋清溶菌酶 MW=14,400开封后溶于200µl蒸馏水,置-20℃保存,使用前室温融化,沸水浴中加热3-5分钟后上样。 样品1:称3mg样品1,加2 ml蒸馏水溶解。
2.实验试剂 2.实验试剂 (1)30%丙烯酰胺(Acr):称Acr30g,甲叉双丙烯酰胺(Bis)0.8g,加蒸馏水至100ml,过滤后置棕色瓶中,4℃贮 存可用1-2月。(2)10%SDS(十二烷基磺酸钠)(3)1.5mol/L pH8.8 Tris-HCl缓冲液:称取Tris18.2g,加入50ml水,用1mol/L盐酸调pH8.8, 最后用蒸馏水定容 至100ml。(4)1.0mol/LpH6.8Tris-HCl缓冲液:称取Tris12.1g,加 入50ml水,用1mol/L盐酸调pH6.8, 最后用蒸馏水 定容至100ml。(5)0.05mol/LpH8.0Tris-HCl缓冲液:称取Tris0.6g,加 入50ml水,用1mol/L盐酸调pH8.0,最后用蒸馏水定 容至100ml。
2.实验试剂 (6)10%过硫酸铵(AP)(7)TEMED(四甲基乙二胺)(8)样品溶解液:SDS(100mg)+巯基乙醇(0.1ml)+溴酚蓝(2mg)+甘油(2g) +0.05mol/L pH8.0 Tris-HCl(2ml),最后定容至10ml。(9)固定液:取50%甲醇454ml,冰乙酸46ml混匀。(10)染色液:称取考马斯亮蓝R250 0.125g,加上述固定液 250ml, 过滤后备用。(11)脱色液:冰乙酸75ml,甲醇50ml,加蒸馏水定容至1000ml。(12)电极缓冲液(内含0.1%SDS,0.05mol/LTris- 0.384mol/L甘氨酸缓冲液pH8.3):称Tris6.0g,甘氨酸28.8g,加入SDS1g,加蒸馏水使其溶解后定容至1000ml。
垂直板电泳装置 直流稳压电源 移液管 滤纸 微量注射器 大培养皿 3. 实验器材
四. 实验过程 1.将玻璃板用蒸馏水洗净晾干, 准备2个干净的锥形瓶.2.把玻璃板在灌胶支架上固定好.※固定玻璃板时,两边用力一定要均匀,防止夹坏玻璃板.3.按比例配好分离胶,用移液管快速加入,大约5厘米左右,之后加少许蒸馏水,静置40分钟.※凝胶配制过程要迅速, 催化剂TEMED要在注胶前再加入,否则凝结无法注胶.注胶过程最好一次性完成,避免产生气泡.
四. 实验过程 ※水封的目的是为了使分离胶上延平直,并排除气泡※凝胶聚合好的标志是胶与水层之间形成清晰的界面.4.倒出水并用滤纸把剩余的水分吸干,按比例配好浓缩胶,连续平稳加入浓缩胶至离边缘5mm处,迅速插入样梳,静置40分钟. ※样梳需一次平稳插入,梳口处不得有气泡,梳底需水平.
四. 实验过程 5.拔出样梳后,在上槽内加入缓冲液,没过锯齿时可拆去 底端的琼脂糖. ※要使锯齿孔内的气泡全部排出,否则会影响加样效果.6、加样三个。 (1)取10µl标准蛋白溶解液于EP管内,再加入10µl 2倍样品缓冲液,上样量为20µl。 (2)取10µl样品1溶液,再加入10µl 2倍样品缓冲液,上样量分别为5µl 和10µl。7.用微量注射器距槽底三分之一处进样,加样前,样品在 沸水中加热3分钟,去掉亚稳态聚合。※注射器不可过低,以防刺破胶体,也不可过高,在样下 沉时会发生扩散. ※为避免边缘效应,最好选用中部的孔注样.
四. 实验过程 8.电泳槽中加入缓冲液,接通电源,进行电泳,开始电流恒定在10mA,当进入分离胶后改为20mA,溴酚蓝距凝胶边缘约5mm时,停止电泳。9.凝胶板剥离与染色:电泳结束后,撬开玻璃板,将凝胶板做好标记后放在大培养皿内,加入染色液,染色1小时左右。10.脱色:染色后的凝胶板用蒸馏水漂洗数次,再用脱色液脱色,直到蛋白质区带清晰。※剥胶时要小心,保持胶完好无损,染色要充分.11.实验结果分析。
五.分析计算 绘制标准曲线: 按下式计算相对迁移率: 以每个蛋白标准的分子量对数对它的相对迁移率作图得标准曲线,量出未知蛋白的迁移率即可测出其分于量,这样的标难曲线只对同一块凝胶上的样品的分子量测定才具有可靠性。
琼脂糖及丙烯酰胺凝胶分辨DNA片段的能力 凝胶类型及浓度 分离DNA片段的大小范围 (bp) 0.3 % 琼脂糖 50000 ~ 1000 0.7 % 琼脂糖 20000 ~ 1000 1.4 % 琼脂糖 6000 ~ 300 4 % 丙烯酰胺 1000 ~ 100 10% 丙烯酰胺 500 ~ 25 20% 丙烯酰胺 50 ~ 1
六.思考题 • 在不连续体系SDS-PAGE中,当分离胶加完后,需在其上加一层水,为什么? • 电极缓冲液中甘氨酸的作用? • 在不连续体系SDS-PAGE中,分离胶与浓缩胶中均含有TEMED和AP,试述其作用? • 样品液为何在加样前需在沸水中加热几分钟?