Download
1 / 39
420 likes | 1.12k Views
Protein extraction from the cerebrospinal fluid requires a well optimized protocol to get the maximum yield of proteins for taking it for clinical analysis. The method explained here mainly focuses on the effective method of extracting protein from the cerebrospinal fluid.

E N D
Protein extraction from the cerebrospinal fluid requires a well optimized protocol to get the maximum yield of proteins for taking it for clinical analysis. The method explained here mainly focuses on the effective method of extracting protein from the cerebrospinal fluid Extraction of protein from Cerebrospinal fluid • Related LOs: Liquid nitrogen properties, using mortar and pestle > Prior Viewing - IDD-1. Extraction of bacterial protein, IDD-4. Protein extraction from human brain tissue > Future Viewing – IDD-11. Protein quantification, IDD-14. Isoelectric focusing, IDD-17. SDS-PAGE. • Course Name: Cerebrospinal fluid protein extraction • Level(UG/PG): UG • Author(s): Dinesh Raghu, Vinayak Pachapur • Mentor: Dr. Sanjeeva Srivastava
Learning objectives 1 • After interacting with this Learning Object, the learner will be able to: • Identify the extraction technique of proteins from the cerebrospinal fluid. • Choose to prepare the buffers required for the extraction. • Infer the steps involved during the experiment. • Assess the troubleshooting steps involved in the experiments. 2 3 4 5
Master Layout 1 Cerebrospinal fluid (Slide:5) Reagents Preparation (Slide:6-10) 2 CSF Protein extraction (Slide:11-12) CSF homogenization (Slide:13) 3 Sample incubation (Slide:14-15) Sample centrifugation & Supernatant collection (Slide:16-19) 4 Biomolecules separation (Slide:20-25) Organic separation (Slide:26-27) Protein precipitation (Slide:28-32) 5 Animate for user click to show images or instruments used for each step from the respective slides.
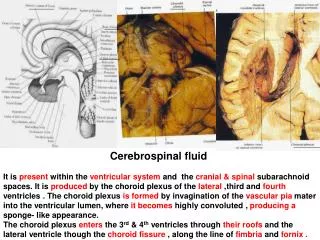
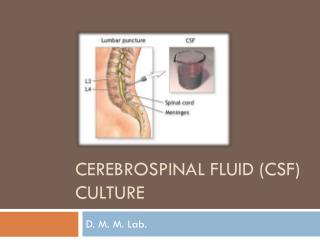
Definitions and Keywords 1 Cerebrospinal Fluid: The fluid extracted from the lumbar region of the spinal cord using the lumbar puncture technique for diagnostic purpose in glioma patients, neurological infection cases. Lyses buffer: Lyses buffer consists of guanidium thiocyanate (protein denaturant), lauroylsarcosine (ionic surfactant), dithiothreitol(disulphide bond reducing agent), sodium chloride and tris base. 2 3 4 5
Description of the action Audio Narration Step 1: T1: Cerebrospinal fluid 1 2 CSF 3 Animator should draw a tube labeled as CSF and a freezer labeled as -20’C. Animate like the user takes the tube by opening the fridge Draw a bucket of ice and animate like the CSF tube is kept on it. Transfer the amount required for processing to fresh tube. Remove the CSF from the freezer and keep it on the ice for 5min to thaw for later use. The sample quantity required depends on the processing step. 4 5
Step 1: T2: Reagents preparation 1 2 3 Audio Narration (if any) Description of the action Show a measuring balance the user should click ON the Instrument, pick paper from rack, fold it across and on the edge, place it on the balance so that balance reads 0.03g and the user should press ”0” on the balance to make the reading to “0.00”. Animate the action, whenever user starts to weigh any reagents. Clean the surface of the balance, Tare the weight of the paper before weighing for each reagent. 4 5
Step 2: T2: reagent preparation 1 2 3 Nacl 4 5
Step 2: T2: reagent preparation 1 Tris base Guanidine 2 Nacl Description of the action Audio Narration 3 Instruct user to prepare Lysis buffer, show the bottles labeled as guanidine thiocyanate, Nacl, Diothiothreitol, lauroylsarcosine,Tris Base, placed on table by the user. Instruct user to weigh 47g of guanidine thiocyanate, 0.5 g of lauroyl sarcosine, 0.0154 g of dithiothreitol, 1.74 g of Nacl and 1.214 g of Tris base, let user pick the bottle, uncap it, with the help of spatula weigh the required amount on a paper over the balance. if the gram exceeds user should remove some quantity or if it low add to get required amount. Each time the user should click on the hands for the event to happen. Animate like dissolving the weighed amount by adding 100ml of water (instruct user to measure water in the measuring cylinder) and give a brief shake to dissolve it. Prepare lysis buffer consists of 4M guanidium thiocyanata, 0.5% lauryl sarcosine,1mM dithiothreitol, 0.3M Nacl and 0.1M tris base. 4 5
Step 2: T2: reagent preparation 1 2 NaOH 3 HCl Audio Narration Description of the action Then the beaker containing (labeled as “Tris base pH 7.4”) has to be taken near pH meter and allow the user to dip pH rod in the solution. Animate like the user switching on the pH meter. The meter should show pH 11 in the display and instruct user to add Hcl. Now allow the user to click on Hcl so that drops of Hcl should be added in fillers and the reading should decrease like.11.,10.3 and then 9.8,9.2,8.3 and 7.4(desired pH) Prepare tris buffer of pH 7.4 helps to maintain the environment condition. 4 5
Step 2: T2: reagent preparation 1 Tris base Nacl 2 Mgcl2 Description of the action Audio Narration 3 Instruct user to prepare Alkaline phosphatase buffer, show the bottles labeled as Nacl,Mgcl2,Tris Base, let user takes out these bottle from the rack. Instruct user to weigh 0.585g of Nacl and 0.102 g of Mgcl2 and 1.11g of Tris and, let user pick the bottle, uncap it, with help of spatula weigh the required amount on a paper over the balance. if the gram exceeds user should remove some quantity or if it is low add to get required amount. Animate to dissolve the weighed amount by adding 100ml of methanol (instruct user to measure methanol in the measuring cylinder) and giving a brief shake by to dissolve it. Each time the user should click on the hands for the event to happen. Prepare Alkaline phosphatase buffer containing Nacl,Mgcl2 and tris base 4 5
Step 3: T3: CSF protein extraction 1 2 CSF Lyses buffer 3 4 5
Description of the action Audio Narration Step 3: T3: CSF protein extraction 1 Animator should instruct the user to add the lyses buffer to the CSF tube as shown in the previous slide The user should click on the hand to pick the pipette and animate like the user setting the pipette to 1ml and takes 1ml of lyses buffer using pipette. The user should click on the pipette so that the lyses buffer has to be added to the CSF sample. Add lyses buffer to the CSF sample to carry out the lyses of the cells for protein extraction. 2 3 4 5
Description of the action/ interactivity Audio Narration (if any) Step 4: T4: CSF homogenization 1 ON Button 2 3 ice Show homogenizer instrument, instruct user to pick the instrument and in other hand for eppendorf tube on ice. Now dip the rod into the CSF solution as shown in the figure. On the instrument by clicking the “start” button. Animate the solution getting mixed in the tube. Kindly redraw the figures Homogenize the CSF and the contents are released. Initially begin with low speed, later increase the speed accordingly. This steps is one of the physical method used for cell lysis. 4 5
Step 5: T5: Sample incubation 1 2 65 3 4 5
Description of the action Audio Narration Step 5: T5: Sample incubation 1 Incubate the lysed sample at 37’C and 65’C for 30 minutes each followed by centrifugation. Animate like the user taking a tube labeled as “CSF” and keep it in the 37’C incubator after homogenization step. The user should open the door of the incubator and keep the tube inside. Show a clock running 30 minutes. After 30 minutes animate like the user open the incubator takes the sample and keeps in other incubator at 65’C by opening it and placing it inside. Show a clock running 30 minutes. 2 3 4 5
Step 6: T6: Sample centrifugation & Supernatant collection 1 2 3 4 rotor Centrifuge 5
Description of the action Audio Narration Step 6: T6: Sample centrifugation & Supernatant collection 1 After an hour remove the lysed sample and centrifuge at 14000 g for 20min for separation of the phases. The animator should draw a centrifuge as shown in previous slide. Animate in such a way that user clicks on open to open it and keep the tube inside the rotor (with lots of holes) as shown. The animator should animate like the user should click on setting and set 14000 g, 20 minutes and click “enter” and animate like closing the lid and click “start”. Show a clock running for 20 minutes. Once the 20 minutes is done the user should open the lid by clicking “open” and remove the column out. Please include the buttons like enter, set, start, open in the centrifuge. 2 3 4 5
Step 7: T6: Sample centrifugation & Supernatant collection 1 2 3 Supernatant Supernatant 4 5
Description of the action Audio Narration Step 7: T6: Sample centrifugation & Supernatant collection 1 After centrifugation step, let user open the lid of centrifuge, open lid of rotor, take out the tube. Zoom the tube to shoe two liquid layers like in previous slide. Instruct the user to take the liquid part of the tube and transfer it to the new tube as shown. The user should click on the hand so that the pipette removes the liquid part and transferring it to the new tube Transfer the supernatant to the new tube for further treatment. Discard the pellet formed. 2 3 4 5
Step 8: T7: Biomolecules separation 1 2 3 4 phenol, chloroform, isoamyl alcohol solution 5
Description of the action Audio Narration Step 8: T7: Biomolecules separation 1 Instruct user to prepare Phenol :chloroform: iso-amyl alcohol solution. Animator should draw 3 bottles labeled as Chloroform, phenol, iso-amyl alcohol from the previous slide. Let user takes these bottles from the rack and keeps on the table. Instruct user to take 25ml of phenol in 25ml cylinder, 24ml of chloroform in 25ml cylinder and 1ml of iso-amyl alcohol using the pipette as shown in figure into the new tube labeled as alcohol solution. Each time the user should click on the hand for transferring the reagents Prepare phenol,chloroform,isoamyl alcohol solution in the ratio 25:24:1 for the phase separation of the protein sample for extraction. 2 3 4 5
Step 9: T7: Biomolecules separation 1 2 Image/graphic for the step 3 4 5
Description of the action Audio Narration Step 9: T7: Biomolecules separation 1 Draw a bottle labeled Phenol :chloroform: isoamyl alcohol solution and the user should click on the pipette to set the reading as 350ul and add it to the tube labeled as CSF supernatant Draw a vortex mixer as shown in previous slide and the user should keep the tube on the rubber pad and press “start “, let user regulate the speed, show mixing of solution in the tube and show a clock running 30 seconds Add the 350ul of alcohol solution to the sample and vortex briefly to mix the solution. 2 3 4 5
Step 10: T7: Biomolecules separation 1 2 3 4 rotor Centrifuge 5
Description of the action Audio Narration Step 10: T7: Biomolecules separation 1 The animator should draw a centrifuge as shown in the previous slide. Animate in such a way that user clicks on open to open it centrifuge lid, let user open rotor lid, and keep the tube inside the rotor (with lots of holes) as shown. The animator should animate like the user should click on setting and set 14000g, 20 minutes and click “enter” and animate like closing the rotor lid, centrifuge lid and click “start”. Show a clock running for 20 minutes . Once the 20 minutes is done the user should open the lid by clicking “open” and remove the column out. Please include the buttons like enter, set, start, open in the centrifuge. Now centrifuge is carried out to separate the sample into different phases. 2 3 4 5
Step 11: T8: Organic Separation 1 2 3 Proteins Protein layer (organic) 4 5
Description of the action Audio Narration Step 11: T8: Organic Separation 1 2 Shown after the centrifuge, let user takes out the tube from the centrifuge, zoom the tube to show the 3 layers of liquid in the tube as given in the previous slide Instruct the user to take the upper two layer and discard. now let user take lower red layer using pipette and transfer it to the new tube as in figure The user has to click on the hand with pipette and putting it slowly inside the tube When removing the red layer the level has to decrease and show like transferring the lower layer to falcon tube The lower phenolic layer consists of proteins which is tranferred to the new tube by discarding the top two layers. 3 4 5
Step 12: ) 1 T9: Protein Precipitation 2 Isoamyl alcohol 3 Description of the action Audio Narration Draw a tube labeled as iso-amyl alcohol. Let user takes out a 5 ml pipette to add the 5 ml alcohol into the sample tube from the previous side. Show like keeping in room temperature for 10 minutes Animate a clock. Add 5 volume of iso-amyl alcohol to the sample for the protein to precipitate by placing the tube in the room temperature for 10 minutes. 4 5
Step 13: 1 T9: Protein Precipitation 2 3 4 rotor Centrifuge 5
Description of the action Audio Narration Step 13: 1 T9: Protein Precipitation Instruct user to carry out centrifugation step like explained in previous slide of centrifugation. The animator should draw a centrifuge as shown in the figure. Animate in such a way that user clicks on open to open it and keep the tube inside the rotor (with lots of holes) as shown. The animator should animate like the user should click on setting and set 10000 g , 5 minutes and click “enter” and animate like closing the lid and click “start”. Show a clock running for 5 minutes . Once the 5 minutes is done the user should open the lid by clicking “open” and remove the column out. Please include the buttons like enter, set, start, open in the centrifuge. Carry out final centrifugation step to precipitate the preotin. 2 3 4 5
Step 14: 1 T9: Protein Precipitation 2 3 supernatant 4 Pellet 5
Description of the action Audio Narration Step 15: 1 T9: Protein Precipitation After centrifugation let user take out the sample tube , zoom the tube to show pellet formation at the bottom and liquid layer on top of it. Instruct the user to take the liquid part of the tube and transfer to discard and keep the pellet as shown in figure Show like keeping the pellet in room temperature for 10 minutes Each time the user has to click on the hand for the event to happen Draw a bottle labeled as 1% SDS and instruct the user to click on the pipette to draw 200ul of the solution and add to the dried pellet Discard the supernatant and retrieve the pellet and keep it room temperature to remove the alcohol and dissolve it using 1%SDS. Now the sample is ready for further processing to carry out protein precipitation, 1D, 2D. For more information and continuity follow the future viewing IDD like mentioned in slide: 1. 2 3 4 5
Button 01 Button 02 Button 03 Slide 6-10 Slide 11,12 Slide 13 Slide 14-15 Slide 16-19 Slide 5 Tab 01 Tab 02 Tab 03 Tab 04 Tab 05 Tab 06 Name of the section/stage Animation area Interactivity area INTERACTION 1: Slide 24-27: Show like the user dropping the tube down and the separate layer mixes together, in some case if user unable to make-out the phase separation. Instruction: Instruct the user to do centrifugation for one more time for the phase separation INTERACTION 2: Slide 31: provide a tube, where in pellet formation is not visible and ask for user input. Instruction: let user take the tube makes a close observation and carries out the centrifugation step again to separate out the pellet. Instructions/ Working area Credits
Button 01 Button 02 Button 03 Slide 20-25 Slide 26-27 Slide 28-32 Tab 07 Tab 08 Tab 09 Name of the section/stage Animation area Interactivity area Instructions/ Working area Credits
Questionnaire: APPENDIX 1 Question 1 From where does the CSF is extracted? a)Lumbar region b)Coccygeal region c) Brain d)Thoracic cavity Question 2 What is the use of guanidium thiocyanate? a)Protein precipitant b)Protein coagulant c)Protein denaturant d)Protein Renaturant Question 3 What is the lauroylsarcosine? a)Ionic detergent b)Ionic protein c)Ionic complex d)Ion soap
Questionnaire: APPENDIX 1 Question 4 What is the pH of TRIS used? a)6.8 b)7.4 c)6.7 d)6.9 Question 5 During Phase separation which layer has protein a)Organic phase b)Inorganic Phase c)Intermediate phase d)Solid phase
APPENDIX 2 Links for further reading • Reference websites: • Bastian FO, McDermott ME (2005). Safe method for isolation of prion protein and diagnosis of Creutzfeldt–Jakob disease. Journal of Virological Methods 130: 133–139.
APPENDIX 2 Links for further reading Research papers: Huber LA,Pfaller K,Vietor I (2003). Organelle Proteomics:Implications of Subcellular Fractionation in Proteomics. Journal of american Heart Association.92:962-68. Mito Sciences (2007).Sucrose Gradient Separation protocol. BOOKS : Biochemistry by Stryer et al., 5th edition Biochemistry by A.L.Lehninger et al., 3rd edition Biochemistry by Voet & Voet, 3rd edition
APPENDIX 3 Summary The method emphasizes on the optimized protocol for the extraction of protein from the CSF using the guanidine lyses for the proteome analysis study. The extraction process works best, when all the steps described above are followed properly. Soon after the extraction process the sample protein obtained can be taken out for further 1D and 2D run analysis.