Download
1 / 35
350 likes | 443 Views
Debugging and Menus. Part07dbg --- Solving the problem, Debugging in Break time, Menus. Carefully Plan the Solution. Understand the inputs and outputs of desired solution. Draw a sketch of proposed solution showing placement of controls.

E N D
Debugging and Menus Part07dbg --- Solving the problem, Debugging in Break time, Menus
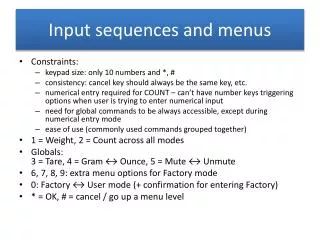
Carefully Plan the Solution • Understand the inputsandoutputs of desired solution. • Draw a sketch of proposed solution showing placement of controls. • Assign meaningful names to controls using CSR naming conventions. • Decide what variables will be required. • Choose test dataand do hand/calculator calculations so that you know what answers should be produced by the program.
3 Modes of Operation • Design Time --- before application is run • Run Time --- when application is running • Break Time --- when run time is suspended, for the purpose of debugging
Design Time • Add controls to form via Designer. • Set/review Property values for controls via Property Window. • Add code to “handle” various events and set/change Property values (at runtime) via Code Window.
Run Time • Code executed in event handler functions can • change Property values for controls (Visible, ForeColor, BackColor, Text). • run methods to reset Focus(), Clear() contents, write variable/control values to the Output Window (via Debug.Writeline()) etc. • perform calculations/comparisons of variable values. • display variable values in controls. • handle various events.
How to Debug Code without using Break Time • Trace through your program by hand, recording variable values (desk-checking). • Insert statements into code that will print messages and/or control or variable values to the Output Window, so you can follow the progress through your code and see variable values, without preparing values for output in controls. System.Diagnostics.Debug.WriteLine(totRed);//print value of variable ---or--- using System.Diagnostics;//add at top of program Debug.WriteLine(lblTotalBlue.Text);//print value of control
Using Visual Studio.NET Debugging Capabilities Using Break Time
Setting Break Points • To set a breakpoint in your code, which will suspend execution before designated statement, • click in the light gray border to the left of the line of code. • press F9.
Helpful Windows during Break Time • Code Window • Hover mouse over variable/control name to display its value. • Locals Window • View values of local variables. • Class-level variables values can be viewed by clicking the + in front of this. • Autos Window • Values of all variables in use near the highlighted line.
Stepping through Code • Continue --- continue running (till next breakpoint) • Step Into --- execute 1 statement • Step Over --- execute 1 statement but don’t branch into any called method • Step Out --- advance rapidly until reach end of function/method, then back to 1 statement at a time execution • Restart --- start back at the beginning • Stop Debugging
Removing Breakpoints • To clear one breakpoint, position cursor and • click in gray border to left of designated line of code. • press F9. • choose Debug, Toggle Breakpoint from menu. • To clear several breakpoints, choose Debug, Delete All Breakpoints from menu.
Let’s Try Debugging Together • Get the Ch04DebugCSR 2005 project folder from Dee Gudmundsen CIS205 on drive z: • A zipped file,Ch04DebugCSR.zip, containing this project folder is also posted on my website in the in part07.zip of the Demonstration files section. • This problem has error(s), which we will discover using the Debugging facilities of Visual Studio.NET.
Introduction to Menus MenuStrip and ContextMenuStrip
The MenuStrip Control • The MenuStrip controlcan be used to add a menu to the top of a form. • The MenuStrip control is new in VS.NET 2005. It replaces the MainMenu component in earlier versions of VS.NET. • MainMenu components did not occupy the client area of the form. The client area of a form is the size of the form, minus the nonclient elements such as scroll bars, borders, and title bars. • MenuStrip controls do occupy the client area of the form.
ClientSize.Width ClientSize.Height The Client Area • The client area, defined by the ClientSize object and its Height and Width properties is that part of the form that can host controls.
MainMenu • The icon for a MenuStrip control resides in the componenttray area of the Designer. • The MenuStrip control supports a point and click editor for constructing a menu with MenuItems. • MenuItems are essentially buttons that are contained in the Items collection associated with the MenuStrip control.
MenuItems • MenuItems are added to a MenuStrip by typing the Text property of a MenuItem in a position suggested by the menu editor.
Renaming Menu Items • MenuItems are controls and should be given meaningful names. • A good organizational strategy is to use a compound name consisting of the menu (top line) name and the MenuItem name. • Use the prefix mnu for MenuItems.
Coding Handlers for MenuItems • The Click event is the default event for MenuItems and their handler functions may be created using the same techniques as with Buttons. • We will add code to our MenuItem Click handler functions to assign different values to the BackColor property of the form. SimpleMenu
Adding Menu Hot Keys • Hot keys allow users to open menus and select menu items using the keyboard. • Menus are opened by pressing Altand the appropriate hot key. • MenuItems are selected by simply pressing the hot key. • Hot keys are created by inserting an & character ahead of the character (that will act as a hot key) in the Text property of a MenuItem.
Hot Keys at Run Time • Hot keys appear underlined at run time. • Hot keys in menus appear when the Alt key is pressed. • Hot keys in open menus (MenuItems) appear automatically. HotKeys
Menu Shortcuts • Shortcuts allow selection of a menu item without even opening a menu. • Shortcuts are assigned to function keys or control key combinations (e.g. ctrl + C). • Shortcuts are applied to MenuItems by assigning a value to the Shortcut property of the MenuItem.
Menu Shortcuts • An additional MenuItem property, ShowShortcuts, sets whether the shortcut will appear on the menu at run time. • Curiously, shortcuts are never visible at design time. capture of shortcuts at run time ShortCuts InvisibleShortCuts
Menu Branching • Branched menus are easily created by typing new MenuItem Text properties in the indicated positions. • Naming conventions should recognize the node at which the menu branches. BranchedMenu
Menu Separators • Menu separators appear as simple horizontal lines to arrange menu items into groups. • They are created by simply typing a hyphen for the Text Property of a MenuItem or right-clicking and choose Insert Separator.
ContextMenuStrips • Rather than appear at the top of a form, ContextMenuStrips “pop up” when an object is right-clicked. • Choose the ContextMenuStrip control from the Toolbox. Edit in the same way as a MenuStrip. • Use cmu as the prefix for Context MenuItems • Associate the ContextMenuStrip with a control by setting the ContextMenuStrip property of the control. ContextMenus ContextMenusDBG
Alternate Main Menus • Multiple MenuStrip controls may be added to a form. • To switch among the MenuStrips available: • assign the desired MenuStrip name to the MainMenuStripproperty of the form. • set the Visible property of desired MenuStrip to true and the Visible property of undesired MenuStrip to false. AlternateMainMenus
Let’s Do a Problem Together • Make a copy of ch4ex4_6pg180 complete and paste it to your hard drive. • We will add menus to this existing problem; see ex 5.1 pg 217 for new menu layout for this revised problem.
Writing functions/methods • So far the only functions/methods we have been working with are methods that handle events; the skeleton of these functions were typed for us when we double-click a control. • You will recall from C++, that it is often convenient to write our own functions: • To break a problem into smaller parts • Because some code will be executed in more than 1 place (reusable code) • We will want to write our own functions in C#, as well, but let’s review C++ functions syntax.
C++ Functions • Functions consist of: • Function prototype --- declares the function, specifies data type of returned value, lists number of parameters and their data types • Function definition --- function header (copy of prototype without ;) plus actual code to be executed • These could be written within the source program file or contained in separate .cpp and .h files; (#include statement was necessary to incorporate these files).
C++ Function Syntax Syntax: return-typefunctionName(data-type variable1, data-type variable2, …) Example 1: //function prototype double calcInterest (int y, double p, double r); //function definition doublecalcInterest(int y, double p, double r) { double temp; temp = p * r * y; return temp; } //function call in main() interest= calcInterest (years, principal, rate);
Another C++ Function Example Syntax: return-typefunctionName(data-type variable1, data-type variable2, …) Example2: //function prototype void printLoanInfo(int y, double p, double r, double i); //function definition voidprintLoanInfo(int y, double p, double r, double i) { cout << “You will have to pay $“ << i << << “ interest on your loan of $“ << p << “ for a term of “ << y << “ years at a rate of “ << r << “%.\n”; } //function call in main() printLoanInfo(years, principal, rate, interest);
C# Function/Method Syntax Syntax: private return-typefunctionName(data-type variable1, data-type variable2, …) Example 1: //function definition private decimalcalcInterest(int y, decimal p, decimal r) { decimal temp; temp = p * r * y; return temp; } //function call interest = calcInterest(years, principal, rate);
Functions: C++ vs. C# • C# functions will generally have the keyword private as access modifier. • private indicates this function can only be used within this class (form) • public indicates this function can be used within other classes • No function prototype or #includes are required; just the function definition (without ;) is required.
Let’s Do a Problem Together • Let’s plan the solution to ch5ex5.2pg217